

Container Gardening for Food
Discover how container gardening for food transforms tiny spaces into productive gardens. Grow the best vegetables for pots and create your small space herb garden—no yard needed. Start harvesting fresh food in weeks!
Here’s something that might surprise you: you don’t need a yard to grow amazing vegetables and herbs. Container gardening for food has completely changed the game for anyone with a balcony, patio, or even just a sunny windowsill.
I’m talking about growing real food—juicy tomatoes, fresh basil, crisp lettuce—right where you live. And honestly? It’s easier than you think.
Whether you’re trying to figure out the best vegetables for pots or just want to start a simple small space herb garden, this guide’s got you covered. Let’s dig in.
Table of Contents
Introduction — The Self-Sufficiency Revolution
So what exactly is container gardening for food? It’s pretty straightforward—you’re growing edible plants (vegetables, herbs, even some fruits) entirely in pots instead of in the ground.
No digging up your landlord’s lawn. No battling with terrible soil. Just you, some containers, and plants that actually produce food you’ll want to eat.
And people are obsessed with it right now, especially in cities. Balconies, rooftops, fire escapes, patios—if it gets sun, someone’s probably growing tomatoes there.
Here’s why container gardening for food actually works better than you’d expect:
- You can grow way more in less space — Stack things vertically, use every square inch
- Pests and diseases don’t stand a chance — Your plants are up off the ground, away from a lot of the nasty stuff that lives in soil
- You control everything — No guessing what’s in your soil or whether it’ll drain properly
- You can literally move your garden around — This is huge and most people don’t realize it
That last point? Total game-changer. Your tomato plant getting scorched by afternoon sun? Move it. Frost warning overnight? Bring everything inside. In-ground gardeners can’t do that.
One thing to know upfront: vegetables and herbs behave differently in containers. Vegetables (especially the ones that produce fruit, like tomatoes and peppers) tend to be needier—bigger pots, more food, consistent watering. Herbs, particularly the Mediterranean types like rosemary and thyme, actually prefer less fussing and can handle drier conditions.
Understanding that difference will save you a ton of frustration.
What Is Container Gardening for Food, Really?
Okay, let’s get specific. Edible container gardening means you’re growing vegetables, herbs, and fruits in pots filled with a special growing medium (we’ll get to why you can’t just use dirt from outside in a minute).
It’s different from regular container gardening where people grow flowers and decorative plants. We’re not worried about things looking Pinterest-perfect here—we want food that tastes amazing.
Who benefits most from growing food in containers?
- Apartment folks who’ve got a balcony but zero yard access
- Renters who can’t exactly install raised beds without losing their security deposit
- Anyone dealing with awful soil — contaminated, full of clay, basically dead
- Total beginners who want some early wins without the complexity of managing an actual garden plot
If you’ve ever looked at your concrete patio and thought “well, I guess I’m not gardening,” think again. Containers eliminate basically every obstacle you’re imagining.
Why Container Gardening Works Better for Small Spaces
Here’s where container gardening for food really shines compared to traditional gardening, especially if you’re working with limited space.
You can go vertical and horizontal. Hang herbs from railings, stack containers on plant stands, use tiered setups. You’re multiplying your growing area without actually needing more floor space.
Your plants grow faster. Sounds weird, right? But when you fill a container with quality potting mix, roots get access to oxygen, water, and nutrients way more efficiently than they would in compacted ground soil. According to the University of Maryland Extension, container-grown plants often establish quicker and produce earlier harvests when properly maintained.
Everything’s easier to manage. You’re not dragging hoses across a huge garden or trying to figure out how much fertilizer to spread over varied terrain. Each pot is its own little ecosystem that you control completely.
Way fewer weeds and diseases. Containers sitting on pavement or decking don’t get bombarded with weed seeds like ground gardens do. Plus, fresh potting mix doesn’t harbor the fungal diseases and soil pests that accumulate in ground soil over the years.
It’s totally scalable. Start with one pot of basil this week. Add a tomato plant next month. Before you know it, you’ve got a dozen containers producing steady harvests—basically a mini-farm customized exactly to your space and ambition.
The Science of the “Soilless” Foundation
Why Garden Soil Fails in Pots (And Why That Matters for Container Gardening for Food)
Real talk: using regular garden soil in containers is probably the #1 mistake beginners make. Don’t do it. I know it seems logical—dirt is dirt, right? Wrong.
It compacts like crazy. Garden soil has clay particles that pack down hard in the confined space of a pot. Without earthworms, decomposing roots, and all the natural structure that exists in the actual ground, it just turns into a brick.
Your roots literally can’t breathe. Plants need oxygen at the root level to function. When soil compacts, oxygen can’t get in. Your plant basically suffocates from the ground up.
Root rot becomes inevitable. Without oxygen, beneficial bacteria die off and the bad guys take over. The whole root zone gets soggy, smelly, and diseased. Your plant’s roots rot away, and no amount of fertilizer or sunshine will save it.
Nutrients get locked up. Even if you’re fertilizing, compacted garden soil in containers creates weird pH and mineral situations where plants can’t actually access the nutrients. You end up with deficiencies even though everything the plant needs is technically there.
Trust me on this one—invest in proper potting mix. It’ll save you so much heartbreak.
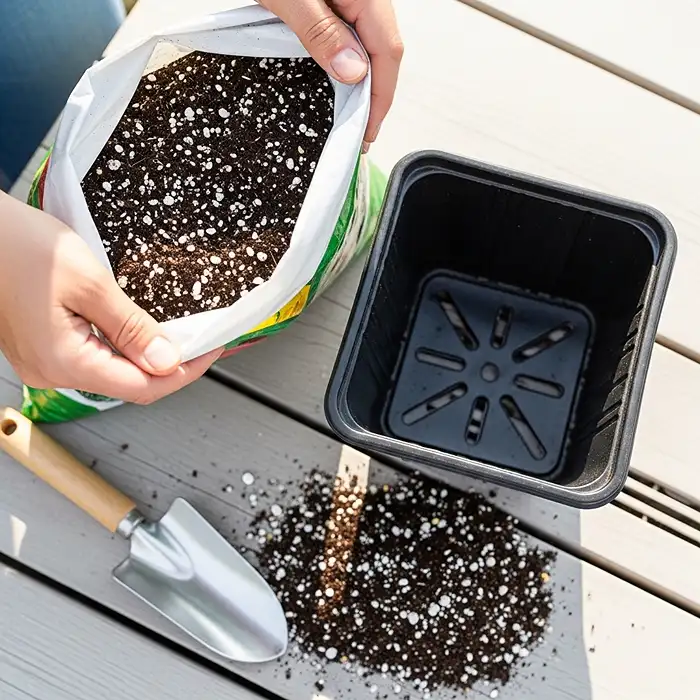
The Perfect Potting Mix Recipe (For Growing Vegetables & Herbs in Containers)
Professional growers and people who’ve been doing container gardening for food for years all use “soilless” mixes. These are specifically engineered to work in pots.
Here’s the magic ratio that works for most edible plants:
- 40–60% peat moss or coco coir (holds moisture and creates structure)
- 20–30% perlite (those white bits that keep everything airy and draining well)
- 10–20% vermiculite (holds onto water and nutrients, releases them slowly)
This combination matters more than you’d think. The peat moss or coco coir acts like a sponge—it holds water and nutrients right where roots can access them, but doesn’t get waterlogged. Perlite creates air pockets that prevent compaction no matter how much you water. Vermiculite is the middle ground—it holds moisture but releases it gradually.
When to tweak this recipe:
- Mediterranean herbs (rosemary, thyme, oregano, sage) hate wet feet. Bump perlite up to 30–40% and reduce the peat moss.
- Heavy feeders like tomatoes and peppers love extra nutrition. Add 10–15% compost or worm castings to the base mix.
Potting Soil vs. Soilless Mix (What You Need to Know for Container Gardening for Food)
| What Matters | Garden Soil | Soilless Potting Mix |
|---|---|---|
| Drainage | Terrible; turns into mud | Excellent; engineered to drain |
| Aeration | Almost none; roots suffocate | Tons; perlite keeps it fluffy |
| Nutrient Control | Total mystery; varies wildly | Consistent; you decide what goes in |
| Weight | Heavy as hell; can’t move it | Light; easily portable |
| Disease Risk | High; full of pathogens | Low; sterile when new |
Looking at this table, you can see why everyone who’s serious about growing vegetables and herbs in containers uses soilless mix. The control and consistency are unbeatable.
Choosing the Right Containers (Because Size Really Does Matter)
Container Materials Explained
The container you choose affects how often you’ll water, how healthy your roots stay, and whether your back hurts from moving things around.
Plastic containers are what most people use for edible container gardening, and for good reason. They hold moisture well, they’re light enough to move when you need to, and they’re cheap. The downside? They don’t breathe at all, so you’ve got to be careful not to overwater.
Terra cotta pots are those classic clay-colored ones. They’re porous, which means air and moisture move through the sides. Great for root health and preventing waterlogging. But you’ll be watering way more often, especially when it’s hot.
Fabric grow bags have gotten super popular lately, and honestly, they deserve the hype. The breathable fabric “air prunes” roots—basically, when roots hit the edge, they dry out and the plant grows new ones instead of circling endlessly. You end up with way healthier root systems.
Raised containers and troughs work beautifully for greens and herbs. Wide surface area, customizable depth, and you can fit multiple plants in one container.
Drainage Engineering (AKA Don’t Put Rocks at the Bottom)
Let’s clear up a myth that refuses to die: putting rocks or gravel at the bottom of containers does NOT improve drainage. In fact, it makes things worse.
Here’s why: Water doesn’t flow easily from fine material (your potting mix) into coarse material (rocks) until the fine stuff is completely saturated. So you end up with a permanently soggy layer right above the rocks—exactly where your roots are trying to live.
It’s called a “perched water table,” and it’s the opposite of what you want.
What actually works:
- Drainage holes — At least one half-inch hole per square foot of container bottom
- Raise your containers slightly with pot feet or bricks so water doesn’t pool underneath
- Use the same potting mix throughout the entire container
If you’re worried about soil washing out through the holes (valid concern), just put a coffee filter or piece of newspaper over them before adding mix. Problem solved.
Container Size Standards for Edible Plants
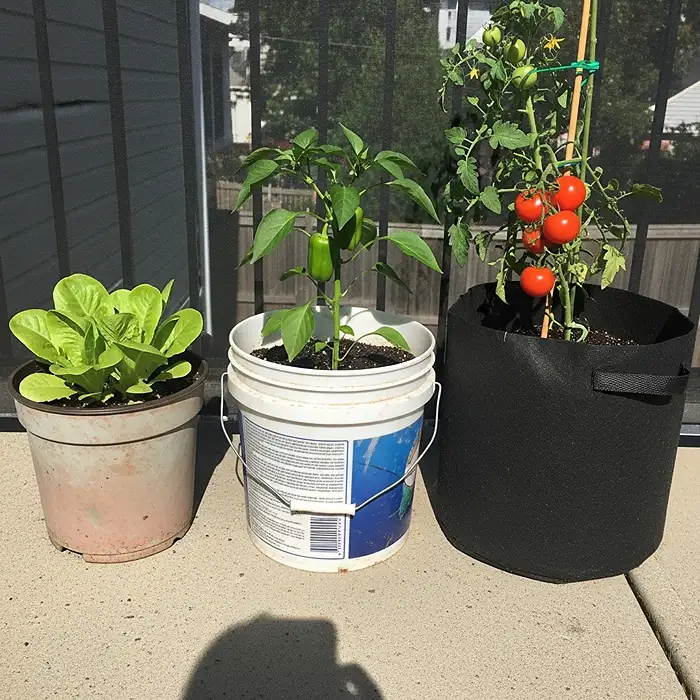
This is where a lot of people mess up. Too small, and you’ll be watering twice a day and fighting constant nutrient issues. Too big is wasteful.
Here’s what actually works:
- Leafy greens (lettuce, spinach, arugula): 1–2 gallons per plant
- Herbs (basil, parsley, cilantro): 1–3 gallons depending on the type
- Peppers and eggplants: 5 gallons minimum
- Tomatoes: 10+ gallons for varieties that keep growing, 5–7 gallons for compact types
These aren’t random numbers. A full-grown tomato plant has a root system that can easily fill 10 gallons of soil. Anything less, and you’re artificially limiting what the plant can do.
Vegetables vs. Herbs — They’re Different Animals in Container Gardening for Food
Understanding how vegetables and herbs differ in containers will make your life so much easier.
Root depth: Most culinary herbs have shallow, fibrous roots. Basil, cilantro, parsley—they’re happy in 6–8 inches of soil. Vegetables, especially fruiting ones like tomatoes and peppers, need 12–18 inches or more.
Water needs: Vegetables (particularly the fruiting types) need consistent moisture. Let them dry out, and you’ll get blossom end rot, bitter flavors, and sad little harvests. Herbs—especially Mediterranean ones—actually prefer drying out between waterings.
Feeding schedule: Vegetables are hungry. Weekly liquid feeds or monthly slow-release fertilizer are pretty standard. Many herbs grow better with minimal fertilization, and some actually taste better when they’re slightly stressed.
How you harvest them: Herbs are usually cut-and-come-again—you snip some off, it grows back. Vegetables follow fruiting cycles where you nurture the plant through flowering and fruit development before you get anything to eat.
Growth timeline: Annual herbs grow fast and can be replanted multiple times per season. Perennial herbs like rosemary and thyme grow slowly but can live in the same pot for years. Vegetables typically follow seasonal cycles tied to temperature and day length.
Best Vegetables for Container Gardening (Quick Overview)
Not every vegetable thrives in containers. The best vegetables for pots share some key traits.
What makes a vegetable container-friendly:
- Stays relatively compact
- Doesn’t need a massive root system
- Produces a lot relative to its size
- Can handle restricted root space
Look for varieties labeled “patio,” “bush,” “compact,” “dwarf,” or “determinate.” These are bred specifically for container growing and small spaces.
Real talk on yields: Container vegetables typically produce about 60–80% of what they’d yield in perfect in-ground conditions. But the convenience, quality, and extended season often make up for the slight reduction.
Want the exact variety names and container sizes? Check out our detailed breakdown of the best vegetables for container gardening.
Root Depth Matters More Than You Think
Match the wrong pot depth to your plant, and you’ll never get the yields you’re hoping for, no matter how well you manage everything else.
Why this matters: When roots hit the bottom of a too-shallow container early, the plant shifts energy toward trying to expand its root system instead of making the leaves, flowers, or fruits you actually want.
Shallow-root vegetables (6–12 inches):
- Lettuce and salad greens
- Radishes
- Spinach
- Arugula
- Bush beans
These do great in wide, shallow containers. A 10-inch-deep trough can pump out multiple harvests all season.
Salad greens are actually the single fastest win in container gardening for food — some varieties go from seed to your plate in 30 days, and you can keep harvesting the same plant for weeks using the cut-and-come-again method. If you’ve got even one small planter and a few hours of sunlight, you’ve got everything you need. We put together a complete walkthrough covering the exact pot depth, soil mix, best varieties, and the watering rule that keeps leaves crisp instead of bitter: How to Grow Salad Greens in Small Planters.
Deep-root vegetables (12–24+ inches):
- Tomatoes
- Peppers
- Eggplants
- Carrots
- Potatoes
These need depth. Period. A tomato in an 8-inch pot will survive but never thrive. It’ll make tiny fruits, struggle constantly, and probably die early.
Growing Root Crops in Pots — The Depth Game Gets Real
Root crops are where container depth goes from “important” to “make-or-break.” We’re talking about vegetables that literally grow underground — carrots, potatoes, beets, radishes, turnips — where the edible part is the root itself. If the pot’s too shallow, there’s physically nowhere for your food to form.
The tricky part? Each root crop has its own depth requirement, and they’re all different. Radishes can get away with as little as 6–10 inches. Standard carrots want 12–18 inches. Potatoes need a full 12–24 inches, especially if you’re using the hilling method to stack tuber production vertically in a bucket.
And depth is only half the equation. Root crops are pickier about soil texture than almost anything else you’ll grow in containers. The medium needs to be loose, rock-free, and completely uniform — one stray chunk of bark or compressed clay lump, and your carrot forks into something that looks like it’s trying to run away from itself.
The fertilizer rules flip too. Most container vegetables love nitrogen for leafy growth, but root crops are the opposite — too much nitrogen gives you gorgeous green tops and roots the size of your pinky. They want phosphorus and potassium driving the show instead.
There’s a lot more to it than I can cover here without turning this into a separate article — which is exactly what we did. If you’re planning to grow carrots, potatoes, beets, or radishes in containers, read the full walkthrough: How to Grow Root Crops in Pots and Containers. It covers the exact pot depths for every crop, a proven soil recipe, the N-P-K feeding ratio that actually works, and step-by-step playbooks for each vegetable — including the bucket hilling method for potatoes that’s honestly one of the most satisfying things you can do in container gardening.
Best Herbs for Container Gardening (They’re Actually Easier Than Vegetables)
Honestly? Herbs might be the perfect container crops. They outperform vegetables in pots for several reasons.
Why herbs are container superstars:
- They stay smaller
- They’re more forgiving if you forget to water
- Many actually prefer confined root spaces
- Seed to harvest is quick
- You can harvest continuously
Perennial vs. annual herbs need different approaches. Perennials like rosemary, thyme, and sage can live in the same pot for years. Annuals like basil, cilantro, and dill finish their life cycle in one season and need replanting.
Indoor growing is totally doable with herbs. Most need 4–6 hours of direct sun or 12–14 hours under grow lights. South-facing windows work great for basil, parsley, and chives.
Balconies and windowsills are perfect for a small space herb garden. The reflected heat from buildings can even extend your season.
Want the complete breakdown? Our detailed guide on the best herbs to grow in pots ranks 10 varieties by actual survival rate, covers the light and soil science that makes or breaks container herbs, and includes a beginner-friendly 30-day starter plan that prevents the overwhelm most new growers face.
Herb Compatibility — Don’t Mix These (Trust Me)
Water-Based Grouping (The Most Important Rule)
The #1 rule when combining herbs: group by water needs.
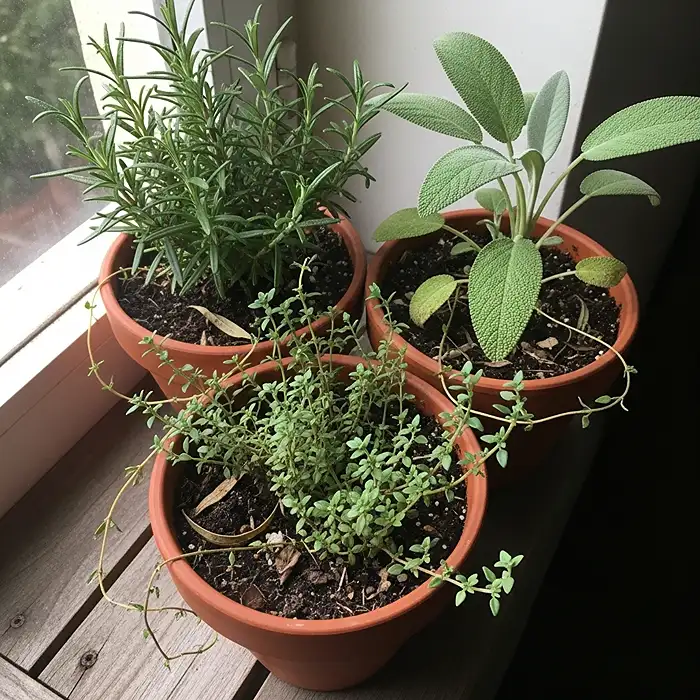
Low-water Mediterranean herbs:
- Rosemary
- Thyme
- Sage
- Oregano
- Lavender
These evolved in hot, dry places. They want to dry out completely between waterings. Keep them wet, and they’ll rot.
High-moisture herbs:
- Basil
- Parsley
- Cilantro
- Chives
- Mint
These need consistently moist (not soaked) soil. They wilt fast when dry and recover slowly, often with permanent damage.
Mixing these in one pot creates an impossible situation. You’ll either drown the Mediterranean herbs or kill the moisture-lovers.
Invasive Herbs That Must Live Alone
Some herbs are aggressive bullies that’ll take over any pot they share.
Mint spreads through underground runners and will fill a container in one season, crowding out everything else.
Lemon balm does the same thing. Plus it self-seeds like crazy.
Oregano can be invasive depending on the variety.
Keep these in dedicated containers. Or if you really want a mixed planter, sink smaller pots within a larger one to create barriers.
Speaking of keeping invasive herbs under control — if you’re planning a mixed container, the way you pair herbs matters just as much as how you contain them. We broke down exactly which herbs grow well together in one pot (and the combinations that’ll quietly destroy each other) in this guide: Herbs That Grow Well Together in One Pot
Growing Tomatoes in Containers (The Most Popular Choice)
Tomatoes are what most people grow when they start container gardening for food. And for good reason—fresh homegrown tomatoes taste incredible compared to store-bought.
Why everyone grows tomatoes: They’re productive, relatively straightforward, and the flavor difference is dramatic. One healthy plant can give you 10–30 pounds of tomatoes per season.
Determinate vs. indeterminate is your first decision. Determinate varieties grow to a set height (usually 3–4 feet), produce all their fruit within a few weeks, then quit. Perfect for containers and for people who want to can or preserve.
Indeterminate tomatoes keep growing and producing all season. They need bigger pots (10+ gallons), serious support, and regular pruning. But you get fresh tomatoes from mid-summer until frost.
Support is non-negotiable. Even compact varieties need cages or stakes. Tall varieties need sturdy cages, trellises, or stake-and-twine setups firmly anchored.
Common mistakes:
- Too-small containers (go bigger than you think)
- Inconsistent watering causing blossom end rot
- Too much nitrogen creating huge plants with no fruit
- Planting too early before nighttime temps stay above 50°F
Nothing compares to a sun-warmed tomato picked straight from your own container. One well-grown plant can supply weeks of fresh harvests — if you set it up right.
👉 Read the full guide: How to Grow Tomatoes in Containers (Complete Guide)
Light, Water, and Sun Requirements
Sunlight Rules for Container Gardening for Food
Light is everything. Without enough sun, nothing else matters.
Fruiting crops (tomatoes, peppers, cucumbers, squash, eggplant) need 6–8 hours of direct sunlight. Not filtered through trees or bouncing off walls—actual direct sun.
Leafy greens (lettuce, spinach, arugula, kale) tolerate partial shade and actually prefer it when it’s hot. They’ll grow with 3–5 hours of direct sun.
Herbs vary. Mediterranean types need full sun (6+ hours). Tender herbs like cilantro, parsley, and basil do fine with 4–6 hours. Chives and mint tolerate shadier spots.
If you don’t have enough sun, adjust your expectations. Don’t try forcing tomatoes in a shady north-facing spot. You’ll just waste time and get frustrated.
Watering Strategy for Containers
Container watering is completely different from watering in-ground gardens.
Why containers dry faster: They’re exposed to air on all sides—top, bottom, and around the edges. Way more evaporation than ground soil where only the top dries out. Smaller pots and clay materials make this even worse.
Morning vs. evening watering: Morning’s generally better. Wet foliage dries quickly, reducing disease risk. Plus plants have water available during hot afternoons when they’re working hardest.
Evening watering works in hot climates, but avoid getting leaves wet if possible.
Signs of overwatering:
- Yellow lower leaves
- Wilting even though soil is wet
- Fungus gnats everywhere
- Foul smell from the mix
- Mushy, dark roots
Signs of underwatering:
- Wilting that fixes immediately after watering
- Crispy, dry leaf edges
- Slow growth
- Soil pulling away from pot sides
The finger test is still best. Stick your finger 2 inches into the soil. Dry? Water thoroughly until it drains out the bottom. Still moist? Wait another day.
Fertilizing Food Crops in Containers
Your container plants depend entirely on you for food. Unlike in-ground plants that can search for nutrients, container crops only have what’s in their pot.
Why nutrients disappear fast: Every time you water, dissolved nutrients wash out the drainage holes. This is unavoidable and happens faster in small pots, light mixes, and with frequent watering.
Slow-release vs. liquid fertilizers:
Slow-release granules release nutrients over 3–6 months. Mix them in at planting time. Easy baseline nutrition.
Liquid fertilizers work immediately and give you precise control. Use them during heavy growth and fruiting.
Half-strength strategy: Many people get better results feeding at half strength twice as often. Half strength weekly beats full strength every two weeks. Prevents salt buildup and provides steadier nutrition.
Organic vs. synthetic:
Organic options (compost tea, fish emulsion, seaweed) release slowly and improve soil biology. They smell funkier.
Synthetic fertilizers provide exact ratios, work fast, and don’t smell. They don’t improve soil structure but deliver reliable nutrition.
Best approach? Slow-release organic at planting, liquid synthetic during heavy production.
Want to Master the Soil and Fertilizer Side? (This Is Where the Magic Happens)
Let’s be honest — everything I just covered about fertilizing barely scratches the surface. If your container vegetables aren’t thriving the way you’d hoped, 9 times out of 10 the answer is hiding in the soil mix or the feeding routine.
And here’s the thing: getting this part right is what separates the people pulling buckets of tomatoes off their balconies from the ones constantly asking “why are my leaves yellow?” on Reddit.
Here’s what actually moves the needle:
The exact ratio of coir, compost, and aeration material that pro growers use (it’s not what most bagged mixes give you). The three-tier feeding strategy that matches nutrition to your plant’s growth stage — because a seedling and a fruiting tomato want completely different things.
How to read your plant’s leaves like a diagnostic chart so you can spot nitrogen, phosphorus, potassium, or calcium issues before they tank your harvest. The trick to rejuvenating old potting mix instead of dumping $40 of soil every season.
I put together a complete deep-dive on all of this — soil recipes, NPK ratios by crop, deficiency troubleshooting, and a feeding schedule that actually works. If you want bigger harvests with less guesswork, this is your next read: Best Soil and Fertilizer for Container Vegetable Gardens.
Seriously, bookmark it. The soil and fertilizer side is the single biggest lever you can pull in container gardening — get it right, and almost everything else takes care of itself.
Maintenance Beyond Watering
Pruning & Harvesting for Higher Yields
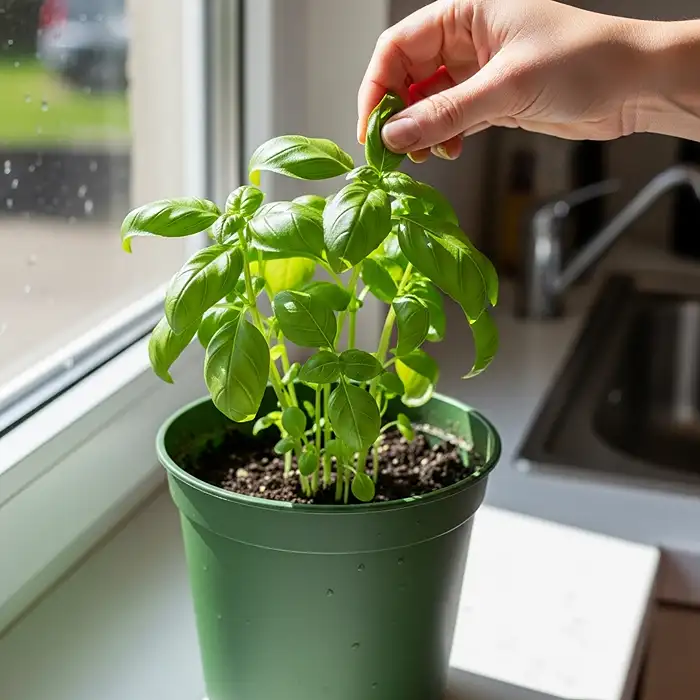
Strategic pruning and harvesting actually boost productivity. You’re redirecting energy toward fruit instead of excessive leaves.
Pinching basil: When it hits 6–8 inches tall, pinch off the top just above a set of leaves. This forces branching—you get two growing tips instead of one. Repeat every few weeks for a full, bushy plant instead of a tall, skinny one.
Never let basil flower unless you’re saving seed. Once it flowers, leaf production crashes and flavor turns bitter.
Removing tomato suckers: Suckers are shoots that pop up between the main stem and branches. On indeterminate tomatoes in containers, removing suckers below the first fruit cluster directs energy to fruit and improves airflow.
Harvest timing: Most vegetables taste best slightly immature:
- Lettuce: Pick outer leaves once plants hit 4–6 inches
- Peppers: Harvest at any color; red/orange peppers are just mature green ones
- Herbs: Harvest before flowering, preferably morning after dew dries
- Tomatoes: Pick when fully colored but still firm
Regular harvesting signals plants to produce more. A constantly-picked basil plant bushes out and delays flowering.
Container Hygiene & Reuse
Reusing containers saves money, but dirty pots spread disease.
Disease carryover is real. Fungal spores, bacteria, and pest eggs overwinter in old mix and on container surfaces. Using contaminated pots guarantees you’ll fight the same problems next season.
10% bleach soak (professional method):
- Empty all old mix
- Scrub with soapy water
- Mix 1 part bleach to 9 parts water
- Soak 10–15 minutes
- Rinse thoroughly
- Dry completely in sunlight
This kills virtually everything without damaging containers.
When to trash old mix: Mix from healthy plants can be revitalized by mixing in 30–40% fresh stuff. Mix from diseased plants should be composted or tossed.
Most pros start fresh each season. New mix is cheaper than fighting carryover problems.
Common Container Gardening Mistakes (And Quick Fixes)
Leggy plants → not enough light
Tall, spindly stems with big gaps between leaves mean insufficient light. Plants stretch toward whatever light exists.
Fix: Move to brighter spots or add grow lights. Seedlings need 12–14 hours of bright light daily.
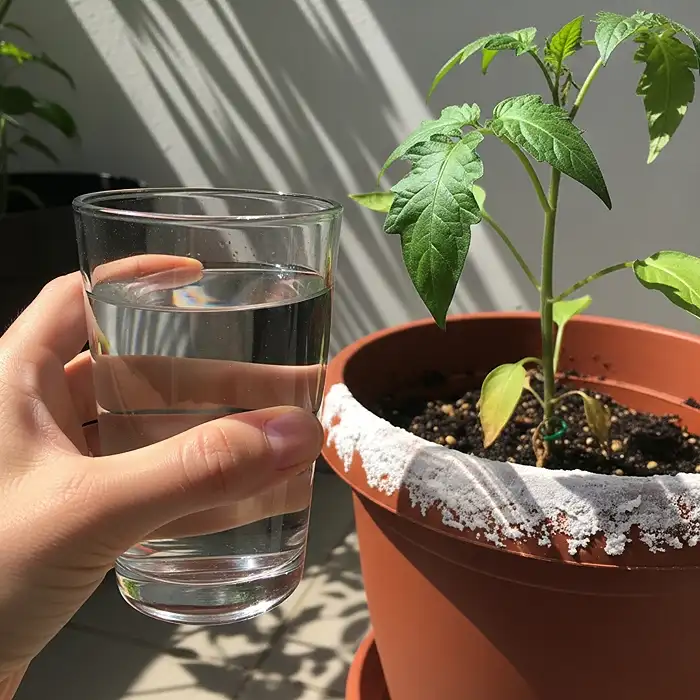
Leaf burn → salt buildup
White crusty stuff on soil or pot edges means fertilizer salt accumulation. Burns roots and leaf edges.
Fix: Flush with 2–3 times the pot’s volume of plain water. Reduce fertilizer concentration.
Damping off → too wet
Fungal disease that kills seedlings at soil level. Thrives in wet, stagnant conditions.
Fix: Better air circulation (fans help), water less, ensure good drainage, avoid overhead watering.
Stunted growth → pot’s too small
Plants that start strong then stall, or wilt daily despite water, are probably root-bound.
Fix: Transplant to bigger containers ASAP.
Frequently Asked Questions
How much sun do container vegetables need?
Fruiting vegetables (tomatoes, peppers, cucumbers) need 6–8 hours of direct sun daily for good production. Leafy greens and herbs tolerate partial shade with 4–6 hours. Root vegetables need at least 6 hours. Not enough light means leggy growth, poor yields, and more disease.
Can I grow food scraps in containers?
Yep! Lettuce, celery, and green onion bottoms placed in water develop roots in days and can be transplanted. Potato eyes, garlic cloves, and ginger planted in containers produce harvestable crops. But most scraps won’t produce as much as plants from quality seeds or transplants.
How often should I harvest herbs?
Every 1–2 weeks during active growth. Never remove more than a third of the plant at once. Regular harvesting encourages bushier growth and delays flowering. For basil specifically, pinch growing tips weekly. For woody herbs like rosemary and thyme, harvest lightly and avoid cutting old wood.
Can I grow vegetables indoors year-round?
Yes, but you need good light. Leafy greens, herbs, and microgreens do well under LED grow lights (12–16 hours daily). Fruiting vegetables like tomatoes and peppers need high-intensity lighting and bigger pots. Dwarf varieties perform better indoors than full-sized ones.
Start Your Container Garden Today (Seriously, What Are You Waiting For?)
Container gardening for food gives you control, flexibility, and real productivity—even if you live in an apartment with just a balcony.
You’re not fighting terrible soil, pulling weeds every weekend, or managing complex amendments. You’re creating perfect conditions in manageable, portable containers.
The best part? It scales perfectly with your ambition. Start with one pot of cherry tomatoes or a few herbs on your windowsill. Learn the basics of soil mix, watering, and light. Watch how your plants respond.
Then expand. Add lettuce. Try peppers. Experiment with mixed herb planters.
Within a season or two, you’ll develop real intuition for matching containers to crops, reading plant signals, and managing your environment. And you’ll harvest fresh vegetables and herbs steps from your kitchen, picked at peak flavor.
Everything in this guide gives you what you need to succeed—from soil science to harvest strategies. Now actually do it.
Save this guide for reference as your garden grows.
Share it with friends who think they can’t garden because they don’t have space.
Your container garden is waiting. Start small, start today, and watch everything—your confidence, your skills, and your harvests—grow.