

Soil Problems in Pots (And How to Fix Them)
Your container plants dying despite perfect care? These soil problems in pots are killing your garden—but they’re shockingly easy to fix. Discover the 10-second test that reveals exactly what’s wrong, plus professional fixes you can do today. Stop wasting money on new plants. Click to save your containers now.
Ever wonder why your container plants look miserable even though you’re doing everything “right”? Here’s the thing nobody tells you: it’s probably not you—it’s your soil.
I’m not talking about watering mistakes or forgetting to fertilize. I’m talking about soil problems in pots (and how to fix them) that happen behind the scenes, slowly suffocating your plants while you’re none the wiser. The truth is, potting soil fails way faster than garden soil, and most of us don’t catch it until our plants are basically waving a white flag.
Table of Contents
The Most Common Soil Problems in Pots (And How to Spot Them Fast)
First things first: you’ve gotta know what you’re dealing with. Think of this as detective work, except instead of solving crimes, you’re saving tomatoes.
Understanding soil problems in pots starts with proper diagnosis. Miss this step, and you’ll waste time and money treating the wrong issue.
The 10-Second Squeeze Test (Yes, Really)
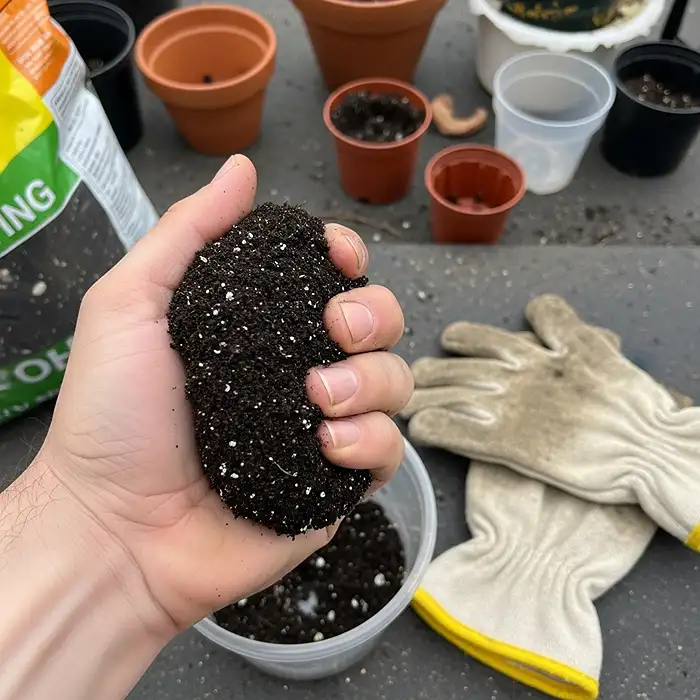
Grab a handful of damp soil from your pot and give it a good squeeze. What happens next tells you everything:
Stays in a clump after you open your hand? That’s compaction, my friend. Your soil’s packed tighter than a subway car at rush hour, and roots can’t breathe.
Falls apart like sand? You’ve got the opposite problem—zero water retention. Your mix is drying out faster than you can keep up.
Turns into a muddy blob? Too many fine particles. You’re basically growing plants in soup, which sounds fun but definitely isn’t.
This simple test has saved me from so many plant failures I’ve lost count.
Your Soil Is Literally Screaming at You (Here’s What to Look For)
Sometimes soil problems in pots are super obvious if you know what you’re looking at:
- Soil pulling away from the edges? It’s gone hydrophobic—basically refuses to absorb water anymore
- Water just sitting on top? That’s compaction blocking everything up
- Water rushing through like a sieve? Channeling—the water’s taking shortcuts around your roots, not through them
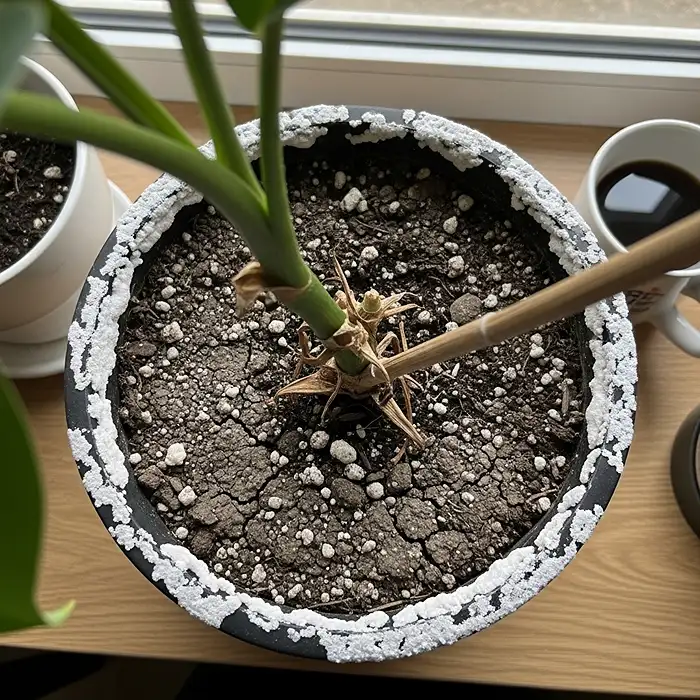
- Crusty white or yellow buildup? Salt accumulation from fertilizers (this one’s sneaky and dangerous)
- Gray, hard, lifeless-looking soil? Yeah, that soil is basically dead. Time for CPR or replacement.
Soil Compaction in Pots (The Silent Plant Killer)
Here’s something that’ll blow your mind: potting soil compacts way faster than garden soil. Like, exponentially faster.
Why? Because every time you water, those particles get squished closer together. Organic stuff breaks down. Fine particles settle. Before you know it, your fluffy potting mix has turned into concrete.
And here’s the kicker—when soil compacts, oxygen can’t reach the roots. No oxygen means beneficial microbes die off and nasty anaerobic bacteria move in. It’s basically a hostile takeover, and your plant’s roots are the casualties.
How to Fix Soil Problems in Pots Caused by Compaction
Mild compaction? Try the chopstick method. I’m not kidding. Just poke a chopstick or bamboo skewer all through your pot every few weeks. You’re creating little air highways for oxygen. It’s simple but it works.
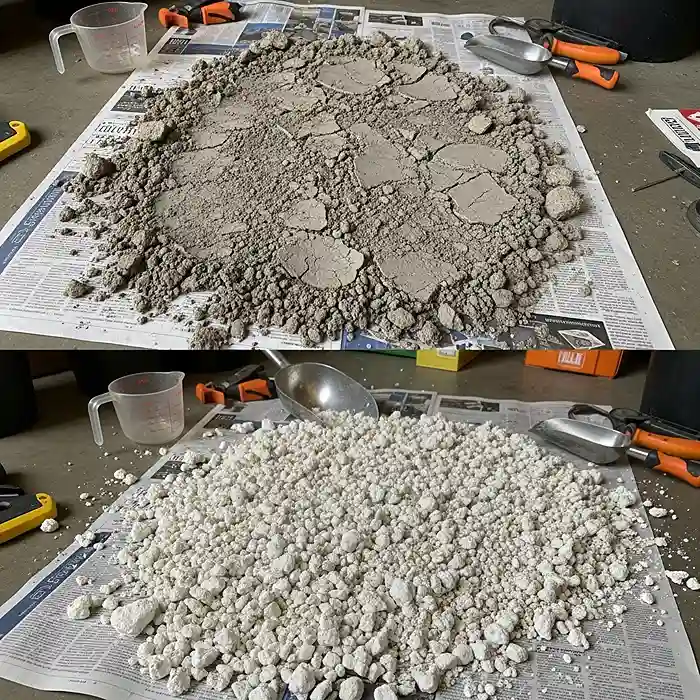
Getting worse? Time to mix in some structural amendments. Add perlite, pumice, or rice hulls—about 20-30% of your total volume. Work it into the top few inches carefully so you don’t shred the roots.
Rock-solid gray soil? Friend, it’s over. That soil is toast. Repot completely with fresh mix. Sometimes you just gotta start over, and that’s okay.
When choosing the right containers for small-space gardening, remember that wider pots actually resist compaction better than tall, narrow ones—more surface area means better aeration.
Root Rot: The Confusing Soil Problem in Pots That Tricks Everyone
Root rot is sneaky because the symptoms look like pretty much everything else. Trust me, I’ve misdiagnosed this more times than I’d like to admit.
Why Root Rot Happens (Spoiler: It’s Usually Our Fault)
Three things team up to create the perfect root rot storm:
- Overwatering plus poor aeration—we’re literally drowning the roots
- Peat-heavy mixes that break down—they turn into sludge over time
- The perched water table effect—I’ll explain this mind-blowing concept in a minute
What Root Rot Actually Looks Like
This is where it gets confusing. Plants with root rot will:
- Yellow and drop leaves (looks like nutrient problems, right?)
- Wilt even though the soil is wet (the classic “what the heck is happening” moment)
- Smell sour or funky (if your soil smells bad, that’s your answer right there)
Fixing This Common Soil Problem in Pots (Yes, You Can Save Them)
First, fix the drainage immediately. Make sure those holes aren’t clogged.
Then comes the scary part—root surgery. Unpot the plant, rinse off the gross soil, and cut away any brown, mushy roots. Healthy roots should be firm and white or tan, not brown mush.
Repot in a mix with 25-35% chunky stuff like pumice or bark chips. And here’s the counterintuitive part: water less often but more thoroughly when you do. Let the soil actually dry out between waterings.
The Perched Water Table Myth (This’ll Blow Your Mind)
Okay, ready for this? Putting gravel at the bottom of pots actually makes drainage worse.
I know, I know. Every article from 1995 told you to do this. But it’s wrong, and here’s why:
Water moving through soil doesn’t just fall through like magic. When it hits a layer of different-sized particles (like gravel), it actually stops and pools above that layer. Physics is weird like that. According to research from Oregon State University, this creates a perched water table that raises the saturation zone right into your root zone.
So basically, that gravel layer you added to “help drainage” is actually keeping water up where it’s causing problems. Understanding the perched water table myth is crucial for fixing soil problems in pots effectively.
What Actually Works for Drainage
Use the same soil texture all the way through. No layers, no gravel, no “drainage material.”
Mix 20-30% coarse stuff (perlite, pumice, bark) throughout the entire mix—not as a bottom layer.
Make sure you’ve got proper drainage holes. That’s where drainage actually happens, not through magical gravel layers.
When Your Soil Holds Too Much Water (Swamp Container Syndrome)
Some mixes just turn into wet sponges that never dry out. It’s frustrating as heck and one of the trickiest soil problems in pots to diagnose.
Why This Happens
Too much peat moss or compost is usually the culprit. These materials are great in moderation but terrible when they dominate.
Also, organic matter breaks down over time, losing structure while somehow still holding ridiculous amounts of water. It’s like the worst of both worlds.
Small pots in humid climates? Forget about it. Not enough surface area for evaporation means your soil stays soggy forever.
The Professional Fix for Waterlogged Soil
Perlite vs pumice: Perlite’s cheaper and lighter but floats to the surface eventually. Pumice costs more but stays put and works better long-term. I use pumice for anything I’m keeping more than one season.
Get your ratios right: Succulents need 40-50% gritty stuff. Veggies do well with 25-30%. Tropical plants like it a bit moister at 20-25% amendments.
In humid climates, dial back the organic content to 40-50% max. Otherwise you’re just creating a swamp.
Soil That Dries Out Stupidly Fast
On the flip side, some potting soil becomes so dry it literally repels water. The irony is painful, and it’s one of the most frustrating soil problems in pots and how to fix them requires some patience.
Why Potting Soil Goes Hydrophobic
Dried-out peat develops this waxy coating that sheds water instead of absorbing it. Once peat dries completely, getting it wet again is like trying to hydrate a hockey puck.
Too much perlite or sand means water drains before roots can drink.
Root-bound plants? There’s no soil left, just a solid mass of roots that can’t hold anything.
How to Fix Bone-Dry Soil
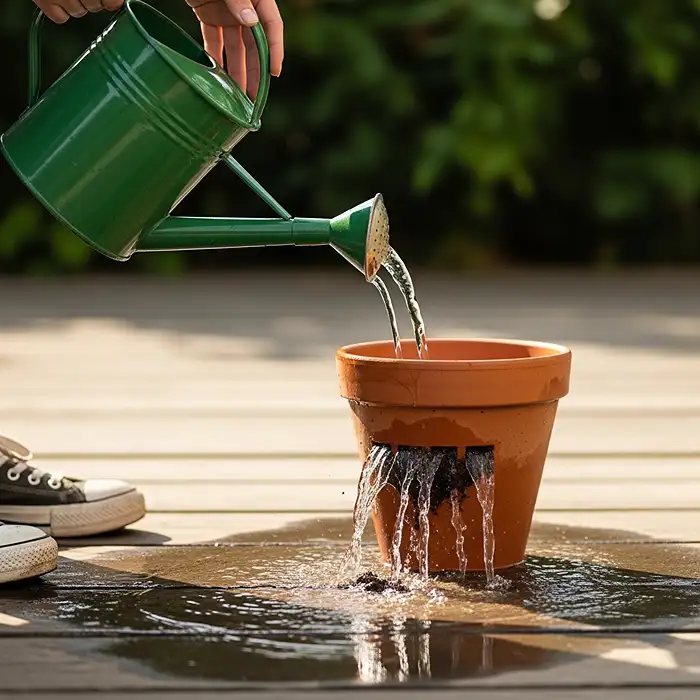
Try the bathtub method: stick the whole pot in water for 30-60 minutes. Let it soak up moisture from the bottom. Sometimes this is the only thing that works.
Mix in coco coir or vermiculite (15-20% by volume) to help retain moisture without creating mud.
Mulch the top with an inch of wood chips. This one trick will extend your watering schedule significantly.
The Master Soil Fix Recipe (I Use This All the Time)
When you need to rebuild completely trashed container soil, here’s my go-to formula for fixing most soil problems in pots:
For a 30-liter batch:
- 40% quality compost (nutrients and beneficial microbes)
- 30% perlite or pumice (structure and oxygen)
- 30% good potting mix or coco coir (base material)
This mix resists compaction, drains well but not too fast, and actually stays healthy for more than one season.
The Budget-Friendly Recharge Method
If you’re reusing old soil (more on that below), add worm castings for microbes and slow-release organic fertilizer for nutrition.
Throw in some kelp meal for potassium and crushed eggshells or lime for calcium.
But real talk: this only works for maintenance. If your soil’s structure is completely gone, no amount of amendments will fix it. Sometimes you just gotta start fresh.
Salt Buildup: The Hidden Soil Problem in Pots Nobody Talks About
Here’s what happens in containers: fertilizer salts build up because they can’t leach away like in garden beds. Eventually, you’ve created a toxic environment.
The confusing part? Salt stress looks exactly like underwatering—wilted, crispy edges, stunted growth. Except the soil is actually wet. Frustrating, right?
The Great Flush (Sounds Dramatic, Works Great)
Run 2-3 times the pot volume through with plain water. For a 10-liter pot, that’s 20-30 liters slowly flushed through.
Let it drain completely between flushes. You’re literally washing away all those accumulated salts.
Make absolutely sure your drainage holes aren’t blocked. Flushing won’t do anything if water can’t escape.
If nothing improves after two weeks, the soil’s probably too far gone and needs replacing.
How to Reuse Potting Soil (Without Killing Your Next Batch of Plants)
Look, fresh potting soil is expensive. I get it. So how to reuse potting soil safely while avoiding common soil problems in pots? Let’s talk about it.
When Old Soil Is Still Good Enough
Check the texture. Does it still have visible structure? Or is it basically mud or concrete?
Smell test. Healthy soil smells earthy and fresh. Sour, ammonia-like, or sulfur smells mean disease or anaerobic nastiness.
Age matters. Soil older than 3 years has probably lost most of its beneficial biology and structure. At that point, you’re better off starting fresh.
Sterilizing Old Soil (Because Diseases Hitchhike)
Solarization is my favorite method: put damp soil in clear plastic bags, seal them up, and leave in full sun for 6-8 weeks during summer. The heat kills pathogens, pests, and weed seeds. Natural and effective.
Oven method (180°F for 30 minutes) works but smells terrible and wastes energy. Last resort only.
Rebuilding Reused Potting Soil
Mix 30% fresh perlite or compost into the old stuff to restore structure.
Add balanced organic fertilizer and worm castings to replenish nutrients.
Inoculate with compost tea or mycorrhizal fungi to restart the beneficial microbe community. Dead soil = dead plants, no matter how much fertilizer you add.
Knowing how to reuse potting soil properly helps you avoid repeating the same soil problems in pots season after season.
Sustainable Soil Choices (Because the Planet Matters Too)
Real talk: peat moss is getting phased out worldwide because harvesting it destroys carbon-storing wetlands. Time to look at alternatives.
Coco coir works similarly to peat but renews faster. Just know you’ll need to add extra calcium and magnesium.
Compost is amazing for nutrients and biology but never use it pure—always blend it.
Biochar is fascinating—it holds water, houses beneficial microbes, and sequesters carbon for literally centuries.
Advanced Move: Worms in Your Containers
If you’ve got pots bigger than 15 gallons, red wiggler worms can actually live in there. They process organic matter, aerate naturally, and poop out nutrient-rich castings. It’s like having tiny gardeners working 24/7.
Downsides? Won’t work in small pots, needs consistent moisture, and worms bail during extreme heat. But when it works, it’s pretty magical.
Container Design Affects Soil Problems in Pots Too
Your pot choice isn’t just about aesthetics—it directly impacts soil health and can prevent many soil problems in pots before they start.
Managing Multiple Plants in One Pot
Root competition gets intense as plants mature. The aggressive feeders will hog all the resources.
Water moves vertically, so upper soil dries faster. Put drought-tolerant plants on top, moisture-lovers below.
Densely planted containers look gorgeous but compact faster and need more frequent soil renewal. There’s always a trade-off.
Common Soil Problems in Pots: Your Questions Answered
Can I just use garden soil in containers?
Please don’t. Garden soil turns into concrete in pots because it compacts so badly it cuts off all oxygen. Potting mix is formulated specifically for container drainage—it’s worth the investment.
How often should I replace potting soil completely?
Annuals and veggies need fresh soil yearly. Perennials can go 2-3 years. But replace immediately if soil shows structural failure regardless of age.
Why does old potting soil turn gray and hard?
All the organic matter has decomposed, beneficial biology is dead, and pore spaces collapsed from soil compaction in pots and salt buildup. It’s basically soil death.
How do I fix nitrogen lockout in woody mixes?
Add nitrogen-rich stuff like blood meal or fish emulsion. Fresh wood chips tie up nitrogen while they decompose, starving your plants.
Is perlite actually better than sand?
Yes, 100%. Perlite aerates without adding weight or compacting over time. Sand is heavy and can actually reduce drainage long-term. Not worth it.
The One Rule That Matters Most for Preventing Soil Problems in Pots
Here’s what I’ve learned after years of container gardening failures and successes: oxygen beats fertilizer every single time.
You can have the fanciest nutrients in the world, but if your soil structure is garbage and roots can’t breathe? Your plants will struggle or die.
Structure matters more than anything else. Soil health determines plant success, and understanding soil problems in pots (and how to fix them) is the foundation of container gardening success.
So invest time in proper potting mixes. Watch for soil compaction in pots and salt buildup like a hawk. Refresh or replace soil when structure fails. Your plants will absolutely reward you with the kind of growth that makes your neighbors jealous.
Trust me on this one—fix your soil problems in pots first, worry about everything else second. It’s the best advice I can give you. Once you master soil health, everything else becomes so much easier.