

Common Tomato Problems in Containers
Yellow leaves? Blossom End Rot? 80% of common tomato problems in containers trace back to 2 fixable causes. Diagnose your plant in 5 minutes—read now.
If your container tomatoes are throwing out yellow leaves, that’s chlorosis—a fancy word for “I’m stressed and something’s off with my nutrients or roots.” And if your fruit has those ugly dark, sunken patches on the bottom? That’s Blossom End Rot, and it freaks people out way more than it should.
So what exactly is Blossom End Rot? It’s a physiological disorder—not a disease—caused by localized calcium deficiency in developing fruit. Basically, your plant can’t move enough calcium to the fruit because water uptake is all over the place. The tissue in the fruit literally collapses. Sounds dramatic, but it’s very fixable.
Here’s the thing about containers: they magnify every little mistake you make. A pot dries out faster, heats up faster, and flushes nutrients faster than a garden bed ever will. That’s exactly why you need a solid tomato nutrient deficiency guide that’s built for container growing.
If you’re just getting started with potted tomatoes, our complete guide to growing tomatoes in containers covers the fundamentals from pot selection to harvest.
But right now? Let’s diagnose what’s going wrong and fix it.
The 5-Minute Diagnostic Checklist
Before you panic-buy anything at the garden center, take five minutes and actually read your plant. It’s telling you exactly what’s wrong—you just need to know the language.
1. Check Which Leaves Are Yellowing
Location matters way more than the yellowing itself.
- Bottom (older) leaves going yellow first? That’s probably nitrogen deficiency or overwatering. Nitrogen is mobile in the plant, so when supplies run low, your tomato basically robs its own older leaves to feed new growth. Kinda ruthless, honestly.
- New growth turning yellow? That’s more concerning—likely iron deficiency or serious root damage. When the baby leaves can’t green up, something systemic is going on.
2. Look at the Veins (Yes, Really)
Grab a yellowing leaf and hold it up to the light. This one detail tells you a lot.
- Whole leaf turning uniformly yellow → Nitrogen running out, or plain old water stress.
- Green veins with yellow tissue between them (that’s called interveinal chlorosis) → Magnesium or iron deficiency. This is one of the most commonly misdiagnosed common tomato problems in containers, so pay attention to it.
3. Do the Finger Moisture Test
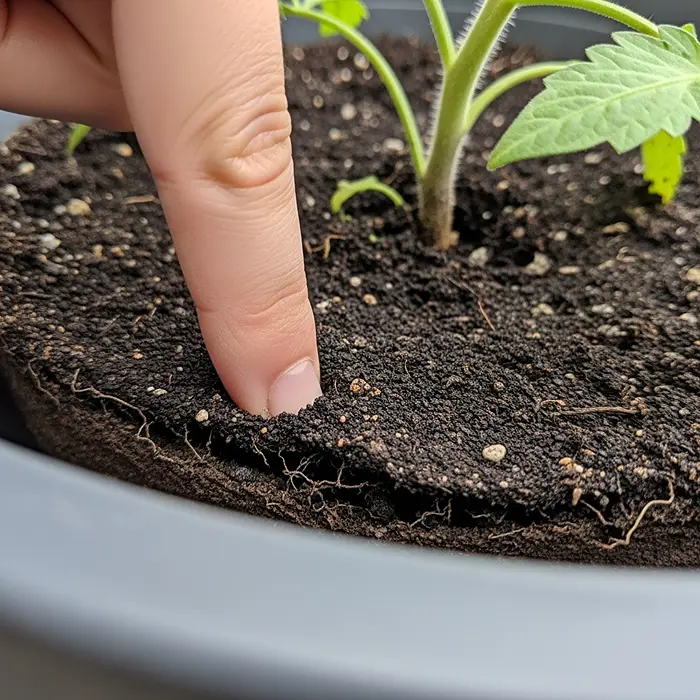
Stick your finger about two inches into the potting mix. Super scientific, I know.
- Dry at two inches? Your plant’s in drought stress. And here’s a fun container problem: when the soil gets really dry, it shrinks away from the pot walls, so when you do water, it just runs straight down the sides and out the bottom without actually soaking in. Cool. Cool cool cool.
- Soggy at two inches? Root hypoxia—that’s oxygen starvation. Roots need air to function. Waterlogged roots can’t absorb calcium, iron, or basically anything useful.
4. Check the Fruit and Foliage
- Dark, leathery spot on the blossom end of the fruit → Blossom End Rot. Remove it. It’s not going to recover.
- Target-shaped spots on the leaves → Likely Early Blight, a fungal problem that loves humidity.
- Curled leaves with tiny stippling dots → Pest activity. Spider mites or thrips are probably having a party on your plant.
The Main Causes of Common Tomato Problems in Containers
Alright, let’s get into the why. Once you understand the root causes (pun intended), fixing things gets way easier.
A. Water Inconsistency — The #1 Troublemaker
I cannot stress this enough: inconsistent watering is behind the majority of common tomato problems in containers. Pots dry out fast—sometimes twice a day in midsummer—and that creates a feast-or-famine moisture cycle that wrecks everything.
Here’s the science in plain English: calcium travels through your plant via the transpiration stream, hitching a ride with water moving up from roots through the xylem. When soil moisture bounces between bone-dry and drenched, that stream stutters, and calcium delivery to developing fruit gets spotty.
The result? Tomato leaves turning yellow from stressed roots, Blossom End Rot on your first fruit clusters, and random leaf drop that makes you question all your life choices.
The “Transpiration Sink” thing you need to know about: If you’ve been heavy-handed with nitrogen fertilizer, your plant probably has gorgeous, lush foliage. Great for Instagram, terrible for fruit.
All that foliage acts like a calcium vacuum, pulling calcium into the leaves instead of the fruit. That’s why an over-fertilized plant with a beautiful canopy can still produce fruit covered in BER. The calcium is there—it’s just in the wrong place.
B. Nutrient Deficiencies — Your Tomato Nutrient Deficiency Guide for Pots
Container mixes leach nutrients every single time you water. Here are the three deficiencies you’ll run into most.
Nitrogen (Mobile Nutrient)
This is the most common one. You’ll see uniform pale-to-yellow coloring on the older, lower leaves. In soilless mixes—peat, coco coir, perlite blends—nitrogen washes out shockingly fast. The fix is easy: apply a balanced liquid fertilizer (a 10-10-10 or fish emulsion works great) every 7–10 days during active growth.
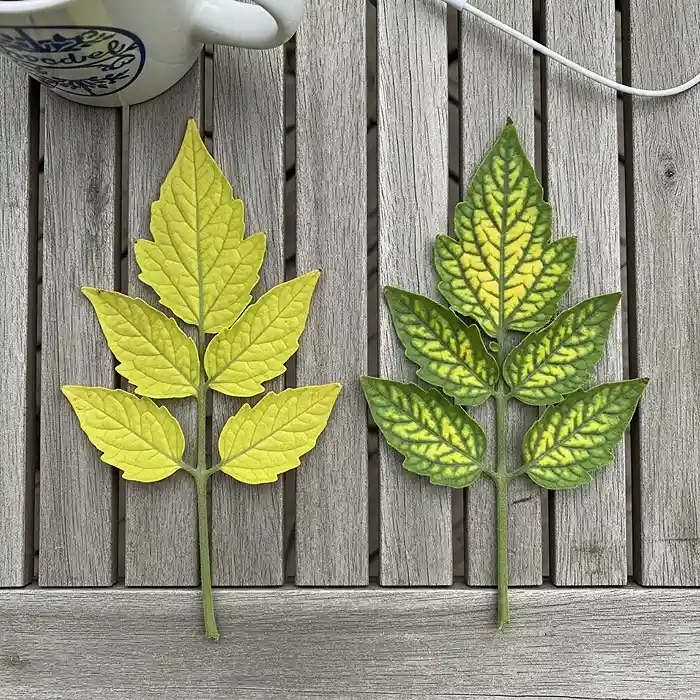
Iron (Immobile Nutrient)
Iron deficiency is dramatic-looking: bright yellow new growth with sharply contrasting green veins. It usually pops up when soil pH creeps above 6.8 or when conditions are cold and waterlogged. Fix it with chelated iron supplements and lower your pH with sulfur or an acidifying fertilizer if needed.
Magnesium
This looks a lot like iron deficiency, but it shows up on older leaves instead of new growth. Interveinal yellowing starts at the leaf edges and creeps inward. The usual culprit? Imbalanced feeding—especially overdoing high-potassium fertilizers.
A balanced fertilizer usually sorts it out. And please, please don’t just throw Epsom salt at the problem without confirming a deficiency first. I know the internet loves Epsom salt. The internet is wrong on this one.
C. Cation Antagonism — The Sneaky Reason Your BER Won’t Quit
Okay, this is the advanced stuff that most gardening blogs skip, but it explains so many frustrating Blossom End Rot cases.
Even when your soil has plenty of calcium, too much potassium (K⁺) or magnesium (Mg²⁺) can physically block calcium (Ca²⁺) from entering root cells. These positively charged ions all compete for the same uptake pathways—like three people trying to squeeze through one doorway at the same time.
The usual culprits? High-potassium “bloom booster” fertilizers applied too early and too often, and repeated Epsom salt applications based on well-meaning but misguided advice. The result: Blossom End Rot even though a soil test shows plenty of calcium. Maddening, right?
The fix: rebalance your nutrients. Calcium nitrate is the best corrective because it delivers calcium in a form your plant can actually use, plus nitrate nitrogen. Dolomitic lime is another solid option that provides both calcium and magnesium in a balanced ratio.
Solving Blossom End Rot Fast
When BER shows up, don’t waste time mourning—act fast. Here’s what to do, in order of priority.
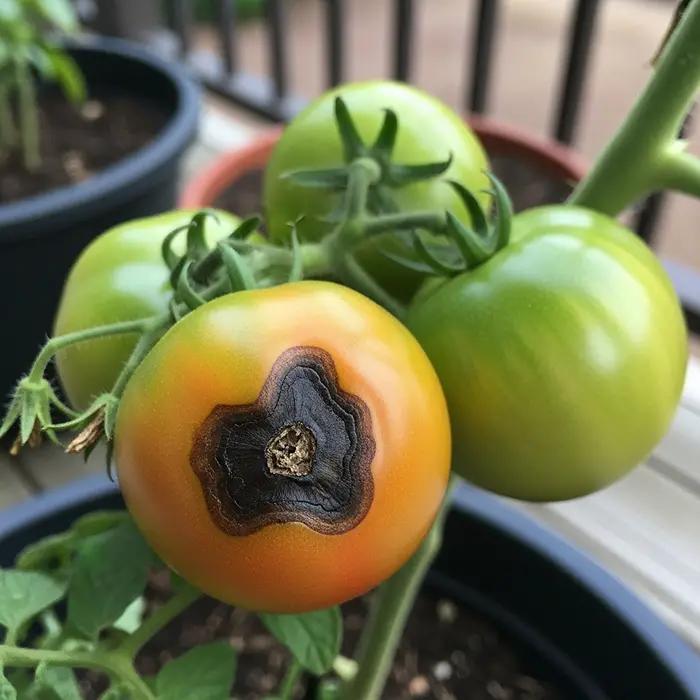
1. Immediate Action
Pull off every affected fruit. I know it hurts, but those tomatoes are done—they’re just draining calcium and water from fruit that still has a chance. Then commit to a consistent watering schedule. Seriously, this single change fixes most blossom end rot cases on its own.
2. Quick Calcium Boost
Mix up a calcium nitrate drench according to the package directions and soak the soil. This is the fastest way to get plant-available calcium down to the roots. Foliar calcium sprays can help a little as a supplement, but research from Michigan State University Extension consistently shows that soil-applied calcium is more effective since calcium doesn’t move well once it enters a leaf.
3. Long-Term Soil Amendments
Work some dolomite lime into the top few inches of potting mix for a slow, steady release of calcium and magnesium that also stabilizes pH. Crushed eggshells? Sure, but they’re a next-season investment—they break down way too slowly to help right now.
4. The Pickling Lime Emergency Drench (Severe Cases Only)
For really bad BER episodes, dissolve ¼ cup of food-grade pickling lime (calcium hydroxide) in a gallon of water and apply directly to the soil—never on the leaves. Fair warning: this raises pH fast, so only use it as a one-time emergency measure and keep an eye on your pH afterward.
Container-Specific Solutions for Common Tomato Problems in Containers
Pots create their own unique set of challenges. Here’s how to work with them instead of against them.
1. The 5–8 Gallon Rule (Don’t Cheat on This)
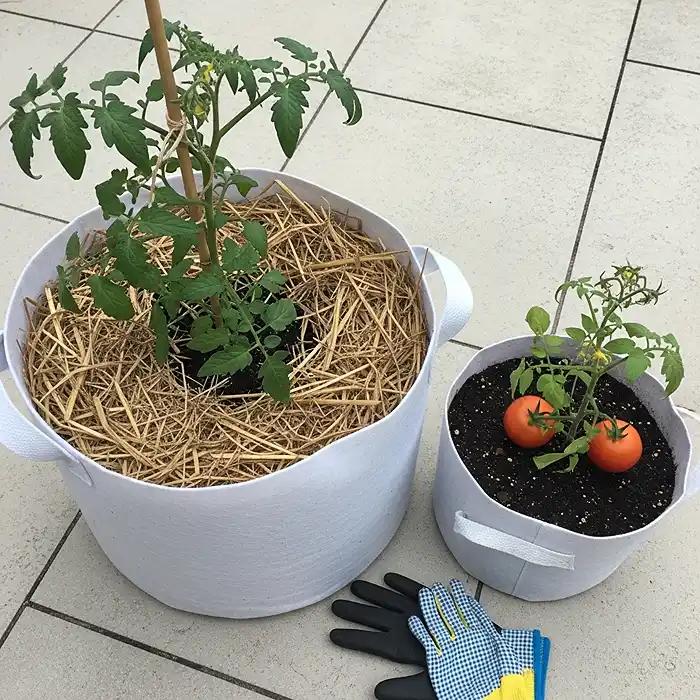
Every container tomato grower should follow this minimum. A 5-gallon pot gives you enough soil volume to buffer temperature swings and hold moisture between waterings. Go smaller and you’re basically guaranteeing the wild dry-wet cycles that cause most common tomato problems in containers. For indeterminate varieties, 7–8 gallons is the sweet spot.
2. Sub-Irrigated Planters (SIPs) — A Game-Changer
If you’re tired of the “is it too wet or too dry?” guessing game, SIPs are honestly one of the best upgrades you can make. They use a built-in water reservoir that wicks moisture upward on demand, keeping soil consistently moist without waterlogging. If Blossom End Rot has been your nemesis, a SIP planter might just end that drama for good.
3. Build the Right Soil Mix (Garden Soil Is Not It)
Never—and I mean never—fill a container with garden soil. It compacts into an airless brick that suffocates roots and turns into a swamp. The ideal container mix balances moisture retention with killer drainage: roughly equal parts peat moss or coco coir, quality compost, and perlite or pumice. Loose, well-aerated, holds water without drowning anything. That’s the goal.
Wilting, Leaf Drop & Environmental Stress
Not every problem is about nutrients or water chemistry. Sometimes it’s just… the weather being the weather.
Why Your Container Tomato Is Wilting
Wilting can come from heat stress (containers on patios absorb a ton of radiant heat), root-bound plants with nowhere left to grow, underwatering, or—plot twist—overwatering. When roots are drowning, they can’t function, so the plant wilts even though the soil is soaking wet. It’s confusing, and it’s one of the trickiest common tomato problems in containers to figure out without the finger test.
Why Leaves Are Dropping
Sudden temperature swings (cold snap, heat wave), severe nitrogen deficiency, or unchecked pest infestations can all trigger leaf drop. Container plants are especially vulnerable because there’s just not enough soil volume to buffer temperature extremes the way an in-ground garden can.
The Quick Fix Protocol
Stabilize your watering first—that’s always step one. Spread 2–3 inches of organic mulch (straw or wood chips) on the soil surface to moderate temperature and slow evaporation. In extreme heat, provide afternoon shade from noon to 3 PM using shade cloth or just scoot the container under a porch overhang. Sometimes the simplest moves make the biggest difference.
Pests & Pathogens to Watch
1. The White Paper Test (Stupidly Simple, Stupidly Effective)
Grab a sheet of white paper, hold it under a branch, and give the foliage a firm shake. Now look at the paper. Aphids show up as small green or black specks, thrips as tiny tan slivers, and spider mites as nearly invisible reddish dots. Catching these guys early makes organic treatment (insecticidal soap, neem oil) way more effective than waiting until the infestation is out of control.
2. Prune for Disease Prevention
Strip the lower 12–18 inches of foliage from every container tomato plant. This prevents soil splash—the main highway fungal spores like Early Blight use to reach your leaves—and massively improves airflow around the base. Better air circulation means leaves dry faster after watering, and fungi hate that.
3. Solarize Old Potting Mix Before Reusing It
Reusing last year’s potting mix? Smart move financially, but solarize it first. Spread it out in a thin layer, moisten it, cover with clear plastic in full sun, and leave it for 4–6 weeks. The trapped heat kills fungal pathogens, nematodes, and weed seeds. Your next crop gets a clean start without you having to buy all new mix.
FAQ: Common Tomato Problems in Containers
Should I remove yellow tomato leaves?
Yes—if a leaf is more than 50% damaged or touching the soil, snip it off. You’re redirecting energy toward healthy growth and fruit while removing a potential entry point for disease. Don’t stress about it; the plant will be fine.
Will Epsom salt fix Blossom End Rot?
Nope. Epsom salt is magnesium sulfate. Adding extra magnesium actually worsens blossom end rot causes by competing with calcium at the root level. Only use Epsom salt if a soil test actually confirms you’re low on magnesium. Otherwise, you’re making things worse while feeling like you’re helping. (We’ve all been there.)
Are catfaced tomatoes safe to eat?
Totally. As long as there’s no fuzzy mold or secondary infection in the scarred tissue, they’re fine—just cosmetically weird. Cut away the ugly parts and enjoy the rest.
Can tomatoes recover from Blossom End Rot?
Yes! And this is the good news people don’t hear enough. BER isn’t a disease—it’s a physiological blip. Once you get your watering consistent and your calcium balance sorted, new fruit on the same plant will develop perfectly normally. The already-affected fruit won’t heal, but the plant’s future is bright.
Prevention Blueprint: Your Container Tomato Action Plan
Want to avoid dealing with common tomato problems in containers in the first place? Follow this season-long checklist:
- Use 5–8 gallon containers minimum. More soil volume = more stability in moisture and temperature. This is non-negotiable.
- Water consistently. Even moisture is the goal—never bone-dry, never waterlogged. Check daily during summer.
- Feed a balanced fertilizer weekly. A complete formula with nitrogen, phosphorus, potassium, calcium, and micronutrients keeps deficiencies from cascading.
- Hold off on bloom boosters early. Wait until fruit is actually setting before bumping up the potassium. High-K too early contributes to blossom end rot causes.
- Prune lower leaves. Remove foliage below the first fruit cluster for airflow and disease prevention.
- Monitor soil pH. Keep it between 6.0–6.8 for optimal nutrient availability. A cheap pH probe and monthly checks are all you need.
- Mulch the soil surface. A 2–3 inch layer of organic mulch stabilizes moisture, insulates roots, and gives you a buffer against all those frustrating temperature swings.
Look, container tomato growing is one of the most rewarding ways to get fresh food out of a small space. The problems are real, but they’re also predictable and—honestly—pretty simple to solve once you know what to look for.
Nail your watering routine, feed with balance, and keep an eye on those early stress signals. You’ll go from “why are my tomatoes dying?” to harvesting perfect fruit off your patio all season long.
And trust me—once you taste a sun-warmed tomato you grew yourself, grocery store tomatoes are ruined forever. In the best way.
Awesome informal