

How to Grow Tomatoes in Containers
How to grow tomatoes in containers without ending up with a leggy, droopy, tasteless plant comes down to three basics—container size, potting mix, and watering consistency. This guide shows a simple setup that works on balconies and patios: a 5–10 gallon pot with drainage, a light, fertile mix, and a variety that thrives in pots.
Save this page—next you’ll get a clear pot-size match guide by tomato type, the best container cultivars, and a straightforward watering + feeding routine to keep plants productive all season.
Table of Contents
What You’ll Learn (The Quick Version)
Container tomatoes succeed when you match the variety to the right pot size, use airy potting mix, and keep moisture steady.
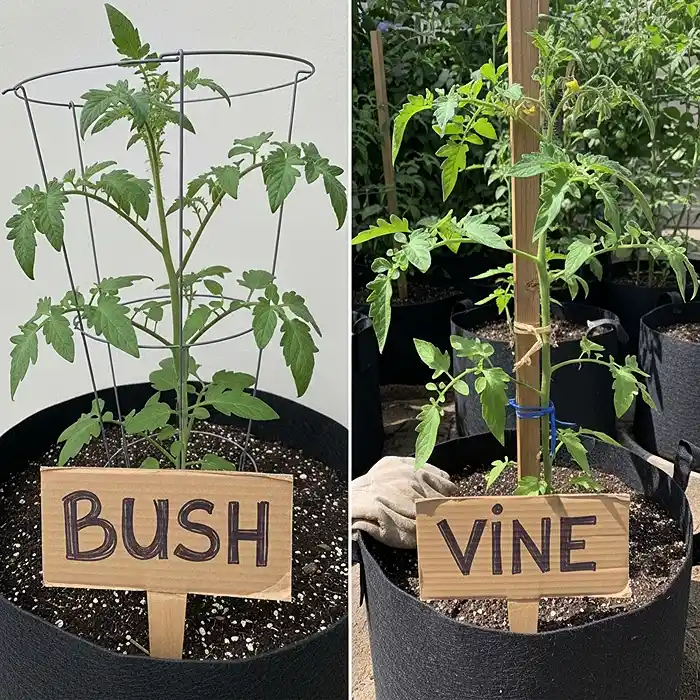
- Choose the type: determinate (bush) for tight spaces; indeterminate (vining) only with tall support.
- Follow pot sizes: 5–7 gal (dwarf), 10–15 gal (determinate), 20–25 gal (indeterminate).
- Use high-aeration potting mix; never fill pots with garden soil.
- Prevent blossom end rot with consistent watering and pH 6.2–6.8.
- Mulch, stake/trellis, and prune to boost yield and reduce problems.
Quick comparison — Determinate vs Indeterminate
- Space/support: compact + simple stake vs tall vine + strong trellis
- Timeline: heavier, shorter harvest window vs steady harvest over a longer season
- Best for: patios/small pots vs large pots and maximum total yield
If you’re new to growing food in pots, our Container Gardening for Food: Vegetables & Herbs guide covers the broader fundamentals — but this article is your deep dive into tomatoes specifically.
How to Grow Tomatoes in Containers: Picking the Right Variety
Here’s where most beginners go wrong. They grab whatever tomato seedling looks good at the garden center, stick it in a pot, and wonder why it turned into a leggy, unproductive mess by July. The secret? Matching the plant’s genetics to your container setup.
Determinate vs. Indeterminate — What’s the Difference?
If you only learn one thing from this article, make it the difference between determinate vs indeterminate tomatoes. It changes everything about how you grow them in containers.
Determinate (Bush Types) — The Easy Choice
Think of these as the “set it and mostly forget it” tomatoes. They grow to a fixed height (usually 3–4 feet), set a big flush of fruit, and then they’re pretty much done for the season.
They’re compact, they don’t need much staking, and they’re genuinely perfect for balconies and patios. If you’re figuring out how to grow tomatoes in containers for the first time, start here. You’ll thank me later.
Indeterminate (Vining Types) — The Ambitious Choice
These are the overachievers of the tomato world. They just keep growing and fruiting until frost shuts them down. The yield potential is way higher, but they’re also needier — they want 20–25 gallon containers, 6–7 foot stakes or trellises, and regular pruning.
They’re totally doable in containers. But they’re not “plop it on the patio and walk away” plants. They’re more like “I’m going to check on you every morning with my coffee” plants.
Best Tomato Varieties for Pots (My Actual Recommendations)
Not all cultivars perform equally in containers. Here are the best tomato varieties for pots that I’d genuinely recommend:
High-Performance Hybrids (AAS Winners)
| Variety | Growth Type | Container Size | Why I Like It |
|---|---|---|---|
| BadaBing! F1 | Determinate | 10–15 gal | Compact cherry type, genuinely disease-tough |
| Zenzei F1 | Semi-Determinate | 15 gal | Crack-resistant — great for unpredictable weather |
Ultra-Compact Picks for Tiny Spaces
- Tiny Tim — lives happily in a 5–7 gallon pot. Perfect for windowsills, and surprisingly productive for its size.
- Tasmanian Chocolate — rich, almost smoky flavor in a 7–10 gallon container. This one’s a conversation starter.
What to Look for on the Tag
When shopping for the best tomato varieties for pots, flip the tag over and look for disease resistance codes: V (Verticillium), F (Fusarium), and N (nematodes). Also consider fruit size versus root capacity — that gorgeous beefsteak won’t do much in a tiny pot. And if you’re gardening somewhere hot, grab heat-tolerant varieties that’ll keep setting fruit above 90°F.
Container Size for Tomatoes: Why It Matters More Than You Think
I’ll be blunt — the number one reason container tomatoes underperform is that the pot is too small. It’s like asking someone to run a marathon in shoes two sizes too small. Technically possible? Sure. Fun? Absolutely not.
The Volumetric Standard for How to Grow Tomatoes in Containers
Here’s the cheat sheet for container size for tomatoes — print it, screenshot it, tattoo it on your forearm:
| Tomato Type | Gallons Needed | Pot Diameter |
|---|---|---|
| Micro / Dwarf | 5–7 gal | 12 inches |
| Determinate | 10–15 gal | 18 inches |
| Indeterminate | 20–25 gal | 24 inches |
The rule is simple: bigger root zone = higher yield and better drought tolerance. When you’re torn between two sizes, always go bigger. Your plant will repay you in tomatoes.
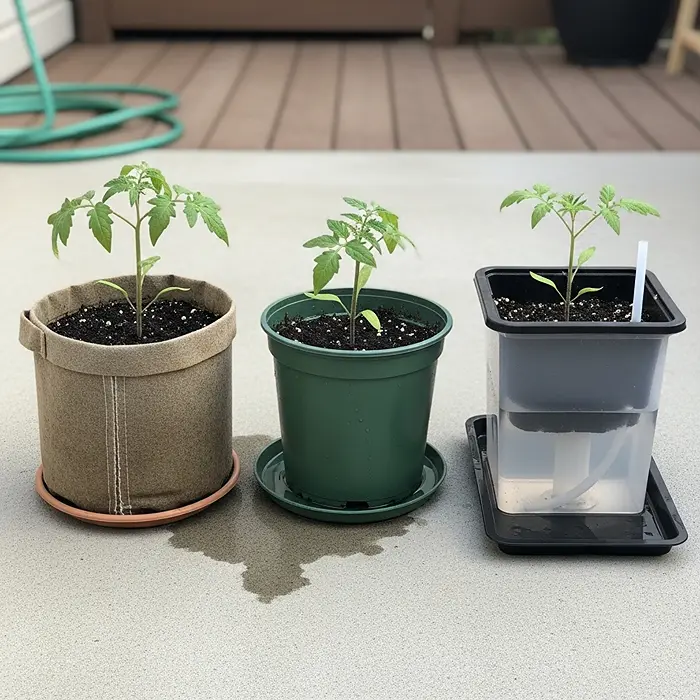
Fabric vs. Plastic vs. Self-Watering Planters — Which One Actually Works?
Fabric Pots
I’m a big fan of these. They air-prune roots naturally (meaning roots hit air, stop circling, and branch out instead), which builds a seriously strong root system. The downside? They dry out faster. In peak summer, you might be watering twice a day.
Plastic Pots
Affordable, lightweight, and they hold moisture longer. Just avoid black plastic if you’re in a hot climate — root-zone temperatures above 96°F stress plants badly, and a black pot in direct sun is basically a little oven.
Self-Watering Tomato Planters (SIPs)
Okay, real talk — self-watering tomato planters might be the single best upgrade you can make. They use a sub-irrigated reservoir that wicks water up to roots on demand, which means consistent moisture without the guesswork. If blossom end rot has haunted your past harvests, SIPs often fix the problem overnight.
According to University of Maryland Extension, container-grown vegetables perform best when moisture levels remain consistent — which is exactly what SIPs are designed to deliver.
How to Grow Tomatoes in Containers with the Right Soil Mix

Why Garden Soil Is a Terrible Idea (Sorry, Grandma)
I know it seems logical. You’ve got perfectly good dirt in the yard — why not scoop some into a pot? Here’s why: garden soil in a container compacts into a dense, airless brick. Roots can’t breathe, water pools instead of draining, and root rot moves in like an unwanted houseguest.
Container gardening demands a completely different growing medium. Full stop.
My Go-To Potting Mix Recipe
Think of this as a layered casserole where every ingredient earns its spot:
The Base (Moisture Retention): Sphagnum peat moss or coconut coir. This holds water without getting heavy.
The Aeration Layer: Perlite or vermiculite, mixed in at about 20–30% by volume. These little white bits create air pockets so roots can actually breathe.
The Nutrient Boost: Fish meal for nitrogen, bone meal for phosphorus and calcium, and crushed eggshells for slow-release calcium throughout the season. Here’s a weird one — toss in two crushed aspirin tablets per pot. It sounds like an old wives’ tale, but it actually triggers a defense response called systemic acquired resistance. Plants literally get better at fighting off disease.
pH Sweet Spot: Aim for 6.2–6.8. Test your mix and add dolomitic lime if it’s running acidic. This range keeps nutrients accessible and plays a direct role in blossom end rot prevention.
Blossom End Rot Prevention: The Watering Problem Nobody Talks About
That dark, leathery patch on the bottom of your tomatoes? That’s blossom end rot, and it’s heartbreaking after weeks of careful growing. But here’s what most articles won’t tell you clearly: it’s almost never about adding more calcium.
The Real Science
Calcium moves through the plant via the xylem — and it travels with water. When your watering is inconsistent (bone dry Monday, drenched Tuesday), calcium simply can’t reach developing fruit. The calcium is probably in your soil already. It just can’t get where it needs to go.
Blossom end rot prevention is really about moisture management. Period.
How to Water Tomatoes in Containers the Right Way
Bottom watering is a game-changer. Set your pots in saucers and water from below. Roots grow downward toward the moisture, foliage stays dry, and you dramatically reduce your risk of early blight.
Mulch everything. Spread 2–4 inches of organic mulch (straw, shredded leaves, wood chips) on top of your potting mix. It stabilizes soil temperature and cuts evaporation in half. This one habit alone makes a massive difference in how to grow tomatoes in containers successfully.
Deep-water, then wait. Water thoroughly until liquid runs out the drainage holes. Then don’t water again until the top inch feels dry. The worst thing you can do? Daily shallow watering that keeps the surface damp but leaves the root zone thirsty.
How to Grow Tomatoes in Containers with Proper Support and Pruning
Matching Your Stakes to Your Variety
Determinate plants are low-maintenance here. A 36-inch wire cage around the plant is usually all you need. Just make sure air can move through the center.
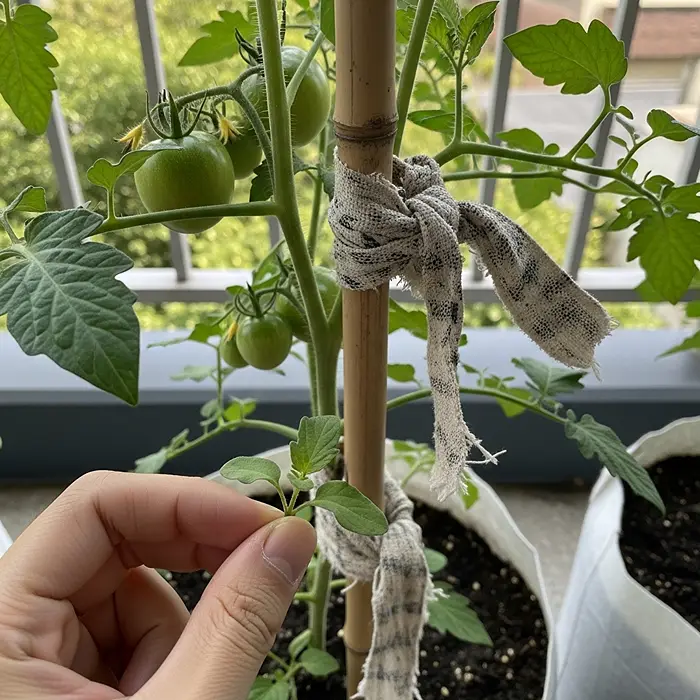
Indeterminate plants are a different story. They need a serious 6–7 foot stake or trellis. Tie the main stem loosely every 8–12 inches with soft twine or cloth strips — tight ties will cut into the stem as it thickens and basically create an open wound for disease.
The Pruning Protocol That Actually Boosts Yield
For indeterminate tomatoes, get in the habit of pinching out suckers — those little shoots that sprout in the “armpit” where a branch meets the main stem. Removing them directs the plant’s energy toward producing fruit instead of extra foliage. It also opens up airflow, which is your best defense against fungal problems.
For all container tomatoes, strip the leaves from the bottom 12 inches of the plant once it’s established. This eliminates the splash zone where soil-borne diseases like early blight and septoria leaf spot hitch rides onto foliage during rain or watering. It’s a two-minute job that prevents weeks of headaches.
Harvesting Your Container Tomatoes (Don’t Wait Too Long)
The Breaker Stage Trick
Here’s a little insider tip: you don’t actually need to wait until tomatoes are fully red on the vine. Pick them at the “breaker stage” — that’s when you see the first blush of color, roughly half pink and half green. A gentle lift-and-twist should pop them right off.
Then ripen them indoors on your countertop at room temperature. They’ll develop full flavor while you avoid losses from cracking, birds, squirrels, and that one neighbor who “accidentally” picks from your patio. (I see you, Dave.)
What to Do with the Harvest Overflow
When you’ve got more tomatoes than you can eat (and you will), here’s what to do:
Freeze them. Toss whole or chopped tomatoes straight into freezer bags. After thawing, the skins slide right off — no blanching needed.
Dehydrate them. Dried tomatoes make incredible powder and concentrated sauce bases. A cheap food dehydrator pays for itself in one season.
Can them. Use water-bath or pressure canning with properly acidified, tested recipes only. The USDA National Center for Home Food Preservation is your go-to resource here — don’t wing it with canning.
Frequently Asked Questions About How to Grow Tomatoes in Containers
Can I grow tomatoes indoors year-round?
Yep! Dwarf varieties like Tiny Tim do well in 5–7 gallon pots under full-spectrum grow lights running 12–16 hours a day. You’ll need to hand-pollinate, though — just give the flower clusters a gentle shake every few days. No bees required.
Why are my container tomato leaves turning yellow?
Don’t panic — but don’t ignore it either. The most common culprits are overwatering, poor drainage, and nitrogen deficiency. Check your drainage first before reaching for the fertilizer bottle. If water sits on the surface or the mix stays soggy for hours, that’s your problem.
Do I really need to add lime when I grow tomatoes in containers?
In most cases, yes. Dolomitic lime does three things at once: it buffers pH to the 6.2–6.8 sweet spot, it supplies calcium and magnesium, and it’s one of the simplest steps for blossom end rot prevention. About a tablespoon per gallon of potting mix at planting time is a solid starting point.
What’s the single best container type for tomatoes?
It depends on your life. Fabric pots build the strongest roots. Self-watering tomato planters deliver the most consistent moisture (and the least stress for you). Plastic is the most budget-friendly way in. If you’re in a hot climate, go with SIPs or light-colored plastic — your roots will thank you.
The Bottom Line
Look, how to grow tomatoes in containers isn’t complicated — but it does reward people who pay attention to a few key details. Match your variety to your space, don’t cheap out on container size for tomatoes, build a proper potting mix, and keep your watering consistent. That’s genuinely 90% of the game.
Pick a couple of the best tomato varieties for pots from the recommendations above, invest in a decent container (SIPs if you can swing it), and get something in a pot this weekend. Your first homegrown, still-warm-from-the-sun tomato will ruin grocery store tomatoes for you forever.
And honestly? That’s the whole point.