

How to Keep Container Soil Cool in Hot Weather
Learning how to keep container soil cool is the single most important thing you can do for your small balcony garden in summer. When pot temperatures spike past 90°F, roots stop working — and no amount of watering saves them.
Table of Contents
The Science of Soil Temperature in Container Gardening
Here’s what most gardening articles skip: your plant’s leaves can tolerate air temperatures well above 95°F. The foliage has stomata that open and close, managing heat through transpiration.
The roots have no such defense. They’re locked inside a pot that can hit 130°F on a south-facing balcony in July.
In the ground, soil acts as a massive thermal buffer. Dig down six inches and the temperature barely budges even on the hottest days. Container soil has none of that mass.
A dark plastic pot in direct sun absorbs radiant heat from all sides simultaneously — top, bottom, and every wall. The soil inside climbs fast.
Once root zone temps cross 85°F to 90°F (30°C to 32°C), root cell membranes start breaking down. Water and nutrient uptake stops. The plant wilts even though the soil feels damp. Push past 95°F and you’re cooking the roots alive.
This is why small space gardening on a balcony demands a different strategy than in-ground growing. The thermal physics are completely different, and the hacks below address that directly.
Diagnosing Overheated Pots on Your Balcony
Before you start stacking insulation and changing watering schedules, confirm heat stress is actually your problem. Other issues — overwatering, pests, nutrient deficiency — can look similar. A five-minute diagnostic saves a lot of wasted effort.
Symptoms of Root Heat Stress
Quick Answer: Look for severe afternoon wilting in soil that’s still moist, combined with blossom drop and crispy leaf edges. If the soil is damp but the plant is limp, the roots have stopped absorbing water due to heat damage.
Here’s what to watch for specifically:
- Wilting despite damp soil — the clearest signal. Squeeze the soil; if it feels moist but the leaves are drooping by 2 p.m., heat stress is the likely cause.
- Blossom drop — tomatoes, peppers, and beans abort their flowers when root temps are too high. This is the plant shedding load to survive.
- Crispy leaf margins — brown, papery edges appearing on otherwise green leaves, typically starting on the side of the plant facing the afternoon sun.
- Stunted new growth — tiny, pale new leaves indicate the root system is failing to supply nutrients, even if the plant isn’t wilting outright.
I lost an entire crop of ‘Sungold’ cherry tomatoes in July 2022 this way. The soil felt fine to touch. But I hadn’t checked the actual temperature, and the roots in my black plastic pots had been cooking for weeks.
Measuring Your Container Soil Temperature
Quick Answer: Use a digital meat thermometer or a dedicated soil thermometer. Push it three inches deep alongside the inner wall of the pot and check at peak heat — around 2 p.m. to 4 p.m. That reading tells you the worst your roots experience daily.
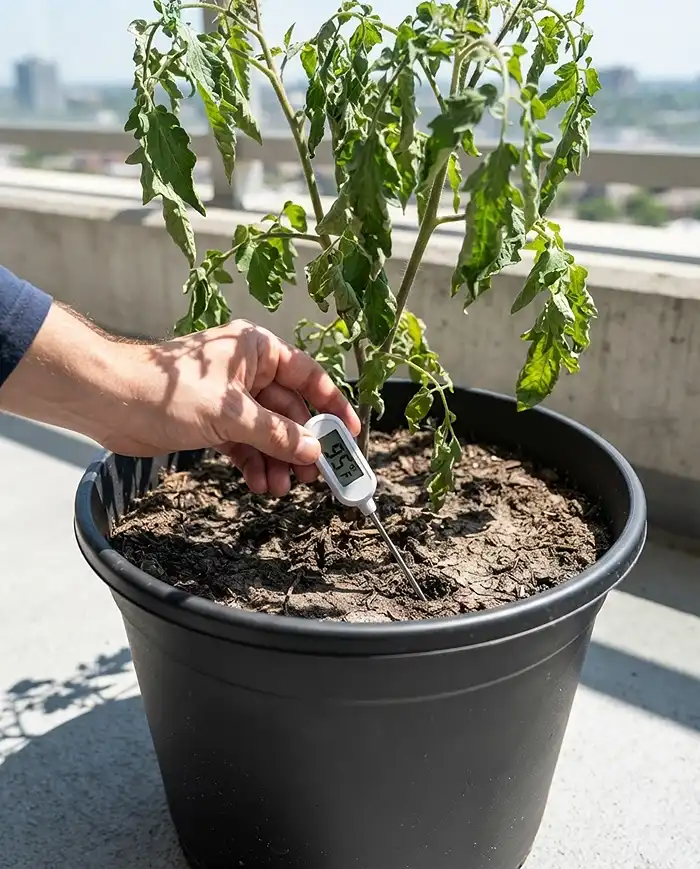
A standard instant-read kitchen thermometer costs around $10 and works perfectly. Probe near the pot wall (not the center), because that’s where heat penetrates first.
Take your reading between 2 p.m. and 4 p.m. when surface temps peak. Anything above 85°F warrants action. Above 95°F, your plant is already in distress.
Pro Tip: Check the temperature on three consecutive hot afternoons before concluding it’s a heat problem — a single hot day usually won’t cause lasting damage, but sustained high temps will.
Top Hacks to Insulate Balcony Pots
The fastest wins come from reducing the heat that reaches the pot itself. These structural hacks cut soil temps by 15°F to 25°F without changing your watering routine at all — and most cost under $5 to implement.
The Double-Potting (Cachepot) Method
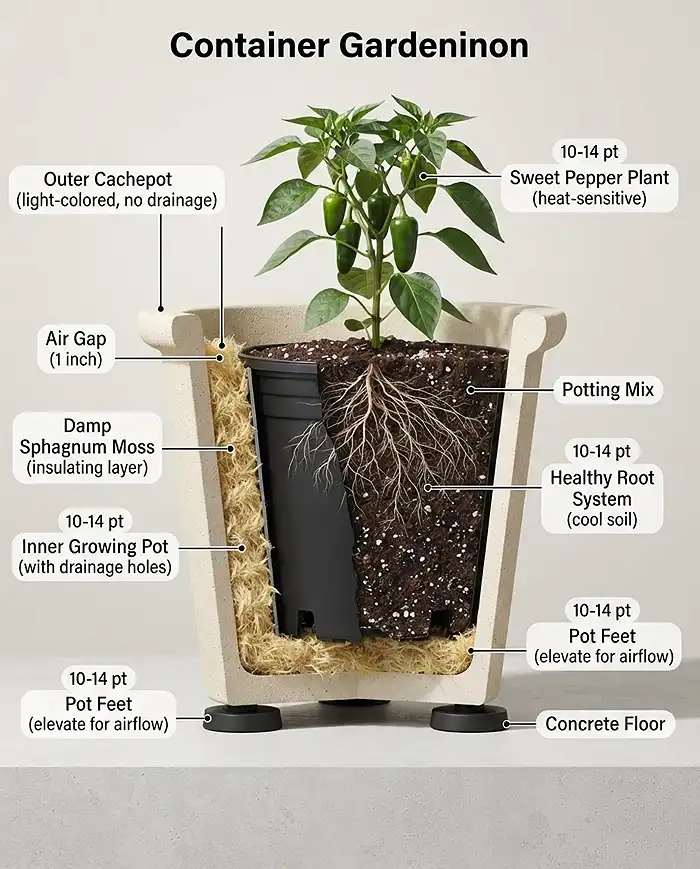
Quick Answer: Place your growing pot inside a slightly larger decorative container, then pack the gap between them with sphagnum moss or crumpled newspaper. This air-and-material gap acts as a thermal break, keeping the inner pot significantly cooler.
This is the single most effective low-cost method I’ve found. The gap between the pots creates dead air space — the same principle used in double-pane windows.
Pack it with damp sphagnum moss for best results. The moss holds moisture and provides additional evaporative cooling as it slowly dries. Crumpled newspaper works nearly as well and costs nothing.
You need at least one inch of gap on all sides. Anything less and you’re not getting meaningful insulation.
In my zone 6b garden (summer 2023), I switched six pots of ‘Lunchbox’ sweet peppers to this setup mid-July. Within three days, their afternoon wilting stopped entirely. I measured a 19°F drop in root zone temperature at the inner pot wall.
Pro Tip: Keep the outer cachepot slightly elevated on pot feet to allow airflow underneath — this prevents the outer pot from absorbing and transferring ground heat upward.
For guidance on which containers work best for this method, see our guide to choosing the right containers for small-space gardening.
Reflective Colors and Shading the Pot
Quick Answer: White or light-colored containers absorb dramatically less solar radiation than dark ones. If you can’t switch pots, shade the sun-facing side with a piece of white cardboard or a trailing plant to cut surface temperature by up to 20°F.
Black plastic is the worst offender. On a 90°F day, the surface of a black pot in direct sun can reach 140°F — far hotter than the air around it.
White, cream, or pale terracotta pots reflect a significant portion of incoming solar radiation. If you’re buying new containers for your tiny garden ideas to come to life, color matters as much as material.
If you can’t swap the pot, create a “pot shadow.” Lean a piece of white foam board against the sun-facing side. Or train a trailing plant — like ‘Tumbling Tom’ tomato or sweet potato vine — to drape over the pot wall, shading it with living foliage.
Pro Tip: White paint applied to an existing dark plastic pot works surprisingly well — one coat of exterior latex drops surface temp by 15°F to 20°F in direct sun.
Insulating Liners: Bubble Wrap and Cardboard
Quick Answer: Before filling a thin metal or plastic pot with soil, line the inner walls with horticultural bubble wrap or thick corrugated cardboard. This thermal barrier can reduce wall-conducted heat by 30% to 40%.
This is the ideal hack for renters who can’t replace their pots. You’re working with what you have and adding insulation from the inside.
Horticultural bubble wrap (sold by the roll at garden centers) is designed for this. Regular packing bubble wrap also works for a season or two. Cut it to height, wrap it around the inner circumference, and secure with a small piece of tape.
Corrugated cardboard from a broken-down shipping box works almost as well. The air pockets in the corrugation act as insulation. Line two to three layers thick.
Leave the base of the pot unlined to preserve drainage. The goal is insulating the walls, not trapping water.
Pro Tip: Double up — use cardboard on the inner wall and a cachepot on the outside for a combined barrier that cuts heat penetration to near zero on most summer days.
Mulching Strategies to Cool the Soil Surface
Most people focus on the pot walls and forget the top of the soil. But on a small balcony garden, the surface of your pot soil faces the sky and receives direct radiant heat all afternoon. Without cover, it can exceed 110°F in midsummer — hot enough to kill surface roots and destroy soil microbes.
Organic Mulches: Straw and Wood Chips
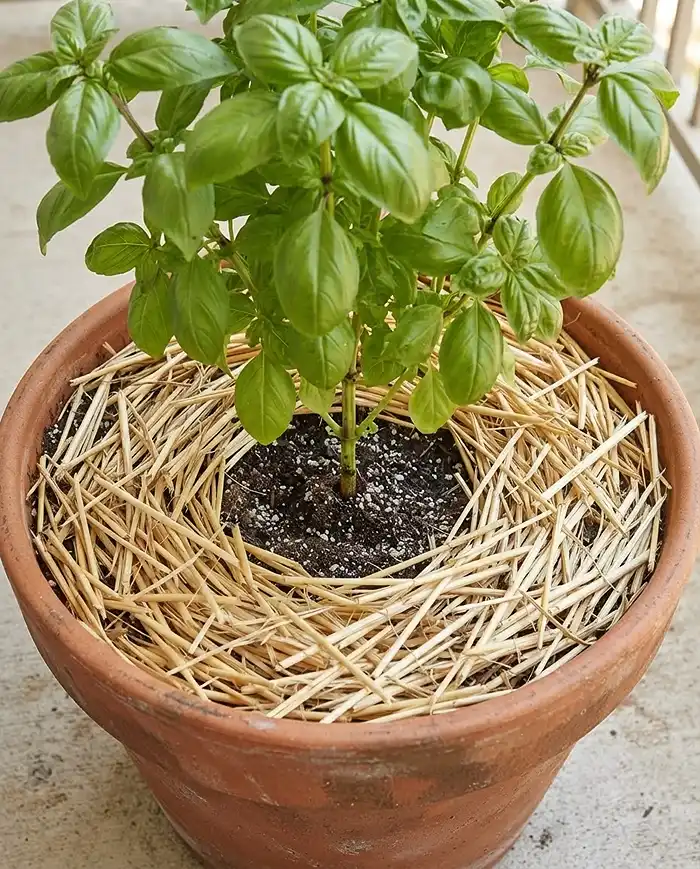
Quick Answer: Apply a two-inch layer of pale straw or cedar wood chips across the soil surface. This layer blocks direct solar radiation, slashes evaporation, and can lower surface soil temperature by 10°F to 20°F on a hot afternoon.
Light-colored materials work best — pale straw reflects more heat than dark bark mulch. Cedar wood chips are ideal: they’re light-colored, slow to decompose, and the scent deters fungal gnats.
Two inches is the minimum effective depth. Less than that and the sun heats the mulch through to the soil underneath. More than three inches can impede water reaching the roots.
I started using barley straw mulch in my ‘Genovese’ basil pots in summer 2024. Previously, the top inch of soil would be bone dry and hot within two hours of watering. With straw, it stayed moist for six to eight hours longer.
Keep mulch pulled back half an inch from the plant stem to maintain airflow at the base and prevent collar rot.
Pro Tip: White pea gravel also works well on the soil surface for an attractive, permanent alternative to organic mulch — and it never breaks down or harbors gnats.
Living Mulch: Underplanting
Quick Answer: Sow shallow-rooted, heat-tolerant ground covers like sweet alyssum or creeping thyme around the base of a tall focal plant. Their leaves shade the soil surface and their transpiration actively cools the root zone — a living air conditioner.
This is one of my favorite tiny garden ideas for containers because it does double duty: looks beautiful and functions as active cooling.
Sweet alyssum (Lobularia maritima) is ideal. It’s shallow-rooted so it doesn’t compete aggressively, heat-tolerant, and the flowers attract beneficial insects. Sow seeds directly around your main plant, leaving two inches of clearance from the central stem.
Creeping thyme is another excellent choice. It’s drought-tolerant, aromatic, and its dense mat of tiny leaves effectively shades the soil surface without significant root competition.
Both choices add to the visual appeal of your small balcony garden while doing real thermal work.
Pro Tip: Avoid mint as underplanting — it’s too aggressive and will outcompete your main crop within a few weeks.
Watering Techniques for Temperature Control
Water isn’t just hydration — it’s a thermal management tool. The physics of evaporation means that correctly timed watering actively pulls heat out of your soil. Get the timing wrong and you can make the problem worse or damage plants through thermal shock.
Timing Your Watering for Evaporative Cooling
Quick Answer: Water deeply in the early morning — before 8 a.m. — so moisture is present in the soil when peak afternoon heat arrives. That moisture evaporates during the hottest hours, drawing heat out of the root zone. Never water with cold tap water during midday heat.
The goal is to front-load moisture so evaporative cooling works automatically during the 1 p.m. to 4 p.m. heat spike.
Water until it drains freely from the base. Shallow watering leaves the top layer wet and the deeper root zone dry and hot — exactly the wrong outcome.
Midday watering with cold tap water is a genuine risk. Water sitting in pipes in summer can be quite cool. Pouring it onto hot roots causes thermal shock — the sudden temperature swing ruptures root cells. The damage looks like sudden wilting that doesn’t recover even after the plant gets water and shade.
If you must water midday, use water that’s been sitting in a watering can in shade for an hour to equilibrate to ambient temperature first.
Hydrogels and Sub-Irrigation Systems
Quick Answer: Water-storing hydrogel crystals mixed into the lower half of your potting soil slowly release moisture over many hours. As they do, they draw heat out of the surrounding soil — essentially acting as a built-in cooling reservoir beneath the root zone.
Hydrogels (sold as “water-retaining crystals” or “soil polymers”) absorb 200 to 400 times their weight in water and release it slowly as the surrounding soil dries out.
Mix them into the bottom half of your pot at planting time — follow package dosing carefully, as too many crystals can cause waterlogged conditions. Their slow moisture release also buffers temperature swings by keeping the lower root zone consistently cooler and more moist.
Self-watering sub-irrigation planters take this further. The water reservoir in the base supplies moisture from below through capillary action, keeping the lower root zone consistently cool and damp without any overwatering risk.
For choosing the best soil mix for balcony vegetables and herbs — which pairs directly with hydrogel use — a well-draining mix is essential so the crystals control moisture without creating anaerobic conditions.
Pro Tip: Pre-soak hydrogel crystals in water before mixing them into soil — adding dry crystals to a filled pot causes them to expand unpredictably and can crack lightweight containers.
Container Soil Cooling: Quick Comparison
| Method | Estimated Temp Reduction | Cost | Best For |
|---|---|---|---|
| Double-potting (cachepot) | 15–20°F | $0–$15 | Any pot, renters and owners |
| White/reflective pot | 10–20°F | $5–$25 | New container purchases |
| Bubble wrap liner | 8–15°F | $0–$5 | Thin metal or plastic pots |
| Straw/wood chip mulch | 10–20°F (surface) | $3–$8 | Any container, immediate fix |
| Living mulch underplanting | 5–12°F (surface) | $2–$5 seeds | Large containers, decorative |
| Hydrogel crystals | 5–10°F (root zone) | $8–$15 | All containers, at planting time |
Common Problems and Solutions
Stacking multiple cooling methods is smart — but it creates a few predictable secondary problems. Here’s how to spot them early and fix them fast.
Fungal Issues Under Heavy Mulch
Quick Answer: Thick mulch in warm, humid conditions can invite fungal gnats and surface mold. Keep mulch pulled back at least one inch from the plant stem to maintain airflow at the base, and let the top of the mulch layer dry between waterings.
Fungal gnats lay eggs in moist organic mulch. Their larvae feed on surface roots, which is counterproductive when you’re trying to protect your root zone.
If you spot tiny flies hovering around the soil surface, let the mulch dry out completely before watering again. A top dressing of fine horticultural grit over the mulch layer also discourages egg-laying.
White surface mold on mulch is usually harmless saprophytic fungi breaking down organic matter. It looks alarming but won’t harm your plants. Improve airflow around the pot and it resolves on its own within a week.
Pots Retaining Too Much Heat Overnight
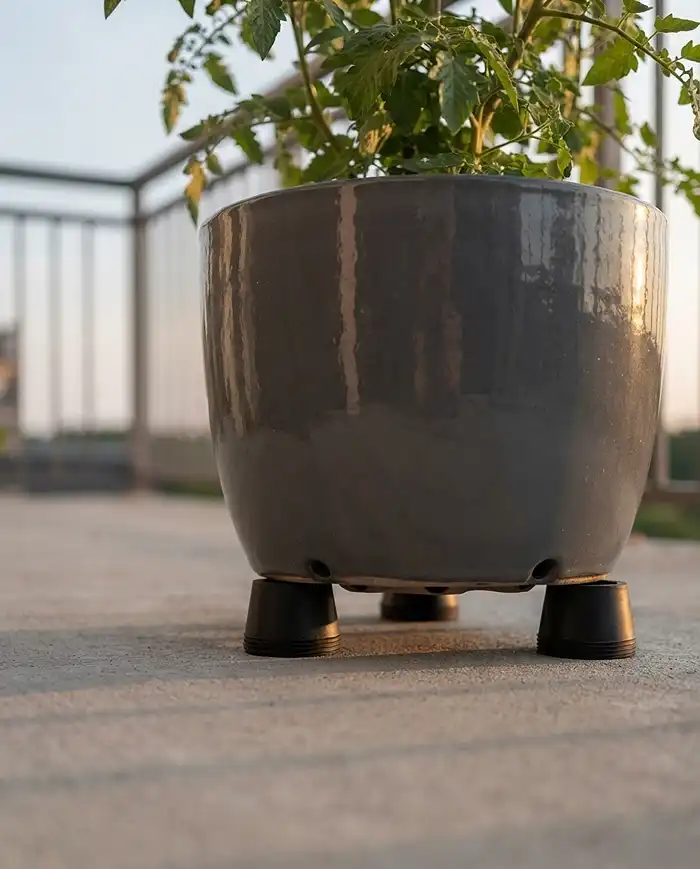
Quick Answer: Heavy concrete, dark ceramic, and thick terracotta pots absorb heat all day and radiate it slowly overnight — roasting roots for hours after the sun goes down. Elevate these pots on rubber pot feet to allow cool night air to circulate underneath the drainage holes.
This is a problem I didn’t catch for two summers. My large glazed ceramic pot stayed warm to the touch until well past midnight in peak summer.
Pot feet create a one-inch gap between the base of the pot and the balcony surface. Night air circulates underneath, cooling the drainage holes and drawing heat down and out of the soil from below.
Rubber pot feet (sold at any garden center for under $5 for a set of four) are stable and protect balcony surfaces. Stack two if you want more airflow underneath.
how to keep container soil cool FAQs
Does wrapping pots in aluminum foil help keep roots cool?
Aluminum foil does reflect UV rays and can lower pot surface temperature slightly. However, it creates significant glare on a balcony, which is uncomfortable for anyone sitting nearby. A white cachepot achieves the same or better cooling effect without the glare, and looks far better too.
What is the maximum safe soil temperature for vegetables?
Most container vegetable roots — including tomatoes and peppers — begin suffering serious heat stress when soil temperatures exceed 85°F to 90°F (29°C to 32°C). At that point, blossom drop begins and nutrient uptake halts until the soil cools back down to a safe range.
Can I use ice cubes to water and cool down potted plants?
No. Dumping ice cubes directly onto hot roots causes thermal shock — the sudden temperature drop ruptures root cell membranes and causes far more damage than the heat itself. If you need to cool the soil quickly, use room-temperature water and shade the pot instead.
What is the best soil for containers in hot weather?
A mix that drains fast but retains enough moisture for evaporative cooling works best. Look for a quality potting mix with perlite for drainage, plus added compost for water retention. Avoid heavy, dense mixes that compact and transfer heat readily. Our DIY potting mix guide covers this in detail.
How often should I check my balcony pot temperatures in summer?
Check daily during heat waves using a digital thermometer probed three inches deep near the pot wall. Take readings between 2 p.m. and 4 p.m. when temperatures peak. Once you know a pot stays below 85°F with your cooling setup in place, weekly checks are sufficient.
Key Takeaways
- Knowing how to keep container soil cool starts with measurement — use a digital thermometer three inches deep at 2 p.m. to confirm heat stress before treating it.
- The double-potting (cachepot) method with a damp sphagnum moss gap is the most effective single hack, dropping root zone temps by 15°F to 20°F.
- Surface mulch is non-negotiable — two inches of pale straw or cedar chips blocks direct solar radiation on the soil top and slashes evaporation rates.
- Water deeply before 8 a.m. so evaporation does its cooling work during the afternoon heat peak. Never use ice-cold water on hot roots — thermal shock causes worse damage than the heat itself.
- Choose your potting mix wisely — a fast-draining, perlite-rich mix allows you to water freely without waterlogging, supporting the evaporative cooling strategy. For a full breakdown of mix options, the best soil for containers guide is a solid next read.