

How to Arrange Pots on a Small Balcony Without Clutter
Knowing how to arrange pots on a small balcony is the difference between a relaxing outdoor retreat and a chaotic mess. Get it right and your small balcony garden feels twice as big — even with 20 containers.
Table of Contents
Why Pot Arrangement Makes or Breaks a Small Balcony
Most balcony gardeners buy plants first, then figure out where they go. That’s the clutter trap. A thoughtful layout makes container gardening feel intentional instead of improvised.
The goal isn’t fewer plants — it’s smarter placement. Negative space, height variation, and grouped containers all trick the eye into seeing a bigger, calmer space.
Apartment gardening done well means your balcony functions as both a garden and a living area. You can have lush greenery without sacrificing a place to stand, sit, or breathe.
This guide lays out every principle and step you need — from your first measurement to your final seasonal refresh.
Start With a Plan: Assess Your Balcony First
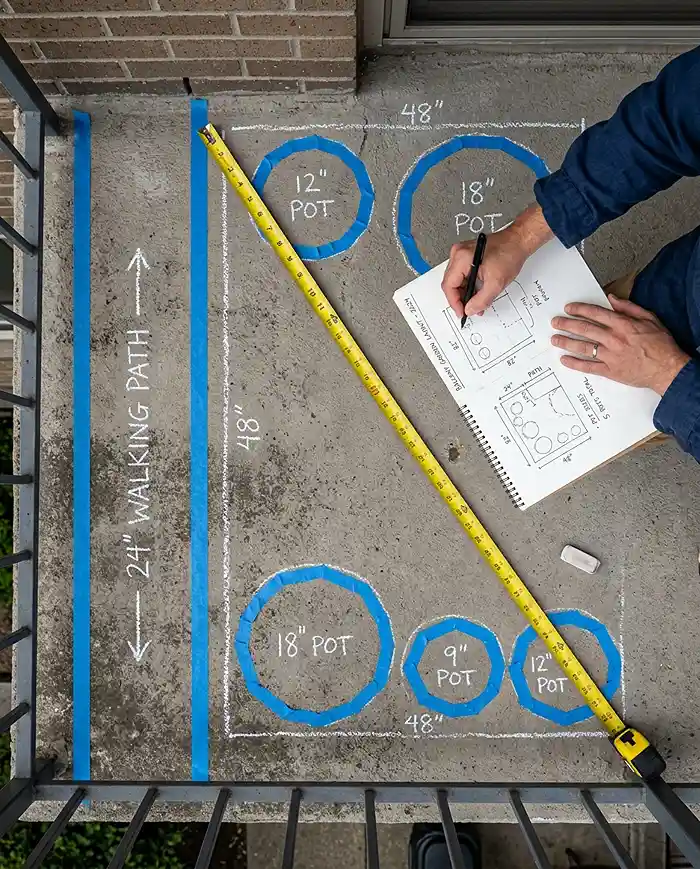
Before you move a single pot, spend 15 minutes evaluating what you’re actually working with. Skipping this step is why most small balcony gardens end up looking cramped.
You need to know your square footage, your weight limits, and where the sun hits. These three things will shape every decision you make about balcony garden ideas.
Most apartment balconies handle 40–60 lbs per square foot. Check with your building if you’re unsure — wet soil and terracotta pots add up fast.
Measuring Space and Mapping Walking Paths
Quick Answer: Measure your balcony’s full dimensions, then subtract a 24-inch-wide walking path. What’s left is your usable planting zone.
- Sketch a rough top-down map on paper — it takes 5 minutes and saves hours of rearranging
- Mark door swings and railing lines clearly
- Reserve at least 24 inches of clear walkway from door to railing
- Keep 6 inches of clearance around furniture legs
Real Example: My balcony is 6 x 10 feet. Once I sketched it out, I realized my door swing alone ate 8 square feet. Moving two large pots freed the whole entry — and the space felt immediately less cluttered.
Pro Tip: Use painter’s tape on the floor to mock up pot footprints before you commit to a layout.
Noting Sun, Shade, and Wind Zones
Quick Answer: Walk your balcony at 8 AM, noon, and 4 PM and mark where full sun, partial shade, and deep shade fall. Place sun-lovers where light is strongest.
- South-facing balconies (USDA zones 5–9): 6+ hours of direct sun — ideal for tomatoes, peppers, herbs
- North-facing: mostly shade — ferns, impatiens, and lettuce thrive here
- East/West-facing: morning or afternoon sun only — good for most herbs and flowers
- Wind tunnels form between buildings — anchor heavy pots in those spots
Pro Tip: A $10 compass app on your phone tells you your balcony’s orientation in seconds.
The Core Principles of Clutter-Free Pot Arrangement
There are four design rules that separate a polished small balcony garden from a chaotic one: grouping, height variation, breathing room, and restraint.
Grouping means clustering pots together instead of scattering them. Isolated pots dotted around a balcony always look messier than a tight, intentional cluster.
Breathing room means leaving deliberate empty space. That bare patch of floor isn’t wasted — it’s what makes the planted areas look intentional in your container gardening layout.
Restraint means editing ruthlessly. If a pot doesn’t earn its spot visually or functionally, it doesn’t belong on a small balcony.
Grouping in Odd Numbers and Varying Heights
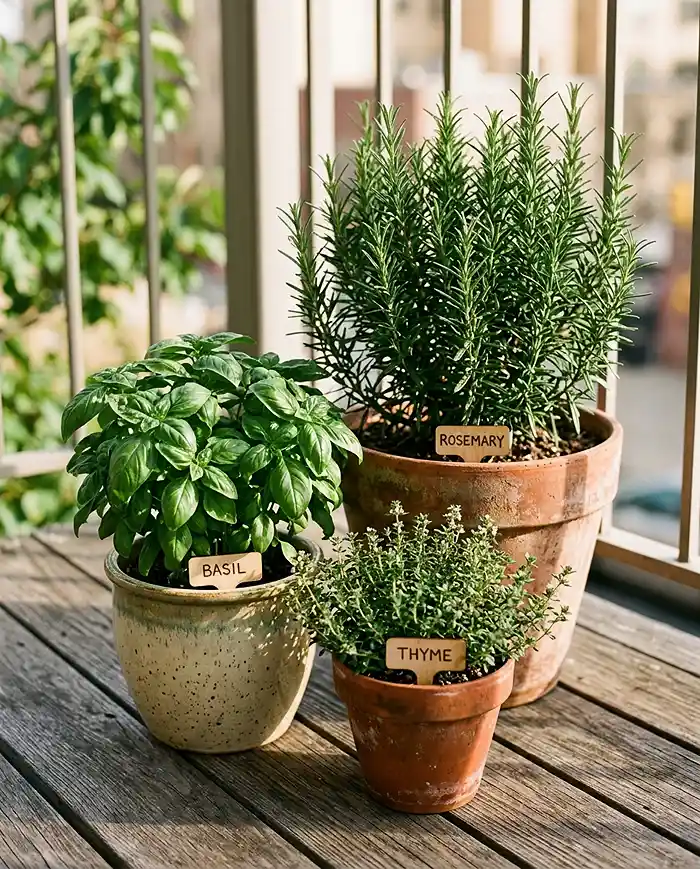
Quick Answer: Arrange pots in groups of three or five — odd numbers look natural. Vary the heights within each group by at least 6–8 inches for visual rhythm.
- Tall back: 18–24 inch plant or pot (ornamental grass, dwarf shrub)
- Mid-height center: 10–14 inches (herbs, compact flowers)
- Low front: 4–6 inches (succulents, trailing plants)
Real Example: I grouped a 20-inch rosemary, a 12-inch basil, and a low thyme in one tight triangle. It looked like a purposeful herb garden instead of three random pots.
Pro Tip: Stagger pots diagonally, not in a straight line — diagonal groupings look more natural and take up less visual space.
Sticking to a Consistent Pot Color or Material
Quick Answer: Choose one pot material or color family and stick to it. Mixed terracotta, plastic, and glazed pots fighting for attention is the number one cause of visual clutter.
| Material | Best For | Watch Out For |
|---|---|---|
| Terracotta | Mediterranean look, herbs, succulents | Heavy, cracks in frost |
| Lightweight plastic | Weight-limited balconies, large pots | Cheap look unless painted |
| Galvanized metal | Modern/industrial aesthetic | Heats up in direct sun |
| Woven/rattan-look | Boho and natural styles | Degrades faster outdoors |
Pro Tip: If you already have mismatched pots, spray-paint them the same color — matte black or white works on almost any style balcony.
Go Vertical to Free Up Floor Space
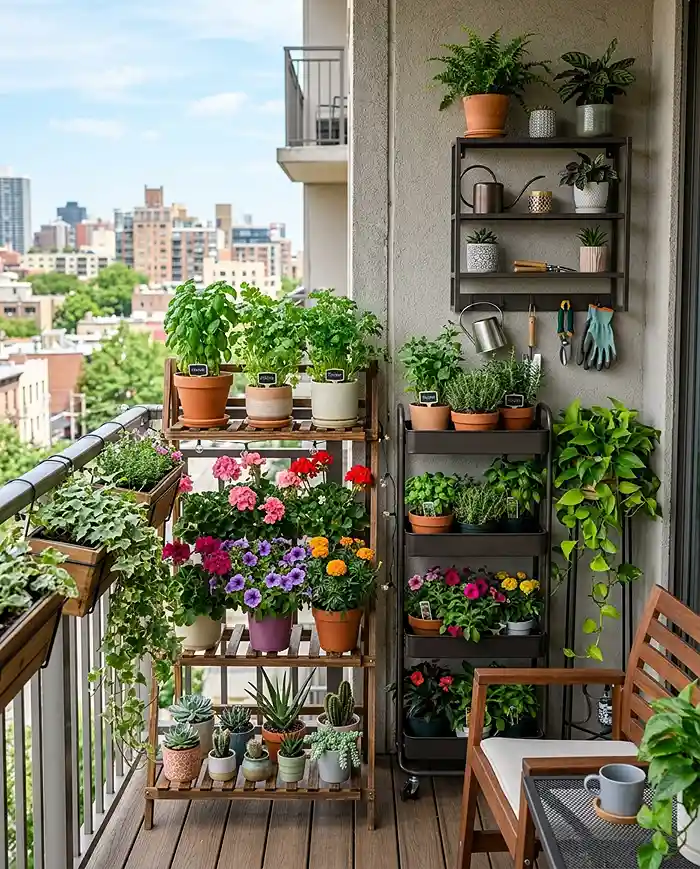
Going vertical is the single most effective move in small balcony garden design. Every pot you lift off the floor opens up precious square footage below.
Vertical container gardening doesn’t mean sacrificing plant health — most herbs, succulents, and trailing flowers actually prefer the better airflow of elevated positions.
For apartment gardening specifically, vertical options also let you add greenery without triggering weight concerns on the floor slab.
Check out these balcony garden ideas for apartments for more vertical inspiration.
Railing Planters and Wall-Mounted Pots
Quick Answer: Railing planters clamp onto most standard railings and hold pots without drilling. Wall-mounted brackets need anchor bolts — confirm with your landlord first.
- Use railing planters rated for your railing width (most fit 1.5–2 inch rails)
- Balance weight evenly — alternate sides of the railing if possible
- Wall brackets: use concrete anchors, not drywall plugs, for anything over 5 lbs
- Trailing plants (ivy, sweet potato vine, lobelia) look best in railing planters
Real Example: I added four railing planters with trailing petunias on my 8-foot railing. It added a full “privacy screen” of greenery and freed up four floor spots for larger containers.
Pro Tip: Self-watering railing planters save you from the drip problem — excess water stays in the reservoir instead of hitting your neighbor’s balcony below.
Tiered Stands, Shelves, and Hanging Baskets
Quick Answer: A 3-tier plant stand can hold 9 pots in the footprint of one. Hanging baskets add overhead greenery without using any floor or railing space at all.
- Tiered stands: look for powder-coated steel rated for 20+ lbs per shelf
- Corner shelves: maximize dead corner space — fit 4–6 small pots in an unused spot
- Hanging baskets: attach to ceiling hooks rated for 30 lbs minimum
- Keep hanging baskets at least 6 feet high to avoid head clearance issues
Pro Tip: A tall ladder-style plant shelf against one wall creates a dramatic “living wall” effect without any drilling or permanent fixtures.
Zone Your Balcony for Plants and Living Space
Dividing your balcony into clear zones prevents the most common balcony garden mistake: plants creeping into every corner until there’s nowhere left to sit.
A simple two-zone approach works on almost any size balcony: one zone for plants, one zone for living. Even a 4 x 8-foot balcony can have both.
| Zone | Location | What Goes Here |
|---|---|---|
| Plant zone | Perimeter and corners | All pots, stands, hanging baskets |
| Living zone | Center or one end | Chair, small table, clear floor |
| Transition strip | Between zones | Low trailing plants, pot feet only |
Plants around the perimeter create a natural “frame” that actually makes the central area feel more spacious — not more crowded.
Browse these small balcony garden ideas for zone layouts that work in tight spaces.
Tools and Materials You’ll Need
You don’t need much to execute a clean container gardening setup. Here’s the short list:
- Tiered plant stand — powder-coated steel, 3-tier minimum
- Railing planters — adjustable clamp-style, self-watering preferred
- Pot feet or risers — 3 per pot for drainage and airflow
- Drip saucers — one per floor pot to protect the surface
- S-hooks and ceiling hooks — rated 30 lbs for hanging baskets
- Measuring tape and chalk — for layout mapping
- Lightweight potting mix — reduces overall load significantly
Using the best soil mix for container vegetables also helps reduce watering frequency, which means fewer trips and less mess.
Step-by-Step: Arranging Your Pots Without Clutter
Now you’re ready to place everything. Follow this sequence and you won’t need to rearrange twice.
- Clear everything off the balcony first — start with a blank slate
- Mark your walking path with tape on the floor
- Place anchor pots in corners — your largest, heaviest containers go here
- Build height layers — tall in back, medium in middle, low in front
- Install vertical elements — railing planters and stands next
- Fill in gaps with small pots — group in threes, not rows
- Step back and edit — remove anything that clutters the walkway or looks isolated
The whole process takes about an hour. Taking photos at each stage helps you compare before and after.
Anchoring Corners and Working Inward
Quick Answer: Start with your two or three largest pots placed in corners. These “anchor” the layout and everything else builds around them naturally.
- Use pots 14 inches or larger as anchors — they create visual weight that grounds the design
- Place anchors first, then work toward the center and door
- Leave 3–4 inches between pots for airflow and easy watering
- Smaller pots should never be larger than 60% of their neighbor’s size
Pro Tip: Put your most drought-tolerant plants farthest from the door — you’re less likely to water them consistently, so make sure they can handle it.
Smart Storage and Space-Saving Hacks
A tidy balcony isn’t just about plant placement — it’s also about where the non-plant stuff lives.
- Nest empty pots inside each other and store under a bench or chair
- Foldable plant stands collapse flat for off-season storage
- Bench with storage underneath hides tools, soil bags, and saucers
- Magnetic tool strips on walls hold trowels and scissors without a hook rack
- Stackable plastic bins hold bulk soil under a side table
Dual-purpose furniture is your best friend on a small balcony. A storage ottoman holds cushions in winter, acts as a seat in spring, and disappears when you need to rearrange.
For smaller containers with big yields, 5-gallon bucket garden ideas are worth exploring — buckets stack when empty and grow a surprising amount.
Seasonal Rearranging and Upkeep
The best small balcony gardens get refreshed at least twice a year — once in spring, once in fall. Seasonal rearranging keeps the space functional and visually fresh.
Spring: Move sun-lovers to center stage, swap out dead winter pots, and add height with new tiered plantings.
Summer: Shift pots slightly to avoid scorched leaves on south-facing balconies. Increase watering frequency — learn the right approach with this guide to watering container plants in hot weather.
Fall: Consolidate pots, move tender plants inside, and strip the layout down to cold-hardy plants only.
Winter: Empty and nest pots, store stands, and use the balcony as a staging zone for seed-starting supplies.
- Deadhead [remove spent flowers] weekly to keep displays looking intentional
- Wipe down pot surfaces monthly — dirty pots make any arrangement look cluttered
- Rotate pots 90 degrees every two weeks for even growth
Common Problems and Solutions
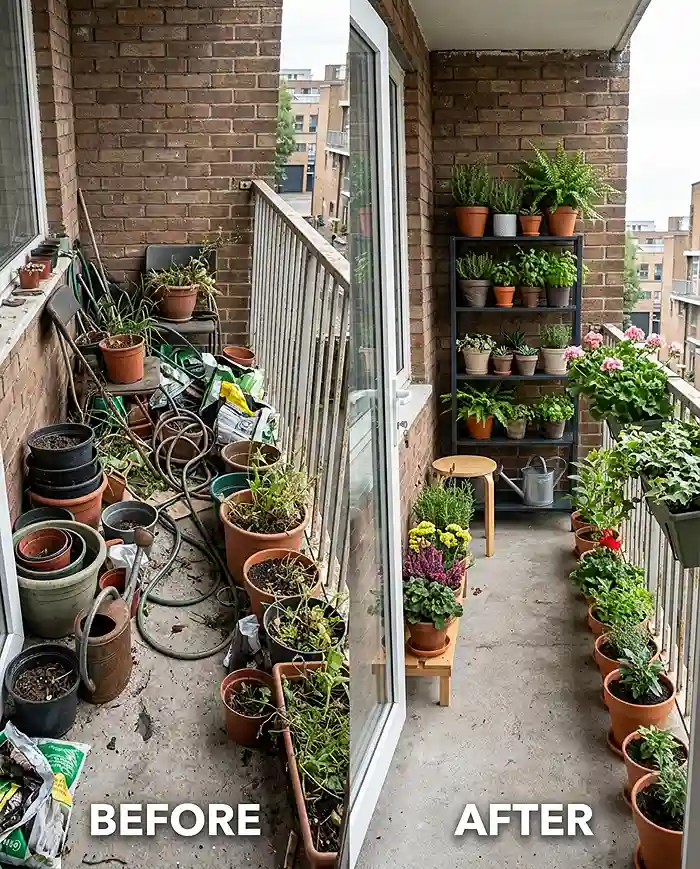
Balcony Feels Overcrowded Despite Few Plants
Quick Answer: Too many different pot styles and sizes, not too many plants, is usually the cause. Unify the containers and add breathing room.
- Swap mismatched pots for a unified material or color
- Remove 20% of your pots and reassess — you’ll likely be surprised
- Add one deliberate empty corner as negative space
Pro Tip: Visual clutter usually comes from the eye having nowhere to “rest” — one empty patch fixes this immediately.
Pots Blocking Walkways or Doors
Quick Answer: Shift floor pots to the perimeter and use railing or vertical options to reclaim the path. Every walkway needs a full 24 inches of clear space.
- Replace floor pots near the door with railing planters
- Use wall-mounted brackets to lift pots out of the traffic zone
- Try slimline rectangular pots against walls instead of round ones
Uneven Plant Growth Making Display Look Messy
Quick Answer: Prune, rotate, and regroup. Uneven growth is normal — a quick trim and a 90-degree rotation usually fixes the look fast.
- Pinch back leggy stems on herbs and annuals every 2 weeks
- Rotate pots toward the light source for balanced growth
- Move a struggling plant to the back and promote a thriving one to the front
how to arrange pots on a small balcony FAQs
How do I arrange plant pots on a small balcony?
Start by grouping pots in odd numbers, varying heights within each group, and sticking to one pot material or color. Place large anchor pots in corners first, then work inward. Use vertical options like railing planters and tiered stands to lift pots off the floor and free up walking space.
How many pots can I fit on a small balcony?
Base your pot count on floor space and your building’s weight limit — typically 40–60 lbs per square foot. A 6 x 10 foot balcony can comfortably hold 10–15 pots when you use vertical space. Always leave a clear 24-inch walkway and room to move around without knocking anything over.
How do I make my balcony look bigger with plants?
Use vertical greenery to draw the eye upward, stick to one pot color or material to reduce visual noise, and leave at least one deliberate empty corner as negative space. Trailing plants on railings add greenery without taking up floor space, which makes the whole area feel more open.
Where should I put pots on a windy balcony?
Place heavy pots along the windward wall or railing where they anchor naturally. Group pots together — a cluster is more wind-resistant than isolated pots. Avoid hanging baskets on the windiest side, and use low, wide pots instead of tall, narrow ones in exposed spots.
Key Takeaways
- Knowing how to arrange pots on a small balcony starts with measuring your space and marking a clear 24-inch walkway before placing a single pot
- Group containers in odd numbers with varied heights — this is the fastest way to make a small balcony garden look intentional rather than cluttered
- Go vertical with railing planters, tiered stands, and hanging baskets to multiply your planting space without adding floor congestion
- Stick to one pot material or color family to reduce visual noise — mismatched containers cause more clutter than extra plants
- Refresh your container gardening layout seasonally and edit ruthlessly — removing 20% of your pots often makes the whole balcony feel bigger and better