

5 Gallon Bucket Garden Ideas
A 5 gallon bucket garden doesn’t have to look like an afterthought. With the right plant picks, a little paint, and some smart layout tricks, container vegetable gardening in plain plastic buckets can look every bit as intentional as a raised bed setup.
Whether you’re gardening on a balcony, driveway, or patio, these ideas will help your small space food garden go from “functional” to genuinely attractive — without spending a lot of money.
Table of Contents
What Makes a 5 Gallon Bucket Garden Look Good?
The difference between a bucket garden that looks great and one that looks cluttered comes down to four things: consistency, plant choice, placement, and finishing touches.
Repeating the same bucket color ties everything together visually. Choosing plants with contrasting heights and textures adds interest. Grouping containers in odd numbers — threes and fives — creates a more designed, less random feel.
Hiding the plain plastic exterior makes the biggest impact. Paint, rope wraps, or wooden slat covers transform a $5 bucket into something that looks like it belongs on a designer patio.
- Use consistent bucket colors or finishes across your space
- Mix tall uprights (tomatoes, peppers) with trailing plants (nasturtiums, herbs)
- Add matching saucers to ground the look and protect surfaces
- Mulch the top of each bucket to hide bare soil and reduce watering frequency
Pro Tip: Matte spray paint in terracotta, slate, or forest green reads as “planter” instead of “bucket” instantly — and it costs under $5 per can.
Planning Your 5 Gallon Bucket Garden Layout
Before you plant a single seed, think through your space. Good layout planning prevents the most common bucket garden mistake: a random scatter of containers that feels chaotic instead of intentional.
Start by mapping out your sunlight. Most vegetables in pots need 6–8 hours of direct sun. Herbs tolerate partial shade. Walk your space at noon and note where the sun actually falls — it’s often different from what you’d expect.
Then think about traffic flow. Leave at least 18 inches between bucket groupings so you can move around without knocking plants over. Group buckets near a water source so daily watering doesn’t turn into a workout.
Match Plants to Sun, Space, and Purpose
Quick Answer: Match your plant choice to your actual conditions first, then your goals. Full sun (6+ hours) opens up nearly every vegetable option. Partial shade limits you to leafy greens, herbs, and some flowers.
| Goal | Best Plants | Sun Needed |
|---|---|---|
| Food production | Tomatoes, peppers, cucumbers, basil | Full sun (6–8 hrs) |
| Beauty + pollinators | Zinnias, marigolds, trailing lobelia | Full sun (6+ hrs) |
| Shade spots | Lettuce, spinach, mint, parsley | Partial shade (3–4 hrs) |
| Privacy screen | Tall tomatoes, sunflowers, climbing beans | Full sun (6+ hrs) |
Real Example: On my east-facing balcony, I get about 5 hours of morning sun. I keep tomatoes on the sunniest corner and fill the shadier end with basil, parsley, and a bucket of lettuce. The mixed textures look great together and I get a harvest from both zones.
Pro Tip: Don’t fight your conditions. One thriving bucket of lettuce in the shade looks better than three struggling tomato plants that never fruit.
Use Color, Height, and Repetition for a Designed Look
Quick Answer: Repeat the same bucket color at least three times across your layout. Combine one tall plant, one medium bush, and one trailing plant per grouping for visual depth.
- Group buckets in threes or fives — odd numbers look more intentional than even pairs
- Vary heights within a grouping: tall tomato in back, bushy pepper in middle, trailing nasturtium in front
- Use one accent color plant (bright marigold, purple basil) per grouping as a focal point
- Line up buckets along a fence or wall in matching colors for a clean, orderly look
Real Example: I painted six buckets in matte charcoal gray and arranged them in two groups of three on my porch. Even before the plants filled in, the consistent finish made the whole setup look planned.
Pro Tip: Add a thin layer of matching wood chip mulch to the top of every bucket — it visually unifies the whole garden even when plants are at different growth stages.
Materials and Tools You’ll Need
You don’t need much to get a good-looking bucket garden going. Here’s everything worth having before you start.
| Item | Purpose | Budget Option |
|---|---|---|
| Food-safe 5 gallon buckets | Main container | Restaurant supply stores, bakeries |
| Power drill + 1/2″ bit | Drainage holes | Borrow or buy a basic drill |
| Premium potting mix | Root health | Avoid cheapest bags — they compact |
| Compost | Nutrients + structure | DIY or bagged |
| Slow-release fertilizer | Season-long feeding | Osmocote or similar |
| Matte spray paint | Visual upgrade | Any hardware store |
| Saucers or trays | Protect surfaces, collect water | Plastic pot saucers |
| Bamboo stakes or tomato cages | Support tall plants | Dollar store bamboo |
You’ll also want a watering can with a long spout, or a hose with a gentle wand attachment. Buckets need deep watering, not just a quick sprinkle on top.
Choosing Safe Buckets, Soil, and Drainage Materials
Quick Answer: For vegetables in pots, use food-grade buckets marked with HDPE (resin code #2). Avoid buckets that held chemicals, paint, or non-food materials. Fill with premium potting mix — never garden soil.
- Look for buckets marked with the recycling symbol #2 (HDPE) for food safety
- Free buckets from bakeries or restaurants are often food-grade — just ask
- Garden soil compacts in containers and smothers roots — always use potting mix
- Skip the gravel drainage layer myth — it actually raises the water table inside the bucket and causes root rot
- Mix in 20–25% compost by volume to improve moisture retention and nutrition
Pro Tip: A bag of quality potting mix costs $8–12 and fills about two 5 gallon buckets. Splitting the cost with a neighbor makes it even easier to start.
How to Turn a 5 Gallon Bucket Into a Finished-Looking Planter
The process is simple. The key is doing each step right — drainage first, soil second, plant third, mulch last. Skipping any step shows in the final result.
Clean new or used buckets with a 10% bleach solution (1 part bleach, 9 parts water). Rinse thoroughly and let dry completely before planting. This prevents fungal issues from the start.
- Step 1: Drill drainage holes in the bottom
- Step 2: Paint or wrap the exterior
- Step 3: Fill with amended potting mix to 2 inches below the rim
- Step 4: Plant, firm soil around roots, water deeply
- Step 5: Add a 1-inch mulch layer on top
- Step 6: Place in final position, add saucer underneath
Drill Drainage Holes and Build the Right Soil Base
Quick Answer: Drill 5–7 holes in the bottom of each bucket using a 1/2-inch bit. Space them evenly across the base. Without drainage, roots rot within weeks regardless of how good your soil is.
- Drill 5 holes in a circle near the outer edge and 1–2 in the center
- For heavy feeders like tomatoes and peppers, mix 1 part compost to 3 parts potting mix
- Add 1 tablespoon of slow-release fertilizer per bucket at planting time
- Avoid adding rocks, gravel, or sand to the bottom — it does more harm than good
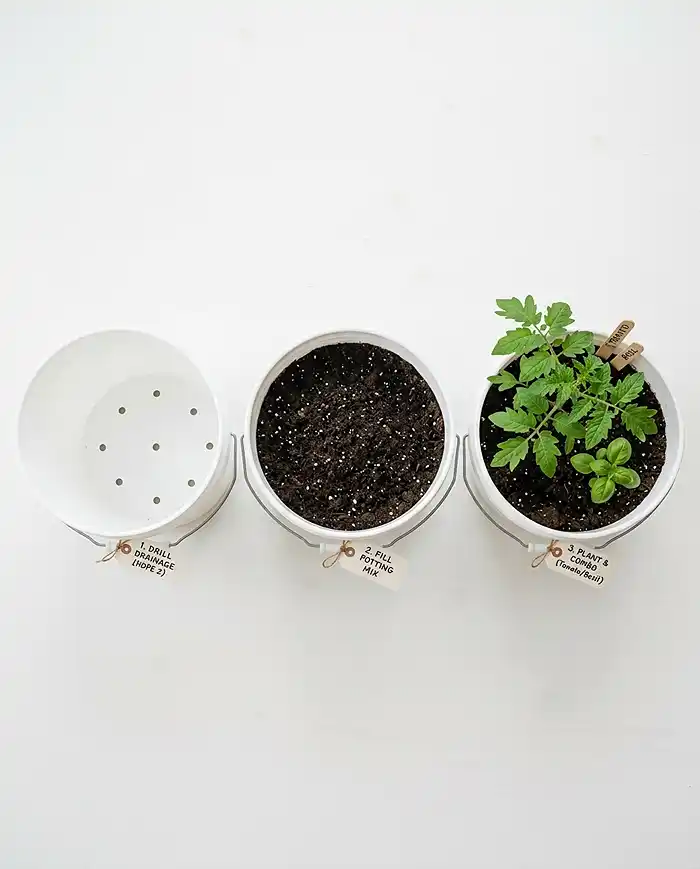
Real Example: The first season I tried bucket tomatoes, I skipped proper drainage in two buckets. Both plants yellowed and died by July. The four properly drained buckets produced all the way into October.
Pro Tip: Set filled buckets on pot feet or small wood blocks to allow air circulation under the drainage holes — it keeps water moving freely and extends bucket life.
Upgrade or Hide the Plastic Bucket Exterior
Quick Answer: The fastest upgrade is matte spray paint in a neutral or earthy color. For a more finished look, wrap buckets in burlap, rope, or wood slats. Any of these options costs under $15 per bucket.
- Spray paint: Use outdoor-rated matte paint. Terracotta, slate gray, olive, and charcoal all read as “intentional planter”
- Burlap wrap: Cut burlap to height, hot-glue around the bucket, fold and tuck the top edge inside
- Jute rope: Wrap tightly from base to rim using hot glue to secure every few rows
- Wood slat cover: Cut thin cedar strips, clamp or screw to a simple band around the bucket exterior
- Decorative outer pot: Drop painted bucket inside a larger ceramic or wicker planter
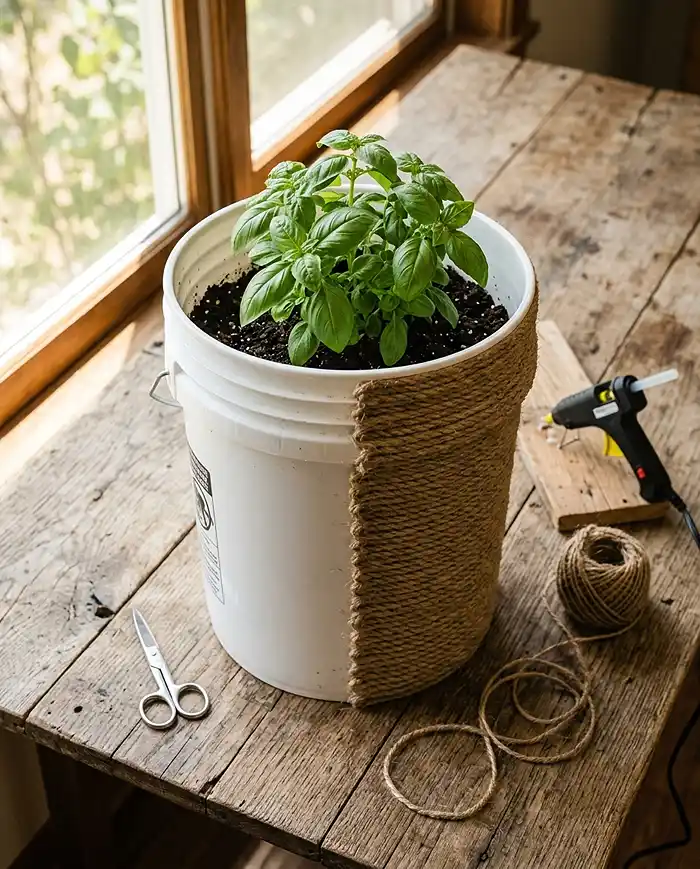
Pro Tip: Don’t wrap the bucket bottom — you need airflow and drainage access. Stop any exterior treatment 1 inch above the base.
5 Gallon Bucket Garden Ideas That Actually Look Good
These aren’t just functional setups — they’re garden designs that hold up visually. The best bucket gardens borrow design principles from traditional container gardening: repetition, variety in texture and height, and a clear focal point.
If you’re just starting out, check out this beginner’s guide to container gardening before diving in.
Edible Bucket Garden Ideas
Quick Answer: The best-looking edible bucket gardens combine productive plants with attractive foliage and flowers. Think tomato-basil pairs, pepper trios, and herb collections that smell as good as they look.
- Tomato + basil bucket: One determinate tomato (try ‘Patio’ or ‘Bush Early Girl’) with 2–3 basil plants around the base
- Pepper trio: Three buckets of sweet peppers in red, yellow, and orange for a colorful grouping
- Herb collection: Rosemary, thyme, and oregano in matched gray buckets — drought tolerant and beautiful
- Salad green bucket: Mix leaf lettuce, arugula, and a few nasturtiums — productive and pretty
- Strawberry tower: Stack two buckets (drill holes in sides of the top bucket) for a vertical strawberry planter
Pro Tip: Purple basil (‘Genovese Purple’) alongside a red tomato looks stunning and the contrast adds real visual punch to any vegetable garden in pots.
Ornamental Bucket Garden Ideas
Quick Answer: For pure beauty, combine one upright focal plant with 1–2 trailing companions in each bucket. Think thriller-filler-spiller, just in a 5 gallon container.
- Dwarf ornamental grass + trailing sweet potato vine + marigold border
- Compact lavender in a terracotta-painted bucket — drought tolerant and pollinator-friendly
- Annual zinnias for season-long color in USDA zones 3–10
- Dwarf fountain grass + calibrachoa (million bells) spilling over the rim
- Snapdragons for cool-season color in spring and fall
Pro Tip: Deadheading [removing spent flowers] weekly keeps ornamental buckets looking full and encourages more blooms all season.
Space-Saving and Vertical Bucket Garden Ideas
Quick Answer: For tight spaces like balconies or narrow patios, go vertical. Tiered plant stands, fence-line rows, and stacked systems all multiply growing space without spreading out.
- Tiered plant stand: A 3-tier metal stand holds 6–9 buckets in a fraction of the floor space
- Fence-line row: Line matching buckets along a fence or wall — creates a privacy screen effect
- Bucket tower: Stack three 5 gallon buckets on a central pole with holes cut in the sides for strawberries or herbs
- Staircase arrangement: Place buckets on stair steps of different heights using overturned crates
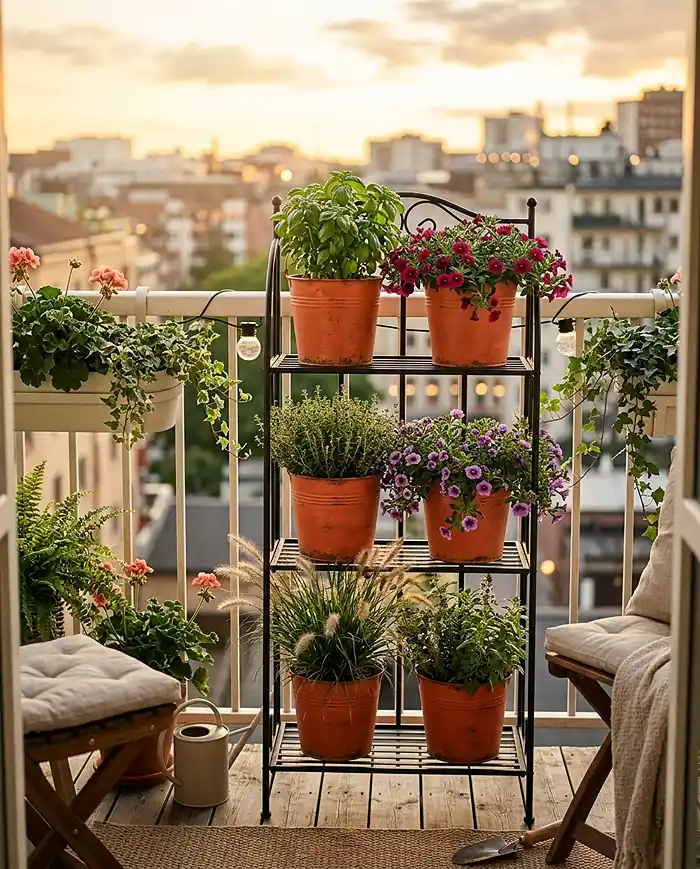
If you’re working with a small outdoor space, these balcony garden ideas pair perfectly with a bucket setup. And for maximizing vertical space on a fence or railing, renter-friendly vertical garden ideas cover exactly that.
Pro Tip: On windy balconies, heavier soil and lower-profile plants prevent tipping. Add a brick or two inside the bucket if your location is especially gusty.
Planting and Care Basics for Healthy Bucket Gardens
Container vegetable gardening requires more attention than in-ground gardening — mostly because buckets dry out faster and have a finite nutrient supply. But the routine is simple once it’s a habit.
Plant at the same depth as the nursery pot unless the plant benefits from deeper planting (tomatoes do — bury up to 2/3 of the stem and it grows extra roots). Water immediately after planting and check daily once plants are established.
Watering, Feeding, and Mulching Tips
Quick Answer: Check soil moisture daily by sticking your finger 2 inches into the mix. Water deeply until it drains from the bottom. Feed heavy feeders like tomatoes every 2 weeks once flowering starts.
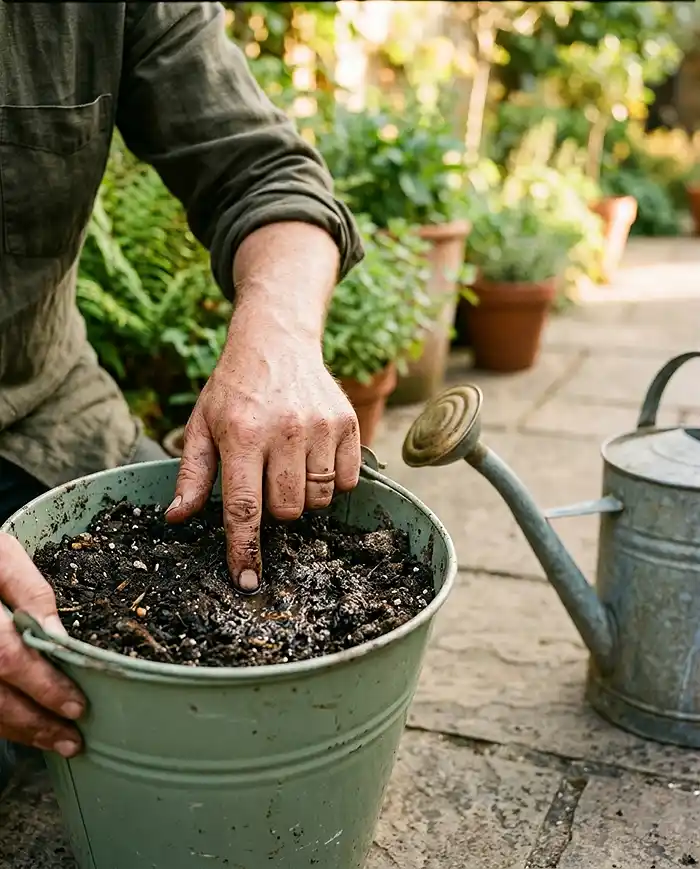
- Water when the top 2 inches of soil feel dry — not on a schedule, based on actual conditions
- Water deeply until you see steady drips from the drainage holes, then stop
- Feed fruiting crops (tomatoes, peppers, cucumbers) with a balanced liquid fertilizer every 14 days
- Feed herbs lightly — once a month is enough; overfed herbs lose their flavor
- Mulch the top of each bucket with 1 inch of wood chips or straw to cut watering frequency by up to 30%
The Royal Horticultural Society’s guide to watering vegetables has solid guidance on reading plant stress signs before they become serious problems.
Pro Tip: Nutrient leaching is real in containers — every time you water, some fertilizer washes out. Slow-release granules at planting plus liquid feeding every two weeks covers both the long-term and immediate needs of hungry plants.
Seasonal Timing and Regional Adjustments
Quick Answer: Start warm-season crops (tomatoes, peppers) after your last frost date. Start cool-season crops (lettuce, spinach, kale) 4–6 weeks before last frost or in late summer for fall harvest.
- Short growing seasons (zones 3–5): Choose short-season varieties like ‘Early Girl’ tomato (52 days) or ‘Carmen’ pepper (60 days)
- Hot climates (zones 9–11): Afternoon shade is your best tool — move buckets to a partially shaded spot during peak heat
- Rainy regions: Elevate buckets to prevent waterlogging; consider moving them under eaves during heavy rain
- Windy balconies: Use lower-profile plants, add weight to buckets, and stake anything tall with bamboo
- Frost protection: Bucket portability is a huge advantage — move them indoors or under cover before frost hits
Pro Tip: Buckets warm up faster than raised beds in spring, so you can often plant 1–2 weeks earlier than your in-ground garden. That’s a real advantage in short-season climates.
Common Mistakes to Avoid
Most bucket garden failures come from a handful of the same mistakes. Spot them early and you’ll save a whole season of frustration.
- Using garden soil: It compacts hard in containers and suffocates roots within weeks
- Skipping drainage holes: Even one missed hole can cause root rot in heavy rain
- Overcrowding: Two tomato plants in one bucket means both will underperform — one plant per 5 gallon bucket for fruiting crops
- Random container mix: Mismatched buckets, colors, and heights make the garden look cluttered rather than curated
- Shade plants in full sun: Lettuce and spinach bolt [go to seed prematurely] fast in hot, direct sun — check your variety’s requirements
- No support for tall crops: Unstaked tomatoes fall over, break stems, and look messy — add a cage or stake at planting time
If you’re growing herbs in your bucket setup, this guide to balcony-tough herbs covers which varieties genuinely thrive in containers versus which ones just survive.
Common Problems and Solutions
Most bucket garden problems trace back to watering, drainage, plant spacing, soil quality, or placement. Here’s how to identify and fix the most common ones fast.
Buckets Dry Out Too Fast
Quick Answer: If your bucket dries out within 24 hours, the fix is usually mulch, grouping, or a more moisture-retentive soil mix.
- Add 1 inch of mulch to the top of each bucket to slow evaporation significantly
- Group buckets tightly together — they create a microclimate that reduces moisture loss
- Move buckets to afternoon shade during peak summer heat
- Mix water-retaining crystals (like Soil Moist) into the potting mix at planting
- Consider a self-watering insert or reservoir saucer for the driest spots
Plants Look Leggy or Sparse
Quick Answer: Leggy growth almost always means insufficient light. Move the bucket to a sunnier spot before trying any other fix.
- Move the bucket to at least 6 hours of direct sun for fruiting crops
- Pinch herbs back by 1/3 to encourage bushy growth rather than leggy stems
- Deadhead flowers weekly to trigger new bloom production
- Avoid excess nitrogen fertilizer — it pushes leafy growth at the expense of flowers and fruit
Yellow Leaves or Poor Growth
Quick Answer: Yellow leaves on bucket plants usually mean overwatering, underwatering, or nitrogen deficiency. Check soil moisture first before adding fertilizer.
- Soggy soil + yellowing = overwatering — let dry out completely between waterings
- Bone-dry soil + curling leaves = underwatering — water deeply and immediately
- Pale yellowing on older leaves = nitrogen deficiency — feed with balanced liquid fertilizer
- Yellow between leaf veins = iron deficiency — add chelated iron or use acidifying fertilizer
Buckets Tip Over or Look Cluttered
Quick Answer: Tipping and clutter are both layout problems. Group buckets together for stability and use consistent finishes to calm visual noise.
- Group three or more buckets together — they stabilize each other
- Add a brick or stone to the bottom of buckets that hold tall plants in windy spots
- Move buckets against a wall or fence to block wind on exposed sites
- Match bucket colors and use consistent saucers to visually organize a cluttered grouping
- Remove any bucket that doesn’t fit the layout — sometimes editing down is the best design move
gallon bucket garden Ideas FAQs
What grows best in a 5 gallon bucket garden?
Tomatoes (determinate varieties), peppers, cucumbers (with support), lettuce, kale, herbs, strawberries, and compact flowers like marigolds and zinnias all do well. Avoid large root vegetables like full-size carrots or parsnips — they need more depth than a 5 gallon bucket provides.
How many plants can you put in a 5 gallon bucket?
One tomato or pepper plant per bucket. For herbs, 3–5 small plants like basil or parsley. For lettuce, 4–6 plants depending on variety. For cucumbers, one plant with vertical support. Overcrowding reduces yield and makes plants look sparse.
Do 5 gallon bucket gardens need drainage holes?
Yes — drainage holes are essential. Without them, water pools at the bottom and causes root rot within days in wet weather. Drill 5–7 holes (1/2-inch diameter) evenly across the bottom of each bucket before filling with soil.
How do you make 5 gallon buckets look nice in the garden?
The fastest upgrades are matte spray paint in a neutral color, burlap or jute rope wraps, or sliding buckets inside larger decorative pots. Grouping buckets in odd numbers, adding matching saucers, and mulching the soil surface all make a bucket garden look intentional rather than improvised.
Key Takeaways
- A 5 gallon bucket garden can look great with consistent bucket finishes, smart plant pairings, and groupings in odd numbers
- Food-safe HDPE (#2) buckets with 5–7 drainage holes and premium potting mix are non-negotiable for healthy container vegetable gardening
- Spray paint, rope wraps, and decorative outer pots transform plain plastic into attractive planters for under $15 per bucket
- Water daily based on soil feel (not a schedule), feed fruiting crops every 2 weeks, and mulch every bucket to reduce watering needs
- For small spaces, go vertical — tiered stands, fence-line rows, and bucket towers expand your growing area without spreading out