

Common Microgreens Mistakes and How to Avoid Mold
Avoid the most common microgreens mistakes with simple fixes for mold, poor airflow, weak germination, damping off, and uneven growth.
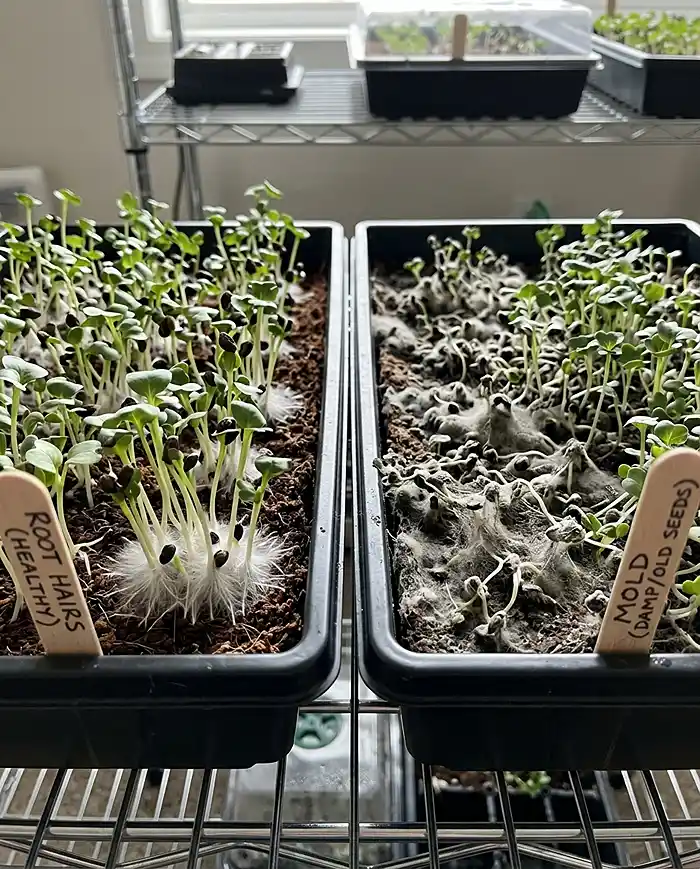
Here’s the thing though—and this is gonna save you so much unnecessary stress—most of the time, that “mold” isn’t actually mold at all. In fact, about 85% of the time, what you’re seeing is just innocent root hairs doing their job. But understanding common microgreens mistakes and how to avoid mold means knowing the difference, and that’s exactly what we’re diving into today.
Throughout this guide, we’re gonna walk through everything together—from foolproof tests that tell you exactly what you’re dealing with, to the environmental tweaks that’ll transform your growing game.
This isn’t some stuffy textbook stuff; it’s real strategies for avoiding common microgreens mistakes and how to avoid mold that actually works. And if you’re just getting started or working with limited space, you might want to check out this guide on setting up a microgreens growing system for small apartments—it’ll make implementing these tips way easier.
Understanding common microgreens mistakes and how to avoid mold starts with separating fact from fiction. Let me share the most common microgreens mistakes and how to avoid mold that I’ve seen in 15+ years of growing. Ready to turn your “Spore Storm” into a gentle breeze? Let’s do this.
Table of Contents
The 3-Step Diagnostic: Mold or Root Hairs? Let’s Find Out
When it comes to common microgreens mistakes and how to avoid mold, accurate identification is your superpower. Alright, so you’ve got white fuzz. Don’t freak out yet—we’ve got three dead-simple tests that’ll tell you exactly what’s going on. No guessing, no crossing your fingers, just straight answers.
The Misting Test (AKA The Magic Disappearing Act)
This is hands-down my favorite test because it’s so satisfyingly instant. Grab a spray bottle with plain water—nothing fancy, just regular tap water is fine—and set it to a nice fine mist.
Now spray that suspicious white stuff from about 6 inches away. Just a light misting, nothing crazy. Here’s where it gets cool: if you’re looking at root hairs, they’ll collapse immediately and basically disappear like magic. It’s wild to watch, honestly. They become transparent or just vanish because surface tension does its thing.
But mold? Oh, mold’s stubborn. It’ll stay put, looking all webby and matted. Sometimes it even becomes MORE obvious when it’s wet, with those stringy bits clumping together. It’s like the difference between cotton candy (which dissolves) and spider webs (which just get damp).
This simple test eliminates one of the most common microgreens mistakes—panicking over healthy root hairs. If you’re still not sure, wait about 30 seconds and look again. Root hairs stay collapsed, while mold starts bouncing back. Pretty straightforward, right?
The Smell Test (Trust Your Nose, Seriously)
Here’s where your nose becomes your best friend. Lean in close to your tray and take a good whiff. I know it sounds weird, but your sense of smell is actually crazy good at early detection.
Healthy microgreens smell… well, nice. Think fresh soil after rain, earthy and clean. Some varieties have their own vibe—radish gets a little spicy, sunflower smells kinda nutty. But overall? Pleasant. You wouldn’t mind smelling it.
Now mold? Mold smells BAD. Like musty basement, swampy water, or that funky ammonia smell that makes you instinctively pull back. And here’s the kicker: you’ll usually smell mold 24-48 hours before you even see it, which gives you a heads-up that something’s wrong.
Pro tip from experience: if a tray smells off, just toss it. I don’t care if you can’t see anything wrong—trust that nose. Trying to salvage a funky-smelling tray almost never works out. When dealing with common microgreens mistakes and how to avoid mold, your nose wins the debate between what you see and what you smell every time.
The Location Test (Where’s It Growing?)
Root hairs are super predictable. They only grow from one place: the radicle (that’s the main root emerging from the seed). You’ll see them as a uniform white “halo” or “fuzzy socks” around the root zone. Every seedling gets them in basically the same spot, same time. It’s orderly and symmetrical—Mother Nature’s very organized like that.
Mold though? Mold’s a chaotic opportunist. It pops up on old seed hulls still stuck to leaves, directly on stems, random patches across your soil surface, corners of your tray—basically anywhere moisture hangs out too long. There’s no pattern, no logic. It just goes where the conditions are right.
And here’s your bonus test: the “Time Test.” Root hairs typically fade after 2-3 days as your plants mature and grow real roots with protective bark. Mold expands, getting bigger and spreading to new areas. So if that white fuzz is growing and spreading? Yeah, that’s your answer right there.
Why Mold Happens: Understanding Root Causes
The Science Behind Mold Development
Avoiding common microgreens mistakes and how to avoid mold requires understanding what actually triggers fungal growth. Okay, quick biology lesson that’ll actually help you. Fungal spores are basically tiny seeds that float around everywhere, just dormant and waiting. Once they hit the right conditions—boom—they wake up and start growing these thread-like things called hyphae. Give them 24-48 hours and you’ve got visible mold taking over.
So what does mold love? Humidity above 70%, air that’s not moving (stagnant air is like mold’s favorite vacation spot), water sitting on leaves and stems, and temperatures over 75°F. And these factors team up against you—high humidity alone might not kill your crop, but add stagnant air and warm temps? You’ve basically rolled out the red carpet for fungi.
The main troublemakers you’ll deal with are Pythium (water mold that attacks roots when things get waterlogged), Fusarium (soil-dwelling fungus causing that devastating damping-off disease), and Botrytis (gray mold that loves humid conditions). According to Cornell University’s pathology research, understanding these specific pathogens helps you target your prevention game way more effectively.
What Actually Triggers Mold Problems
These environmental triggers represent the most common microgreens mistakes that lead to mold issues. Let’s get real about what’s probably going wrong. Number one culprit? Moisture imbalance. When your growing medium turns into a soggy mess, you’re creating oxygen-depleted conditions that stress your plants while giving fungi exactly what they want.
Poor air circulation creates these little stagnant pockets around densely planted areas. Humidity builds up, carbon dioxide displaces oxygen, and you’ve got fungal incubators happening right in your tray. Often starts in corners or center spots where airflow can’t reach.
Temperature swings stress your plants out, weakening their natural defenses while simultaneously waking up dormant spores. A grow room bouncing between 68°F at night and 78°F during the day causes way more problems than one that stays steady at 72°F.
Learning about common microgreens mistakes and how to avoid mold means identifying every contamination vector. And then there’s contamination sources—dirty trays from your last grow, growing medium that wasn’t actually sterile, cheap seeds carrying surface nasties. All of this pumps more spores into your environment until it overwhelms even decent growing conditions.
Top 7 Common Microgreen Failures (And How to Fix Them)
Let’s dive into the most common microgreens mistakes and how to avoid mold in each scenario. These are the issues I see repeatedly, and honestly, they’re all fixable once you know what to look for.
1. Uneven Germination (The Patchy Problem)
Nothing’s more frustrating than walking into your grow room expecting a carpet of seedlings and instead finding… well, more like a balding carpet with weird bare patches. Some spots are thick, others are nearly empty. What gives?
Almost always, this comes down to mechanics. Your growing surface isn’t level, so water pools in low spots (hello overwatering) while high areas stay bone dry. Or you’re not getting consistent moisture across your tray. Sometimes it’s just poor seed-to-medium contact—seeds need to touch moisture to wake up and germinate.
Here’s the fix: before you even sprinkle seeds, tamp down your growing medium evenly. Use a flat board or just press gently with your hand. You want a uniform surface without compacting it too much. Then—and this is gonna sound extra—grab a little spirit level and make sure your tray’s actually sitting flat. Even a tiny tilt causes water to migrate and mess everything up.
For hard-coated seeds like peas, sunflower, and beets? Pre-soak them for 4-8 hours before planting. This softens that tough shell, lets water reach the embryo, and gets all your seeds germinating at basically the same time. Fixing this prevents one of those common microgreens mistakes that cascade into mold problems later. Game changer for uniform trays.
2. Leggy, Pale Stems (The Stretch Problem)
You know those sad, stretched-out microgreens with thin stems and tiny pale leaves? Those plants are literally reaching for light they’re not getting enough of. It’s kind of sad when you think about it.
Your microgreens need proper light intensity—we’re talking minimum 20-40 μmol/m²/s PPFD if you want to get technical about it. Regular LED shop lights about 6-8 inches above your crop usually do the trick. Put them too high or use wimpy lights? Your plants stretch upward desperately searching for more energy.
And blackout timing matters more than you’d think. Radish only needs 2-3 days in darkness during germination, while peas actually prefer 4-5 days. Remove covers too early and you get stretched stems; leave them too long and everything turns yellow from lack of chlorophyll development.
Oh, and harvest timing affects this too. Each variety has a sweet spot when nutrient density peaks and texture is perfect. Wait too long and stems get tough and fibrous as plants transition from cotyledon stage to developing true leaves.
3. Damping-Off Disease (The Absolute Worst)
Damping-off represents one of the deadliest common microgreens mistakes connected to how to avoid mold. This one’s brutal because it happens FAST. Like, one day your tray looks fine, next day entire sections have collapsed. Damping-off is caused mainly by Pythium and Fusarium pathogens attacking stems right at the soil line.
You’ll know it when you see it: stems develop this brown, water-soaked appearance at the base, then just collapse like someone pinched them. Affected seedlings topple over while their neighbors still stand, creating these distinctive death circles spreading outward. It’s not pretty.
Prevention is all about environmental control. Research shows that maintaining soil temperature at 73-75°F during germination significantly reduces damping-off incidence. Go above 78°F or drop below 70°F and you’re asking for trouble.
Make sure your growing medium drains well—water should move through, not sit there pooling. Use fresh, sterile medium every single crop. Clean your trays thoroughly between uses. And get good air circulation happening around those plants to dry surface moisture where pathogens hang out.
4. Seed Density Problems (The Overcrowding Crisis)
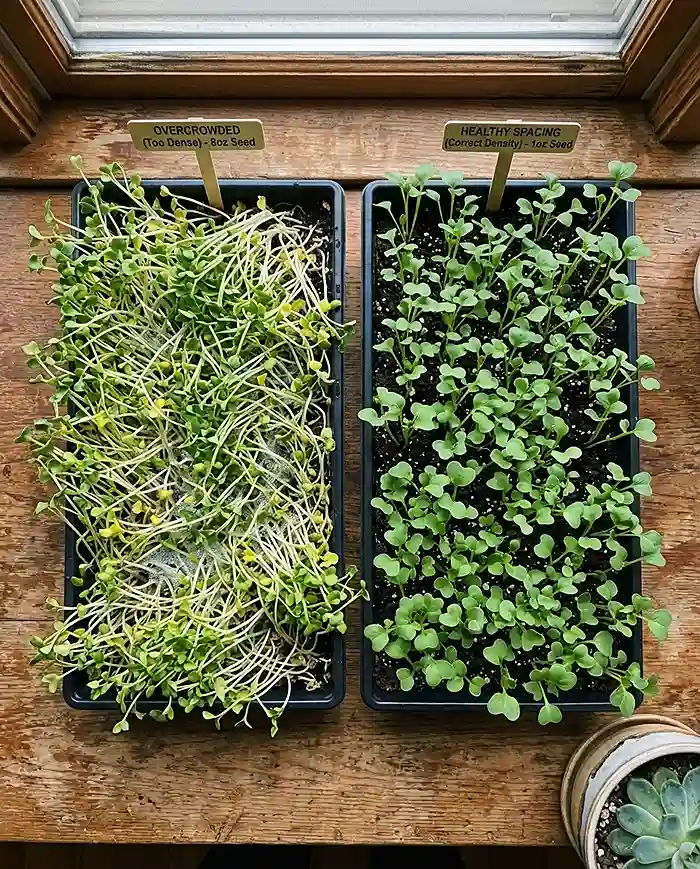
Overcrowding is among the most common microgreens mistakes, and understanding how to avoid mold starts with proper seed density. Here’s where things get mathematical. Too many seeds creates the perfect storm for fungal problems, but weirdly, using exact numbers isn’t intuitive at all.
For a standard 1020 tray, here are the proven densities: Radish needs 1.5-2.0 oz, Broccoli wants 1.0-1.5 oz, Sunflower does best at 3.0-4.0 oz, and Pea should get 4.0-5.0 oz. These aren’t random—they’re optimized through years of balancing yield against disease risk.
The physics explanation makes it click: overcrowded trays create tiny stagnant air pockets between densely packed stems. Even with fans running, these micro-environments stay undisturbed, accumulating moisture and becoming fungal paradise.
And get this—the relationship between seed density and disease isn’t linear. Seed 25% over the recommended rate and you don’t get 25% more disease risk. You often get DOUBLE or TRIPLE the mold incidence because the effects compound: reduced airflow plus increased transpiration plus higher density equals overwhelmed environmental controls. Proper density prevents common microgreens mistakes related to how to avoid mold. Not worth the extra few grams of yield, trust me.
5. The “Oven Effect” During Blackout (The Heat Trap)
The oven effect is one of those sneaky common microgreens mistakes that directly impacts how to avoid mold during germination. Here’s something most beginners don’t realize: germinating seeds generate heat. Yep, all that metabolic activity as they convert stored energy into growth actually produces warmth. In nature, this heat just dissipates into the environment. No big deal.
But under solid plastic lids during your blackout phase? That heat gets trapped, creating a greenhouse effect that raises your tray temperature 5-10°F above room temp. Add moisture from germination, and congratulations—you’ve accidentally built a humid, warm incubator. Which is exactly what fungal spores dream about.
The fix is pretty elegant actually: use ridged or vented blackout trays that allow air exchange while still blocking light. Or switch to weighted breathable covers—burlap, microfiber cloths, or specialized blackout fabric that lets gases exchange while keeping things dark.
Grab an infrared thermometer (they’re like $15 on Amazon) and check your tray temperature during germination. Internal temps should never exceed 75°F. If they do, increase room ventilation, lower room temp, or use less insulating covers.
6. Overwatering vs. Underwatering (The Balance Problem)
Watering errors rank as the top common microgreens mistakes when learning how to avoid mold. Water management is honestly a feel thing that you develop over time. Can’t really learn it from a chart. But the “Weight Test” method is the best teacher I’ve found.
Right after thoroughly watering a 1020 tray, lift it up. Feel that weight—probably 3-4 pounds depending on your medium depth. Pay attention to how it feels in your hands, how much muscle you’re using, that sense of water weight. Really focus on it.
Check that same tray 12 hours later and lift again. It’s noticeably lighter, right? As plants transpire and evaporation happens, water disappears. When your tray feels about half the weight of freshly watered, it’s time to water again.
This method beats checking soil color or following rigid schedules because it accounts for YOUR specific environment—your temperature, humidity, airflow—all the stuff that affects how fast water disappears.
Once cotyledons emerge and stems hit 1-2 inches? Switch to bottom watering. Top watering at this stage splashes soil onto leaves, damages tender stems, and puts moisture on plant surfaces where fungi love to grow.
7. Poor Seed Quality and Contamination (The Foundation Issue)
Sourcing quality seeds prevents common microgreens mistakes and simplifies how to avoid mold from the start. Not all seeds are equal, and honestly, price differences often reflect critical stuff like food safety testing and proper storage conditions.
Here’s what freaks people out: seeds sold for garden planting might carry E. coli, Salmonella, or fungal spores because they’re treated as agricultural products, not food. But microgreens? We eat them raw. So pathogen-free seeds are non-negotiable.
Only buy from suppliers who provide pathogen testing certifications and specifically market seeds for microgreens or sprouting. These seeds go through wash treatments and testing that garden seeds skip entirely.
Store your seeds properly too—cool (below 60°F), dry conditions in airtight containers. High humidity during storage promotes surface mold on seeds, while temperature swings reduce germination rates and stress emerging seedlings, making them more susceptible to disease.
Vet suppliers by requesting recent germination test results (should be 85%+), asking about pathogen testing protocols, and checking reviews from other microgreens growers. Good suppliers understand these requirements and happily provide documentation.
Ventilation and Climate Control: Making Mold Hate Your Grow Room
Mastering ventilation eliminates several common microgreens mistakes related to how to avoid mold effectively. Let’s talk about creating an environment where your plants thrive and mold struggles.
Getting Humidity Right
Proper humidity management addresses one of the core common microgreens mistakes in mold prevention. Target 40-60% relative humidity and you’re in the sweet spot—high enough to prevent plants from drying out, low enough that fungi can’t get comfortable. This range is where your plants thrive while your “Spore Storm” stays manageable.
Equipment matters here. Size your dehumidifier based on grow space VOLUME, not just floor area. A 10’ x 10’ room with 8’ ceilings contains 800 cubic feet of air. Choose a unit rated for that volume or higher, and factor in extra moisture from watering and plant transpiration.
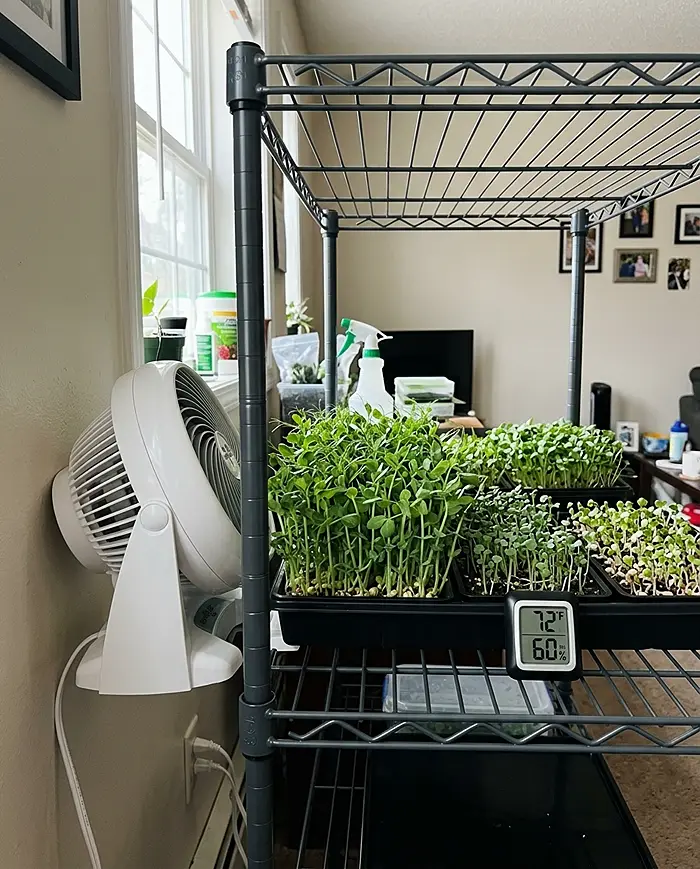
Digital hygrometers with data logging are surprisingly useful. You might discover humidity spikes to 75% for three hours after morning watering, then drops to 50% by evening. Knowing this pattern lets you time dehumidifier operation or adjust when you water.
And don’t forget seasonal stuff. Winter heating dries indoor air (you might actually need to ADD humidity). Summer humidity might require running your dehumidifier constantly or cranking up ventilation with outdoor air exchange.
Airflow Physics (Moving Air = Happy Plants)
Understanding airflow physics helps you avoid common microgreens mistakes that create stagnant, mold-friendly zones. Oscillating fans disrupt the boundary layer—that thin film of still air right around each plant that gets saturated with moisture from transpiration. Move that stagnant air away and fresh, drier air can reach leaf surfaces. Simple but effective.
Position fans for indirect airflow rather than blasting plants directly. Mount an oscillating fan above and to the side of your growing area, angled so air sweeps across the tops of trays without causing windburn damage to tender seedlings.
For enclosed growing spaces, aim for complete air turnover every 3-5 minutes. Calculate this by dividing room volume by your fan’s CFM (cubic feet per minute) rating. Keeps things fresh without creating hurricane conditions.
Here’s a fun trick: walk through your grow room with a stick of incense while fans are running. Watch the smoke patterns. You’ll spot dead zones where humidity accumulates—areas that need additional fans or repositioning.
Temperature Management (Keeping Things Steady)
Different growth stages want different temps. During germination, maintain 70-75°F for rapid, uniform emergence. Once plants start photosynthesizing, slightly cooler temps of 65-70°F promote compact growth and intense color.
Heat mats with thermostat control give consistent bottom heating that warms the growing medium without overheating the air. Set thermostats to maintain soil temp at 73-75°F, measured with a probe stuck into your medium.
Avoid putting trays near heating vents, windows with direct sun, or exterior walls that experience temperature swings. Stable, consistent conditions always beat warmer but variable environments. Always.
The Professional Sanitation Protocol: Cleaning Like You Mean It
Sanitation protocols prevent common microgreens mistakes and show you exactly how to avoid mold through cleanliness. This is where a lot of problems get stopped before they even start.
The Between-Crop Cleanup
Pre-use prep starts with thorough cleaning using dish soap and hot water to remove organic matter. Then disinfect using food-safe sanitizers that kill pathogenic spores without leaving sketchy residues.
Even if your previous crop looked perfect, microscopic pathogen populations might’ve established themselves. Sterilize every tray, every time. No shortcuts, no exceptions. This is foundational to avoiding common microgreens mistakes and how to avoid mold problems.
Commercial growers recommend a three-step process: mechanical cleaning with scrubbing to remove debris, chemical disinfection with proper contact time, and thorough rinsing with clean water to remove sanitizer residues before adding fresh medium.
Treatment Options (The Arsenal)
These treatments address common microgreens mistakes by targeting mold before it establishes. You’ve got several natural and synthetic options for effective pathogen control:
Hydrogen Peroxide (3%): Food-grade H₂O₂ at 1 tablespoon per 16 oz water works great for misting trays or pre-treating seeds. That extra oxygen molecule oxidizes fungal cell walls while staying safe for plant tissue. Just rinse after contact time to avoid root damage.
White Vinegar (5%): Mix 1 tablespoon per 16 oz water for spray or wipe applications. Vinegar’s acidic pH creates hostile conditions for most pathogens while being completely food-safe. Especially good for cleaning hard surfaces between crops.
Grapefruit Seed Extract: Natural antimicrobial at 8 drops per gallon for water additives or 1 teaspoon per 8 oz for foliar spray. Follow label dilution carefully—too much damages seedlings, too little loses effectiveness.
Cinnamon Powder: Ground Ceylon cinnamon has natural antifungal compounds. Lightly dust the medium surface before seeding or apply a thin layer over seeds during blackout. This old-school remedy actually has research backing for suppressing damping-off.
Safety First (Seriously, Don’t Skip This)
NEVER EVER mix vinegar and hydrogen peroxide in the same container—this creates peracetic acid, a highly corrosive substance that’s dangerous even at low concentrations. Use these treatments separately, never combined or back-to-back without thorough rinsing between.
Ventilate properly when using any treatments, even natural ones. Concentrated vapor from vinegar or peroxide can irritate your lungs, especially in enclosed spaces.
Wear gloves and eye protection during sanitation. Even food-safe chemicals can irritate skin or eyes with prolonged contact or accidental splashing. Better safe than sorry.
Advanced Watering Techniques: Level Up Your Game
Advanced irrigation eliminates common microgreens mistakes related to moisture management and how to avoid mold. Let’s talk about taking your watering game to the next level.
Bottom Watering Mastery
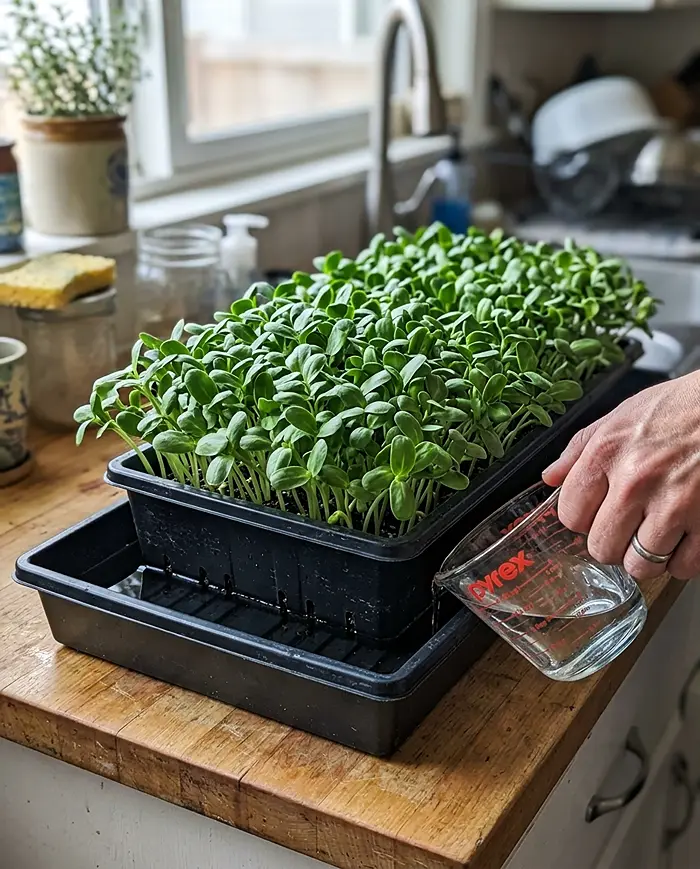
Switching from top misting to bottom watering after cotyledons emerge is a game-changer for avoiding common microgreens mistakes and how to avoid mold through proper irrigation. This transition—usually day 3-5 depending on variety—happens when roots are deep enough to access water from below.
Bottom watering uses capillary action (water moving upward through medium against gravity via surface tension) to deliver moisture directly to roots while keeping stems and leaves bone dry. It’s pretty clever when you think about it.
System options range from simple flood trays (just add water to the bottom tray) to fancy capillary mat systems using specialized fabric that wicks water from reservoirs. Both work fine—choose based on your scale and how automated you want to get.
Water level management prevents root zone saturation causing oxygen-depleted conditions and root rot. Add only enough water that it’s absorbed within 10-15 minutes. Never let trays sit in standing water for hours.
Creating Moisture Gradients
The goal? Moisture at root level, everything above soil line stays dry. This gradient creates perfect conditions for root absorption while eliminating surface water where pathogens party.
Prevent splash during watering operations. Use gentle water flow, pour slowly against tray edge rather than directly onto medium, and immediately wipe up spills that reach plant surfaces.
Different species have different needs based on root depth and water requirements. Shallow-rooted varieties like broccoli need more frequent, lighter watering. Deep-rooted crops like sunflower prefer less frequent, thorough watering that encourages roots growing downward.
Future Tech: The Cool NASA Stuff
Space-Age Growing Media
PEGDA hydrogels are these wild 3D-printed growth mediums originally developed for NASA’s space agriculture research. They eliminate soil entirely, providing sterile, pathogen-free substrates with optimized water-holding capacity.
Engineered substrates remove soil-borne disease risks completely. Without natural soil microorganisms or organic matter harboring spores, you focus purely on environmental factors rather than managing complex biological warfare in your trays.
Currently there are cost barriers for most home and small-scale growers. But like all new tech, prices should drop as adoption increases and manufacturing scales up. Worth watching.
The cost-benefit question considers not just material costs but crop loss prevention. If advanced substrates eliminate 90% of mold losses, they might pay for themselves even at premium prices—especially for high-value specialty varieties or organic production.
Hydroponic and Aeroponic Systems
NFT (Nutrient Film Technique) systems provide continuous nutrient solution flow over bare roots, eliminating medium entirely. Great oxygenation, eliminates many soil-borne pathogens, but requires more technical expertise and equipment investment.
Aeroponic advantages include superior root zone oxygenation preventing anaerobic conditions—basically eliminating damping-off disease. Roots suspended in air and misted with nutrient solution develop exceptional vigor.
Implementation means higher equipment costs for pumps, timers, and specialized chambers, plus technical requirements for maintaining pH, EC, and nutrient balance. These systems reward attention to detail with amazing yields and minimal disease pressure.
Your Burning Questions About Common Microgreens Mistakes and How to Avoid Mold
Here are your most-asked questions about common microgreens mistakes and how to avoid mold, answered straight-up with no fluff.
Can I eat microgreens if there’s just a tiny patch of mold?
Nope, hard no. This is one of those critical common microgreens mistakes—trying to salvage moldy trays instead of learning proper mold prevention. When you see mold on the surface, microscopic spores have already colonized your entire tray. Mycotoxins produced by common molds can cause respiratory problems, allergic reactions, and digestive issues. Toss the whole tray in compost—don’t try salvaging “clean” portions because they contain invisible contamination. Not worth the risk.
My pea sprouts look white and fuzzy at the base—is that mold?
Misidentifying root hairs is one of the most common microgreens mistakes when learning how to avoid mold. Almost definitely just root hairs, not mold. Peas produce crazy vigorous root systems with prominent root hair development that freaks out new growers. Do the misting test right away—spray with water and watch if it collapses (root hairs) or stays visible (mold). Pea microgreens naturally develop these fuzzy white “socks” around roots, especially with good air circulation.
Does mold spread between trays?
Oh yeah, absolutely. Airborne spores transmit rapidly between trays through air currents from fans, foot traffic, and natural convection. Immediately isolate suspected trays by moving them to separate areas or outside. Increase ventilation, clean all surfaces with disinfectant, and inspect neighboring trays carefully. Maintain 2-3 inches spacing between trays to reduce cross-contamination risk.
How do I know if my seeds are the problem?
Test germination rates on small samples before seeding large batches. Place 100 seeds on damp paper towel, keep moist for 3-5 days, count how many germinate. Quality seeds hit 85% or higher. Visual inspection should show uniform color without discoloration, damage, or debris. Source seeds exclusively from suppliers providing pathogen testing certifications for E. coli, Salmonella, and common fungal contaminants.
What’s the most mold-resistant growing medium?
Coconut coir offers the best combo of drainage, moisture retention, and natural antifungal properties. Its fibrous structure promotes root zone air circulation while its pH and chemistry discourage fungal growth. Avoid peat-heavy mixes retaining excess moisture and creating anaerobic conditions. Ensure 1-1.5 inches medium depth regardless of type—too shallow limits roots, too deep stays waterlogged in lower layers.
Your No-BS Mold Prevention Checklist
This checklist addresses all common microgreens mistakes and how to avoid mold systematically. Alright, let’s wrap this up with your systematic prevention protocol. Follow these ten steps consistently for every grow cycle:
1. Sterilize everything between crops—trays, tools, surfaces. Use appropriate sanitizers and rinse thoroughly to eliminate pathogen carryover.
2. Calculate proper seed density using species-specific guidelines rather than eyeballing it. Proper density prevents common microgreens mistakes related to how to avoid mold. Precision prevents overcrowding creating humid micro-environments.
3. Maintain 40-60% humidity using dehumidifiers and monitoring equipment. Keep conditions optimal for plants, hostile for fungi.
4. Establish consistent airflow with oscillating fans creating gentle, continuous air movement that disrupts boundary layers and prevents stagnant pockets.
5. Monitor soil temp at 73-75°F during germination using heat mats with thermostat control. Avoid cold stress and excessive heat favoring pathogens.
6. Switch to bottom watering after cotyledons emerge to keep plant surfaces dry while maintaining root zone moisture through capillary action.
7. Apply the 3-step diagnostic at first sign of white fuzz—misting test, smell test, location test—to accurately distinguish root hairs from mold.
8. Isolate suspect trays immediately to prevent airborne spore transmission to healthy crops. Treat any visible mold as a quarantine situation.
9. Source pathogen-tested seeds from reputable suppliers who understand food safety and provide testing documentation.
10. Keep detailed records tracking seed sources, environmental conditions, problems, and outcomes. Continuous improvement through data-driven decisions.
Bottom Line: Mastering Common Microgreens Mistakes and How to Avoid Mold
These common microgreens mistakes and how to avoid mold strategies work for beginners and commercial growers alike. Understanding common microgreens mistakes and how to avoid mold isn’t about luck or having a magical green thumb. It’s about systematically engineering growing conditions favoring your plants while making life miserable for pathogens.
Your “Spore Storm” never completely disappears—spores will always be around. But by consistently implementing these strategies for avoiding common microgreens mistakes and how to avoid mold, and adjusting for your specific conditions, you transform that storm into a light drizzle.
Focus on controlling what you can: humidity, airflow, temperature, sanitation, and seed density. Master these fundamentals, avoid common microgreens mistakes, and learning how to avoid mold becomes second nature. Common mistakes in microgreens and mold prevention are completely preventable once you understand the science behind them.
Ready to grow perfect trays every single time? Start with step one of this checklist today and watch your success rate skyrocket. Your microgreens (and your peace of mind) will thank you.