

Microgreens Growing Timeline
Follow this microgreens growing timeline from sowing to harvest, with clear stage-by-stage tips for blackout, watering, light, and cutting.
Let’s be real — most people kill their first tray of microgreens not because they lack talent, but because nobody told them when to do what. You either pull the tray too early (pale, sad little seedlings), or you wait too long (hello, bitter baby leaves).
Either way, you’re left standing in your kitchen wondering where things went sideways. The microgreens growing timeline is the one thing that changes all of that, and honestly, once you understand it, you’ll wonder how you ever grew without it.
This guide breaks down the entire microgreens growing timeline day-by-day — from seed prep on Day 0 all the way to harvest morning and post-harvest storage. Whether you’re growing on a windowsill or running a commercial tray operation, this masterclass has the timing, the numbers, and the real-talk advice you need to get it right. Let’s get into it.
Table of Contents
Understanding the Microgreens Growing Timeline and Growth Stages
The 4 Critical Growth Phases of the Microgreens Growing Timeline
Think of your microgreens growing timeline as a four-act play. Each act has its own rules, and skipping ahead (or dragging your feet) kills the show.
- Day 0 — Seed Prep and Setup: Your foundation. Mess this up and every day that follows will frustrate you. Get it right and the rest practically runs itself.
- Days 1–3 — Germination: The seed wakes up. The root tip punches through the seed coat, the stem starts its upward push, and if you’ve done Day 0 correctly, you’ll hit 90%+ germination uniformity across your tray. That’s the goal.
- Days 4–7 — Growth: This is the fun part. Stems shoot up, chlorophyll kicks in, and your tray goes from pale yellow sprouts to vibrant, green, genuinely impressive-looking plants within about 24 hours of light introduction. It feels like magic every single time.
- Days 8–14 — Harvest Phase: The sweet spot. Cotyledons are fully open, flavor is at its absolute peak, and nutritional density is through the roof. This is when you cut — not before, not after.
- Day 14+ — Baby Leaf Transition (Don’t Harvest Here): Once true leaves start developing, the plant is already redirecting its energy away from the nutrient-packed cotyledons. For most microgreens varieties, this is the “you waited too long” zone — the flavor flattens, the texture gets tougher, and you’ve essentially started growing a different product.
Why the Microgreens Growing Timeline Is a Nutritional Science Decision
Here’s something that’ll change how you think about microgreens forever: according to peer-reviewed research, microgreens contain 4 to 40 times higher concentrations of carotenoids compared to their fully mature counterparts (Frąszczak & Kleiber, 2022).
A landmark USDA study found nutrient levels up to 40 times higher in microgreens than in adult vegetables. And a 2023 American Chemical Society study confirmed that broccoli microgreens specifically contain five times more glucosinolates — potent cancer-fighting compounds — than mature broccoli.
But here’s the kicker: all of that nutritional density peaks at the cotyledon stage. Once the true leaf emerges, the nutritional profile starts normalizing toward the mature plant’s values. So when you harvest isn’t just a freshness question — it’s a nutrition question.
Original Insight — The Nutrient-to-Speed Ratio Chart:
Think of this as your cheat sheet for choosing which varieties to prioritize. The best varieties aren’t just nutritious — they’re nutritious fast.
| Variety | Days to Harvest | Nutrient Density Multiplier | Nutrient-to-Speed Score |
|---|---|---|---|
| Radish | 6–8 | 20–30x | ⭐⭐⭐⭐⭐ |
| Broccoli | 8–10 | 30–40x | ⭐⭐⭐⭐⭐ |
| Kale | 9–12 | 25–35x | ⭐⭐⭐⭐ |
| Sunflower | 10–12 | 15–20x | ⭐⭐⭐⭐ |
| Pea Shoots | 10–14 | 10–15x | ⭐⭐⭐ |
| Basil | 18–25 | 8–12x | ⭐⭐ |
Radish and broccoli win this game almost every time, and that’s exactly why they anchor most commercial production schedules.
Pre-Microgreens Growing Timeline Setup: What You Actually Need
Day 0 Preparation: Your Equipment Checklist
You don’t need a greenhouse, a grow tent, or a bank loan to get started. But you do need the right five things. Miss one, and your microgreens growing timeline gets wobbly fast.
Beginner Windowsill Kit (5 Non-Negotiables):
- A 1020 tray with drainage holes (your grow tray) plus a solid tray underneath for bottom watering
- A quality growing medium — organic potting mix or a coco coir compressed pad both work great
- Seeds from a verified supplier with confirmed germination rates of 90% or above
- A fine mist spray bottle for initial watering plus a second tray or book for blackout stacking
- A simple timer for lights and a thermometer/hygrometer combo — seriously, don’t skip this
If you’re tight on space and wondering how to fit all of this into a small home setup, check out this guide to building a Microgreens Complete Growing System for Small Apartments — it’s packed with smart, space-saving solutions that actually work.
Professional 1020 Tray Setup: Once you go beyond hobby growing, the 10″ x 20″ tray is the industry standard for a reason. It fits standard shelving, integrates with commercial grow lights, and gives you a consistent, measurable surface for accurate yield tracking.
Sanitize every tray before use — a 3% hydrogen peroxide rinse does the job perfectly — and check for cracks that cause uneven moisture distribution, which throws your timeline off in unpredictable ways.
And please, label your trays. Write the seed date, variety, and target harvest date on every single one. This one habit eliminates more “when was this seeded again?” chaos than any other system you’ll ever implement.
Grow Media Comparison for Microgreens Growing Timeline Consistency
Your growing medium isn’t just a base for roots to sit in — it directly controls how fast germination happens and how consistent your harvest timing will be. Here’s the honest breakdown:
| Medium | Germination Speed | Timeline Consistency | Sustainability |
|---|---|---|---|
| Organic Potting Soil | Moderate (2–3 days) | High — buffers moisture well | Compostable; moderate environmental impact |
| Coco Coir | Fast (1–2 days) | Very High — excellent drainage | Renewable coconut byproduct; low impact |
| Jute/Hemp Mats | Moderate (2–3 days) | Moderate — can dry unevenly | Fully biodegradable; great sustainability |
| Reusable Silicone Mats | Slow (3–4 days) | Lower for most varieties | Best long-term sustainability; 100+ cycles |
Coco coir is genuinely hard to beat for most growers — it’s fast, it drains well, it resists compaction, and it’s a byproduct of coconut processing that would otherwise go to waste. Jute mats are excellent if sustainability is your top priority. Silicone systems are brilliant for long-term waste reduction but work better with hydrophilic varieties like radish and wheatgrass.
Precision Seeding for a Predictable Microgreens Growing Timeline
Seed density is probably the most underestimated variable in the entire microgreens growing timeline. Too many seeds create competition, trap moisture, and invite mold. Too few seeds produce a patchy canopy that dries unevenly and looks unprofessional at market. Use these verified seed weights per standard 1020 tray and you’ll be in great shape:
- Broccoli: 15–20g — fine seeds that need a sieve for even distribution
- Radish: 30–35g — medium seeds that broadcast well by hand with a gentle press
- Sunflower: 180–200g — large hulled seeds that must be laid in a single, even layer
- Pea Shoots: 200–250g — pre-soak first, then pack tightly in a single layer
AI-based yield and seeding calculators (available on platforms like Bootstrap Farmer and Microgreen Manager) take the math completely out of this step. If you’re managing multiple varieties on overlapping timelines, these tools are genuinely worth five minutes of your time.
Days 1–3: Mastering the Germination Phase of Your Microgreens Growing Timeline
Day 0–1: The Soak Decision (This One Matters More Than You’d Think)
Before a seed can germinate, it needs to absorb enough water to kick enzymatic processes back into gear — a process called imbibition. For thick-coated seeds, pre-soaking in water for 4–12 hours essentially gives them a head start and can shave a full day off your microgreens growing timeline.
Seeds that need pre-soaking: Peas, Sunflowers, and Beets — all have hard coats that resist water penetration. Soak overnight in 20–22°C (68–72°F) water and you’ll see dramatically more uniform germination.
Seeds you should never soak: Basil, Chia, and Arugula are mucilaginous varieties. Get them wet and they turn into a sticky, gelatinous mess that clumps together, blocks airflow, and creates a mold buffet. Always seed these varieties dry onto pre-moistened media.
One more thing: use room-temperature water (18–22°C / 64–72°F). Cold water shocks seeds and can delay germination by 24–48 hours. It seems minor. It really isn’t.
Day 1–2: Why the Weighted Blackout Technique Actually Works
Here’s one of those techniques that sounds a bit weird until you understand the science — and then you’ll never skip it again. After seeding, you stack a second tray on top and add 2–5 lbs of weight (books, water bottles, purpose-built weights — anything evenly distributed). The emerging hypocotyl has to literally push against this weight as it grows upward.
This mechanical resistance — called skotomorphogenesis combined with thigmotropism, if you want to impress people at dinner parties — produces noticeably thicker, stronger, more vigorous stems. The crop builds density by working for it. Temperature during this phase should sit consistently between 18–24°C (65–75°F), and relative humidity targets of 70–85% keep the media surface moist without creating waterlogged, anaerobic conditions underneath.
Day 2–3: Reading Your Germination Progress
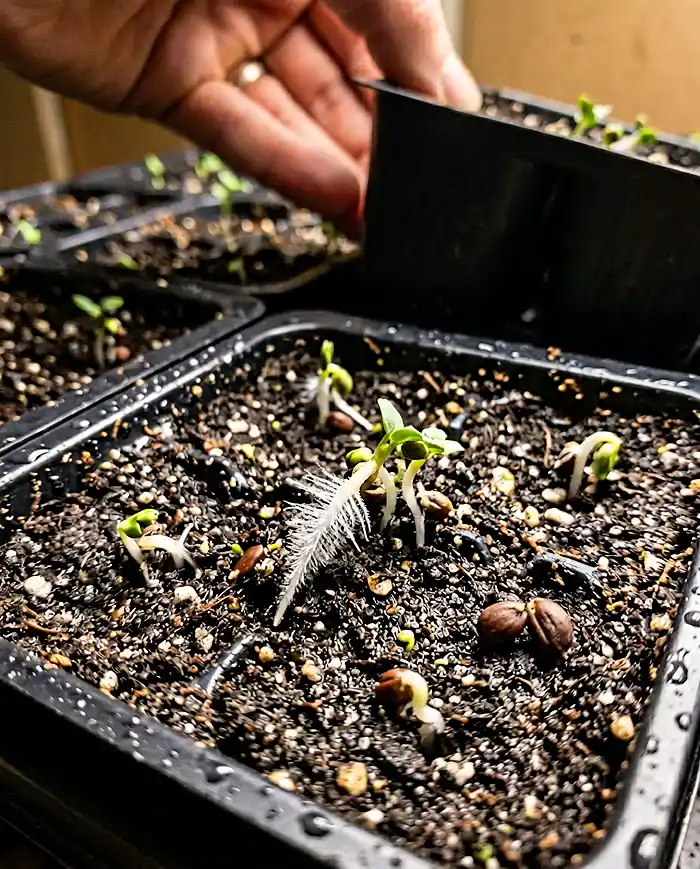
By Day 2–3, you’re aiming for 90% or greater seed emergence across the entire tray surface. Uniform germination here is your most reliable predictor of a consistent harvest timeline ahead. Now, the most common beginner panic at this stage: “Is that mold or root hairs?” Great question. Here’s how to tell them apart:
- Healthy root hairs: Fine, white, fuzzy filaments attached to individual roots. They disappear when the root is dampened. Clean, earthy smell. Completely normal and a sign of a healthy, vigorous crop.
- Mold warning signs: Web-like networks spanning across multiple seeds, not attached to individual roots. Gray, blue, or black patches. Musty or sour smell. Concentrated in areas of excess moisture or poor airflow.
If you’re below 70% germination at Day 3, extend the blackout phase by 12–24 hours and check your temperature and moisture levels. Document the issue — it’s almost always temperature, seed age, or insufficient pre-moistening, and knowing which one saves you from repeating it.
Days 4–7: The Explosive Growth Phase of the Microgreens Growing Timeline
Day 4: Breaking the Blackout the Right Way
Your “bench press test” is simple: if the top tray is visibly lifting off the surface as the crop pushes upward, germination is complete and it’s time to introduce light. For fast growers like radish and mustard, this happens right at the Day 3–4 boundary. Broccoli and kale typically hit this milestone at Day 4–5.
Start with 6–8 hours of light at reduced intensity — about 50% of your normal output — to give the cotyledons time to begin chlorophyll synthesis without getting hit with photoinhibition shock. At the same time, switch from top misting to bottom watering.
Add 100–200ml of water to your reservoir tray and let the growing medium wick it up from below. This one change keeps the canopy surface dry and dramatically reduces your mold risk going forward.
Days 5–6: Watching the Microgreens Growing Timeline Transform in Real Time
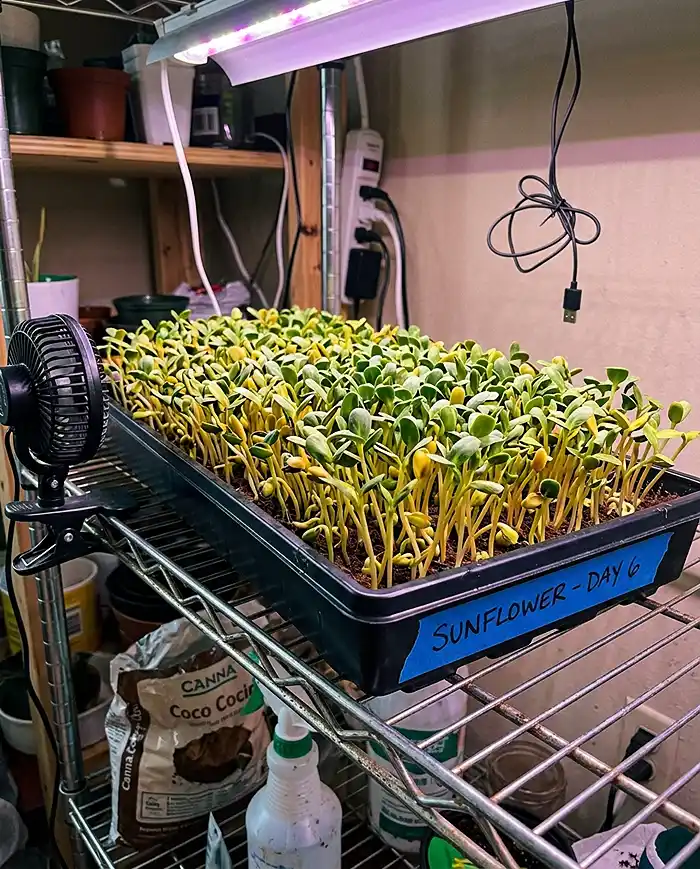
Full photoperiod starts now: 12–16 hours daily under 6500K spectrum LED lighting (cool white/daylight) positioned 30–45cm (12–18 inches) above the canopy. Too close? Heat stress and bleaching. Too far? You’ll get the dreaded leggy growth — those tall, floppy, pale stems that fall over and make the whole tray look defeated.
The greening process that happens within the first 24 hours of consistent light is one of the genuinely exciting moments in microgreens cultivation. Cotyledons that were pale yellow or cream the previous day visibly shift to bright, vibrant green as chlorophyll synthesis accelerates. It’s fast, it’s dramatic, and it never gets old. Continue bottom watering once daily — moist but not saturated is your goal.
Day 7: Your Pre-Harvest Checkpoint
Not all varieties are created equal, and Day 7 is where the timeline really starts to diverge. Here’s where each group stands:
- Fast Growers (Radish, Mustard): Cotyledons fully open and developing mature green coloration. Start taste-testing and checking density. Harvest may be only 1–2 days away.
- Medium Growers (Broccoli, Kale): In active cotyledon expansion. Still developing — this is not the time to rush. Give it more time and you’ll be rewarded.
- Slow Growers (Basil, Cilantro): Still in active stem development. True leaf primordia may be visible. Do not cut yet.
Start introducing gentle airflow now with a small fan on low speed, maintaining relative humidity below 55%. This is your primary defense against the late-stage fungal pressure that shows up right before harvest if humidity gets out of hand.
Days 8–14: The Microgreens Growing Timeline Harvest Window
Speed Leaders: The 8–12 Day Microgreens Growing Timeline
These are your most profitable varieties on a per-week basis, and they’re also the most forgiving for newer growers:
- Radish (6–8 days): Look for vivid purple or red stem coloration and fully open, flat cotyledons. Peppery, bright flavor — if it tastes right, it’s ready.
- Broccoli (8–10 days): Medium green, smooth, equally sized cotyledons across the whole tray. Uniform canopy height = uniform maturation.
- Kale (9–12 days): Slightly waxy texture with a mild, earthy flavor that intensifies toward the later end of the harvest window.
- Mustard (8–10 days): Taste-test daily from Day 7. The spice level builds progressively — harvest at your preferred heat point.
Standard Growers: The 10–14 Day Microgreens Growing Timeline
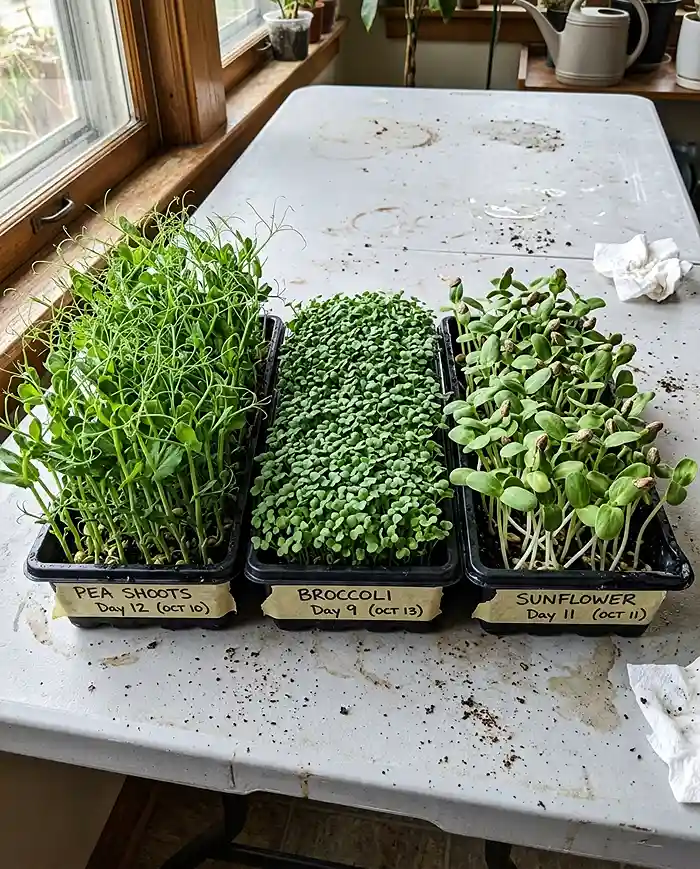
- Sunflower (10–12 days): Wait for hull shedding to be mostly complete — more than 10–15% un-shed hulls means another day or two is needed. Nutty, rich flavor with a satisfying crunch that chefs absolutely love.
- Pea Shoots (10–14 days): Look for tendril development and a cutting height of 8–12cm above the media surface. These are your most visually impressive tray product.
- Cabbage (10–12 days): Mild, slightly sweet flavor that’s surprisingly different and delicate compared to mature cabbage.
Slow-Growing Aromatics: The 15–25 Day Extended Microgreens Growing Timeline
- Basil (18–25 days): True leaf emergence signals peak flavor. Harvest before this and you get a bland, structurally weak product. Wait for it.
- Cilantro (15–20 days): Temperatures above 26°C (79°F) trigger premature bolting. Keep the grow space consistently cool — this variety punishes warm, fluctuating environments.
- Parsley (20–25 days): The longest wait of any standard variety. The reward is a premium product with a flavor profile and visual appeal that genuinely commands higher prices.
According to Penn State Extension’s comprehensive microgreens growing guide, production time can range from as little as 7 days to up to 21 days depending on variety and environmental conditions — which is exactly why understanding your specific variety’s timeline is so important rather than guessing.
Harvest Execution: The Morning Advantage in Your Microgreens Growing Timeline
Why the 6–9 AM Window Is the Best Time to Harvest
Early morning harvesting isn’t just a romantic farming tradition — it’s backed by plant physiology. During the overnight transpiration cycle, plants reach maximum turgor pressure (cells are fully hydrated), which means the crispest texture and the brightest, most concentrated flavors are all locked in right before the sun rises.
Sugar content in the cotyledons also peaks in the early morning before daytime photosynthetic consumption begins. Harvest at noon in the heat and you’re literally leaving quality on the table.
Taste-test daily from Day 5 onward. Your palate is genuinely your best quality control instrument — changes in sweetness, peppery sharpness, bitterness, and texture development will tell you more accurately than a calendar exactly when your crop is at its peak.
Cutting Techniques and the 30-Minute Rule
Use a sharp, clean blade — chef’s knives, serrated harvest knives, or dedicated microgreens scissors all work depending on your scale and canopy density. Cut above the soil line, leaving approximately 1–2cm of stem in the growing medium to avoid contaminating your harvest with soil. Wipe your cutting tool with a 70% isopropyl alcohol swab between varieties to prevent cross-contamination.
Then comes the rule that most beginners skip — and immediately regret: the “Dry-Before-Bag” rule. Allow your freshly cut microgreens to air dry for a minimum of 30 minutes before packaging. Packing wet microgreens is basically a mold invitation.
Condensation builds up inside the container, microbial growth accelerates, and a product that should last 10–14 days is going bad within 3–5. Don’t skip the dry window. It matters enormously.
Post-Harvest Storage to Extend Your Microgreens Growing Timeline Value
Research published in food science journals confirms that storing microgreens at 5°C (41°F) in breathable packaging preserves postharvest quality and sensory attributes for up to 10–14 days. At room temperature (20–25°C), microgreens deteriorate beyond consumption within a single day — so your refrigerator isn’t just helpful here, it’s absolutely essential.
For retail and restaurant packaging, use breathable clamshell containers or perforated bags that allow gas exchange without full exposure. For home use, a loosely covered container in the crisper drawer gives adequate airflow while maintaining the humidity needed to prevent wilting. Completely sealed, airtight packaging accelerates anaerobic deterioration regardless of temperature.
Microgreens Growing Timeline Troubleshooting Guide
Days 1–4: Early Microgreens Growing Timeline Problem Identification
The root hair vs. mold anxiety is real, and it trips up almost every new grower at least once. Here’s your definitive diagnostic:
Healthy root hairs are pure white, uniformly fine, attached individually to each root tip, produce no odor, and are completely normal. Mold forms web-like networks spanning multiple seeds, often appears gray or blue-gray, emits a distinctly musty smell, and concentrates in areas of excess moisture or poor airflow. When in doubt — smell it. Healthy crops smell like fresh earth. Mold smells like a damp basement.
Hull stick prevention (where seed hulls cling to cotyledons and prevent them from opening cleanly) is handled through targeted misting during the blackout phase and using a humidity dome in especially dry environments. And watch your temperatures — fluctuations greater than 4–5°C between day and night cycles can introduce a 24–48 hour delay across your entire microgreens growing timeline.
Days 5–10: Mid-Cycle Microgreens Growing Timeline Corrections
Leggy growth means one thing: not enough light, or lights positioned too far away. Drop your light distance by 5–10cm and extend your photoperiod if you’re seeing tall, floppy stems.
“Falling over” syndrome in sunflowers — where stems collapse sideways — is almost always underwatering. Watch for reddening stems as an early warning signal, then increase your bottom-watering volume immediately.
Yellowing cotyledons tell a different story: they usually mean you missed the harvest window by 1–2 days and the plant is already burning through its seed reserves. That’s feedback for next cycle — harvest earlier.
Environmental Control Benchmarks for Microgreens Growing Timeline Success
Getting your humidity and temperature dialed in correctly across the full timeline makes everything easier:
- Days 1–3 (Germination): Keep humidity at 70–85% to support seed imbibition and root development
- Days 4–14 (Growth and Harvest): Drop progressively to 40–55% to prevent fungal pressure while maintaining healthy cellular hydration
- Temperature: Maintain a consistent 18–24°C (65–75°F) throughout the full cycle
Advanced growers can leverage intentional environmental stress — like a controlled 2–3 day period of reduced watering in sunflower crops — to induce the signature nutty red-stem flavor modification that commands serious premium pricing at farmers markets and with restaurant clients. It’s essentially a legal performance enhancement for your product.
Variety-Specific Microgreens Growing Timeline Quick Reference
Fast Track Varieties: 6–10 Day Microgreens Growing Timeline
Radish, Mustard, and Arugula are the workhorses of any production schedule. Radish gives you the fastest feedback loop in microgreens cultivation — you can watch the stems deepen from white to vivid purple/red across consecutive days, and the flavor sharpens from mild to boldly peppery as it approaches harvest. Its 6–8 day timeline means more production cycles per month than almost any other variety.
Arugula’s 7–9 day window delivers a nutty, peppery flavor that’s disproportionately in demand relative to how easy it is to grow. These fast-track varieties also offer a 2-day harvest flexibility window — you can cut anywhere within a 2-day range of peak readiness without significant quality loss.
Standard Production Varieties: 10–14 Day Microgreens Growing Timeline
Broccoli, Kale, Sunflower, and Pea Shoots form the commercial backbone of most microgreens businesses — and this is where the business actually gets built. Their 10–14 day timeline fits perfectly into weekly delivery schedules, their yield-per-tray economics are excellent, and restaurant clients consistently reorder them without much convincing.
Mid-cycle corrections for this group are mostly light distance and watering volume adjustments — both straightforward once you’ve done one full production cycle.
Premium Slow Growers: 15–25 Day Microgreens Growing Timeline
Basil, Cilantro, Parsley, and Celery require the most patience and the most precise environmental management of any microgreens category. Extended timelines increase production costs, but they also command significantly higher prices — basil microgreens regularly sell for $35–50 per tray to specialty restaurants and premium farmers market customers.
The smart positioning strategy here is to market these as exclusive, limited-availability products rather than standard catalog staples. Scarcity, when it’s genuine, is a legitimate pricing strategy.
Scaling for Profit: Building a Microgreens Growing Timeline Business Model
Staggered Production for Continuous Microgreens Growing Timeline Harvests
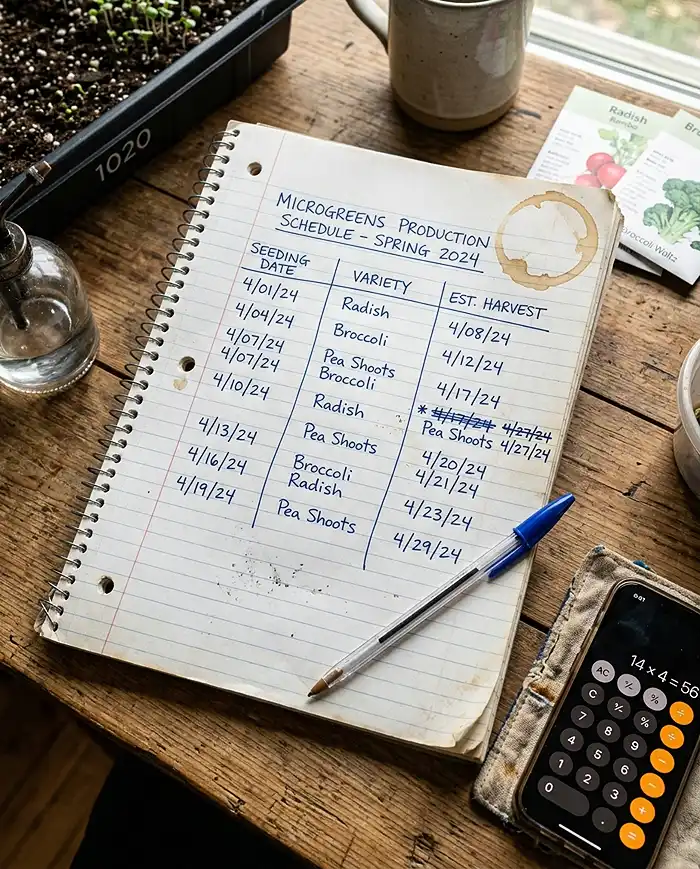
If there’s one operational insight that separates profitable microgreens businesses from chaotic ones, it’s this: never harvest everything at once. A 3-day rotation system — seeding new trays every 3 days — creates overlapping timelines that allow you to deliver fresh product on any given day of the week.
For a full commercial operation managing 50–100+ trays, this means maintaining at least 5–7 distinct cohorts at different points in the microgreens growing timeline simultaneously. It sounds complicated until you set it up once — then it becomes second nature within two weeks.
AI production planning calculators are increasingly used by commercial growers in 2026 for automated COGS optimization, harvest forecasting, and delivery scheduling — tools that take most of the manual spreadsheet management out of running a multi-variety operation.
Commercial Microgreens Growing Timeline Management
The “Big Three” for consistent restaurant revenue are Broccoli, Radish, and Pea Shoots. Together, they cover the fast, medium, and texture variety spectrum that chefs most reliably demand week after week. Build your production schedule around these three first, then layer in premium slow growers as upsell items once your core revenue base is stable and predictable.
Pricing Strategy by Microgreens Growing Timeline Efficiency
💰 Farmers Market Revenue: $20–25 per 1020 tray
💰 Chef Wholesale Revenue: $25–35 per tray (premium varieties)
The most profitable growers track their nutrient-to-speed ratio as an actual business metric — prioritizing varieties that deliver the highest nutritional value in the shortest microgreens growing timeline, commanding premium prices while minimizing the amount of shelf space and time they occupy. Radish and broccoli consistently dominate this calculation.
Advanced Microgreens Growing Timeline Manipulation Techniques
Environmental Stress for Premium Product Characteristics
Controlled stress is where sophisticated growing becomes an actual competitive advantage. In sunflower microgreens, intentionally reducing watering frequency during Days 8–10 — dropping from daily to every-other-day — induces mild drought stress that triggers anthocyanin production, creating the signature nutty red-stem sunflower variety that commands 30–50% price premiums. It’s not just visually stunning; the flavor genuinely changes — nuttier, richer, more complex.
Brief temperature reduction to 15–16°C during the final 2 days before harvest has been shown to intensify color in radish, kale, and red cabbage microgreens while concentrating glucosinolate levels.
And red-spectrum LED light (630–660nm) during the final 48 hours can similarly boost anthocyanin and carotenoid concentrations in light-sensitive varieties. These aren’t gimmicks — they’re documented physiological responses that translate directly into better-looking, better-tasting, better-selling product.
Second Harvest Possibilities in the Microgreens Growing Timeline
Pea shoots are the one reliable exception to the no-regrowth rule. Cut them above the lowest leaf node — leaving the bottom 2–3cm of stem with at least one leaf attached — and lateral bud activation produces a second harvest in approximately 7–10 additional days. It’s a smaller crop, but it’s essentially free yield from media and space you’ve already paid for.
For all Brassicaceae family members — broccoli, kale, radish, mustard, cabbage — regrowth simply doesn’t happen. These varieties produce a single growing apex with no axillary bud architecture capable of regenerating a harvestable canopy. Don’t waste your grow space hoping for a second cut from a broccoli tray. It won’t come.
FAQ: Microgreens Growing Timeline Questions Answered
How long does the microgreens growing timeline take from seed to harvest?
Most microgreens take 7–14 days. Fast varieties like radish complete their microgreens growing timeline in 6–8 days, standard varieties like broccoli in 8–12 days, and slow-growing herbs like basil require 18–25 days for optimal flavor and nutrition.
Do microgreens regrow after cutting?
No — most microgreens, especially all Brassicaceae varieties like broccoli, kale, and radish, don’t regrow after harvest. Pea shoots are the exception, offering a second cut 7–10 days later if cut above the bottom leaf node.
Are microgreens safer than sprouts from a microgreens growing timeline perspective?
Yes. Microgreens grow in soil or growing media with proper above-surface airflow throughout the 7–14 day microgreens growing timeline — this dramatically reduces microbial contamination risk compared to water-only sprout systems where seeds are submerged for the full germination period.
Why is my microgreens growing timeline taking longer than expected?
The most common culprits are insufficient light intensity, temperatures below 18°C, old or low-quality seeds, inadequate watering frequency, or simply choosing a variety that’s naturally slow — herbs genuinely need 15–25 days and shouldn’t be compared to fast-growing brassicas on the same timeline.
What’s the exact best moment within the microgreens growing timeline to harvest?
Harvest when cotyledons are fully expanded but before true leaves develop. For fast varieties, that’s Days 6–8; medium varieties, Days 8–12; slow varieties, Days 15–25. Always aim for the 6–9 AM window — peak nutrition, peak turgor pressure, and maximum shelf life all happen right there.
Once you truly internalize the microgreens growing timeline — not just as a schedule but as a living biological process with its own rhythm — everything clicks. You stop guessing, you start harvesting with confidence, and your trays start looking exactly like you imagined they would when you first scattered those seeds. Give yourself three full production cycles with this framework, and you’ll be teaching this to someone else before you know it.