
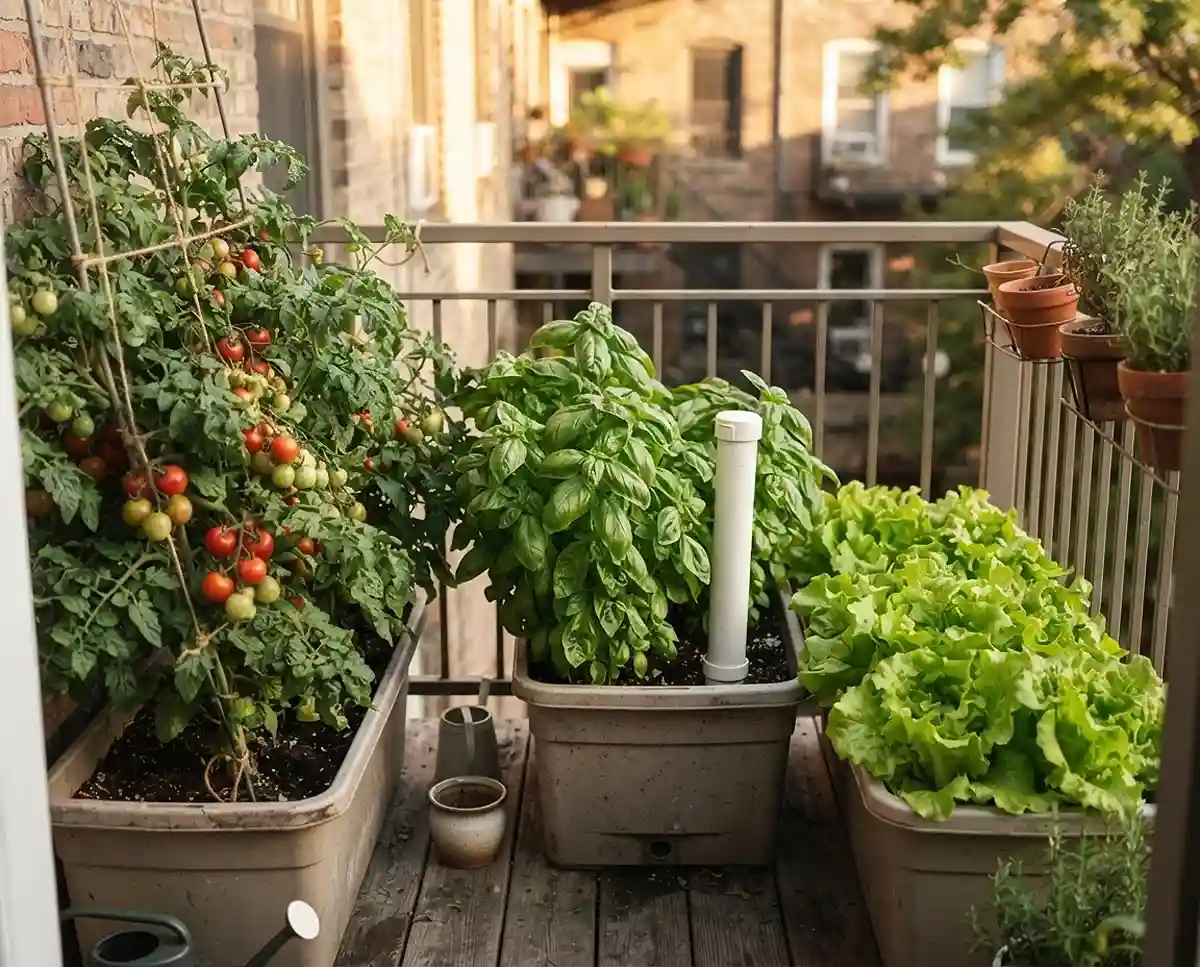
self watering planters for small spaces
Self watering planters for small spaces solve the one problem every balcony gardener knows: soil that’s bone-dry by Tuesday. I’ve run these on a 5th-floor Chicago balcony (zone 6a) for six seasons now.
What follows is everything I’ve learned, including the batch of basil I killed my first year by getting the wicking layer wrong. No filler, just what works.
Table of Contents
Why Self-Watering Systems Are a Game-Changer for Small-Space Gardens
A self-watering setup holds a reservoir of water below the root zone, and the soil pulls moisture up as it dries. That’s the whole trick. No more soaking wet Monday, cracked-dry Friday.
For small space gardening, this matters more than in a big yard. Containers dry out fast, especially on a hot, wind-exposed balcony or windowsill. A reservoir buys you 5-14 days between refills instead of daily watering.
If you travel, rent, or just forget things (guilty), this is the setup that keeps plants alive. It also reduces root stress, since roots aren’t swinging between flood and drought.
How Self-Watering Containers Actually Work
Every self-watering planter, whether it’s a $60 EarthBox or a bucket from the hardware store, runs on the same three parts. Understand these and you can build or troubleshoot any system.
The Reservoir, Wicking Layer, and Overflow System
Quick Answer: Water sits in a bottom reservoir, a wicking material pulls it upward into the soil through capillary action, and an overflow hole caps the water level so roots don’t drown.
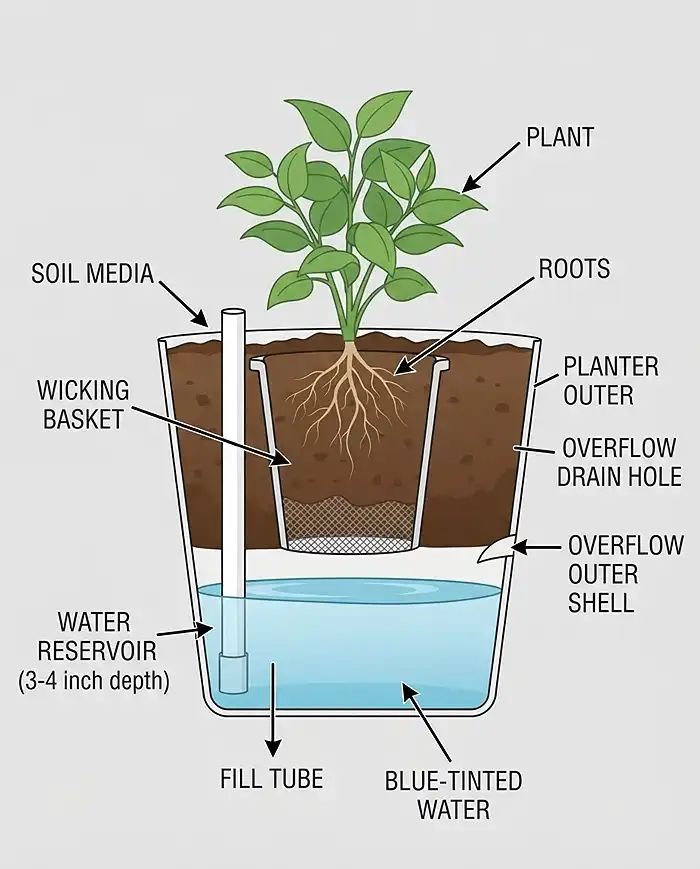
- Reservoir: The sealed bottom chamber that holds water, usually 2-6 inches deep depending on container size
- Wicking layer: Soil, a fabric strip, or a perforated basket that draws water up through capillary action, the same physics that pulls coffee up a paper towel
- Overflow hole: Drilled at the top of the reservoir, this drains excess water and tells you when the reservoir is full
Roots grow down toward the moisture instead of you pouring water down to the roots. That’s the entire shift, and it’s why these containers need so much less babysitting.
Choosing the Right Self-Watering Setup for Your Space
Before building anything, decide whether you want to buy or build. Both work. It comes down to time, budget, and how much you enjoy a Saturday with a drill.
Store-Bought vs. DIY Self-Watering Planters
Quick Answer: Store-bought planters like EarthBox or Lechuza cost more but arrive ready to plant, while DIY builds from totes or buckets cost a fraction as much and let you customize size for tight balcony corners.
| Option | Best For | Watch Out For |
|---|---|---|
| EarthBox ($35-60) | Beginners wanting zero setup | Fixed size, limited to standard rectangle footprint |
| Lechuza Cubico ($40-120) | Patios where looks matter | Pricier per container, smaller reservoirs on compact models |
| Elho Corsica ($20-45) | Windowsills and railings | Shallow reservoirs need more frequent refills |
| DIY tote or bucket ($8-20) | Budget growers, odd-shaped spaces | Requires drilling, a couple hours of build time |
I run three EarthBoxes for tomatoes and peppers because I don’t want to think about them, plus four DIY buckets for herbs where I don’t mind the extra effort. Mixing both has worked well for my setup.
Sizing Guide for Balconies, Patios, and Windowsills
Quick Answer: Herbs need at least 6-8 inches of depth, leafy greens need 8-10 inches, and tomatoes or peppers need 12+ inches with a minimum 5-gallon reservoir capacity.
- Windowsill herbs (basil, thyme, chives): 6-8 inch deep railing planters work fine
- Leafy greens (lettuce, spinach): 8-10 inch deep containers, wider footprint over depth
- Compact tomatoes and peppers: 5-gallon minimum, ideally 10-gallon for indeterminate varieties
- Vertical stands: stack shallow trays to multiply growing area without adding footprint
Check out these space-saving small garden ideas if your balcony is under 30 square feet, since vertical stacking changes your math entirely.
Materials and Tools You’ll Need to Build a DIY Self-Watering Planter
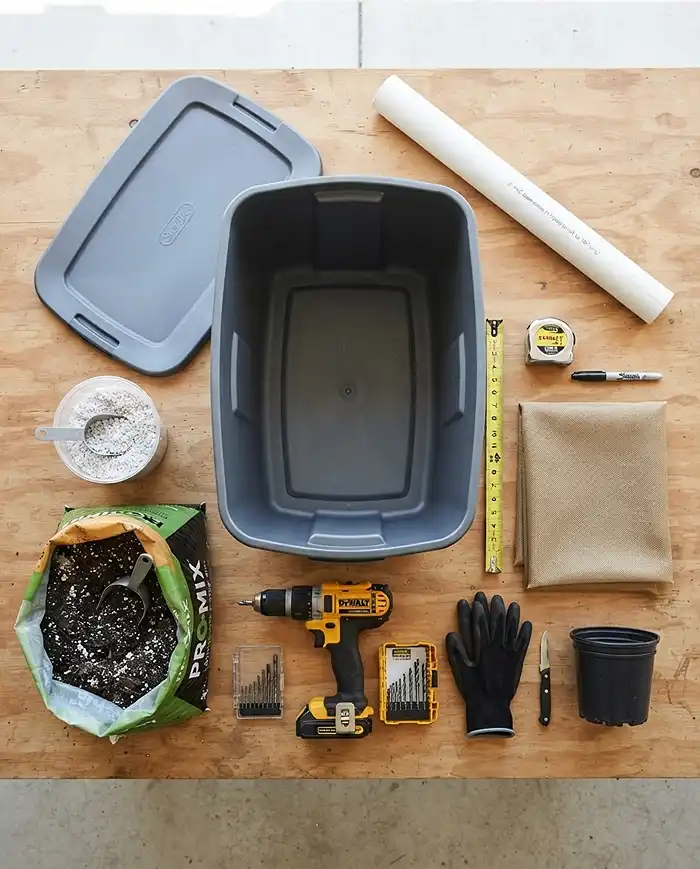
Here’s exactly what I buy for a standard 18-gallon tote build. You’ll spend around $25-35 total if you’re starting from zero on tools.
- 18-gallon plastic storage tote with lid (opaque, not clear, to block algae-feeding light)
- 2-inch diameter PVC pipe, cut to container height plus 3 inches
- Landscape fabric or window screen mesh for the wicking basket
- Cordless drill with 3/4-inch and 1/4-inch bits
- Lightweight potting mix (not garden soil, it compacts and blocks wicking)
- Perlite, roughly 20% of your total soil volume
Skip garden center “container mix” that’s mostly bark. You want something closer to a seed-starting blend with real moisture-holding structure.
Step-by-Step: Building a DIY Self-Watering Container
This is the exact build I use for herbs and greens. It takes about 90 minutes start to finish, including a coffee break.
Step 1: Drilling the Overflow Hole and Preparing the Reservoir
Quick Answer: Mark the overflow hole 3-4 inches up from the container’s base, drill with a 3/4-inch bit, then set aside the bottom chamber as your water reservoir.
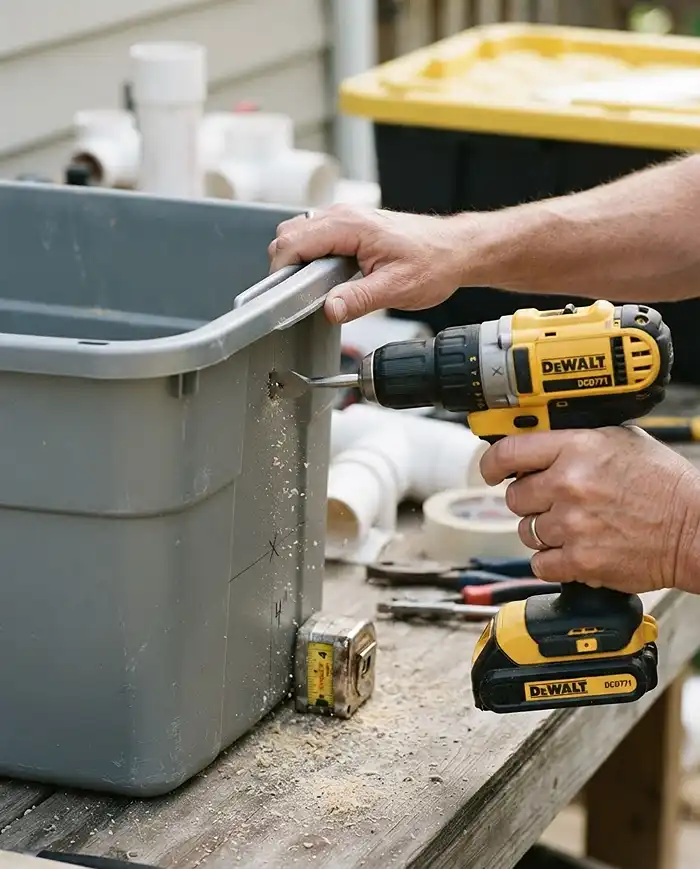
Measure up from the bottom and mark a level line at 3-4 inches. This becomes your reservoir depth. Drill the overflow hole here on one side wall. Any water above this line drains out, so your plants can’t drown even if you overfill.
Step 2: Creating the Wicking Basket and Water Fill Tube
Quick Answer: Cut a section of plastic mesh into a basket shape, fill it loosely with soil, and set it inside the reservoir zone so it touches the water below.
Cut your landscape fabric into a cup shape roughly 6 inches across and 4 inches deep. This basket sits directly in the reservoir, touching water at the bottom while its rim pokes above the waterline.
Cut your PVC pipe at a 30-degree angle on the bottom end (this stops it from sealing flat against the container floor) and stand it upright in a back corner, reaching down into the reservoir.
Step 3: Adding Soil Media and Planting
Quick Answer: Fill the container with pre-moistened potting mix over the wicking basket, plant at the same depth the plant was in its nursery pot, and water once from the top to settle everything.
Pack soil around the wicking basket so it makes solid contact, no air gaps. Fill to about an inch below the rim. Plant, water from the top once to kickstart capillary flow, then fill the reservoir through your PVC tube.
Best Plants for Self-Watering Small-Space Gardens
Most vegetables and herbs thrive in consistent moisture, which is exactly what these systems provide. A few categories do especially well:
- Determinate tomatoes (Patio Princess, Tumbling Tom) and peppers
- Leafy herbs: basil, parsley, mint, cilantro
- Leafy greens: lettuce, spinach, arugula
- Strawberries, especially everbearing varieties like Seascape
Skip succulents, lavender, and rosemary here. Drought-lovers hate constant moisture and will rot in a reservoir system faster than they’d ever die from underwatering.
Seasonal Care and Maintenance Timing
Self-watering doesn’t mean zero-maintenance. Seasons change the refill math a lot, especially once summer heat hits your balcony.
Spring Setup and Summer Watering Frequency
Quick Answer: Refill reservoirs every 5-7 days in spring’s mild weather, dropping to every 2-4 days once summer temperatures climb past 85°F.
| Season | Refill Frequency | Notes |
|---|---|---|
| Spring (60-75°F) | Every 7-10 days | Check wicking is working before planting heavily |
| Summer (75-95°F) | Every 2-5 days | South-facing balconies need the shorter end of this range |
| Fall (50-70°F) | Every 8-12 days | Growth slows, reservoirs last longer |
In late April, rinse out last year’s reservoirs, check the wicking basket for mold, and top-dress with fresh compost before you plant anything new.
Fall Cleaning and Winter Storage
Quick Answer: Drain all standing water, scrub the reservoir with a mild bleach solution, dry completely, and store indoors or somewhere freeze-protected to prevent cracking.
Plastic totes crack when water freezes and expands inside them. Empty everything by late October in colder zones, scrub out algae buildup, and let containers dry fully before stacking them for winter.
Regional Considerations for Climate and Hardiness Zones
Your USDA hardiness zone shapes how often you’ll refill and what you can grow. Hot, dry zones like 8-10 evaporate reservoirs fast, sometimes in 2-3 days during peak summer.
Humid zones (6-7 in the Southeast, for example) hold moisture longer and need bigger overflow capacity to handle heavy rain on top of your reservoir fill. In arid zones, oversize your reservoir if you can, since a bigger buffer means fewer refills during heat waves.
As of the 2026 growing season, several extension offices are recommending slightly larger reservoirs than older guides suggested, mostly a response to hotter, longer summer stretches in many regions.
Pro Tips for Maximizing Self-Watering Efficiency
- Add 1-2 inches of mulch on top to cut evaporation from the soil surface by a real, noticeable margin
- Mix in slow-release fertilizer at planting since regular feeding gets tricky once the reservoir is sealed up
- Paint clear containers or reservoirs with exterior latex paint to block light and stop algae before it starts
- Group containers by water need so heavy drinkers and light drinkers aren’t sharing a watering schedule
The University of Maryland Extension’s guide to self-watering container construction is a solid technical reference if you want more build variations beyond what’s here.
Common Problems and Solutions
Every self-watering setup runs into one of these three issues eventually. Here’s how I’ve fixed each one on my own containers.
Algae Growth in the Water Reservoir
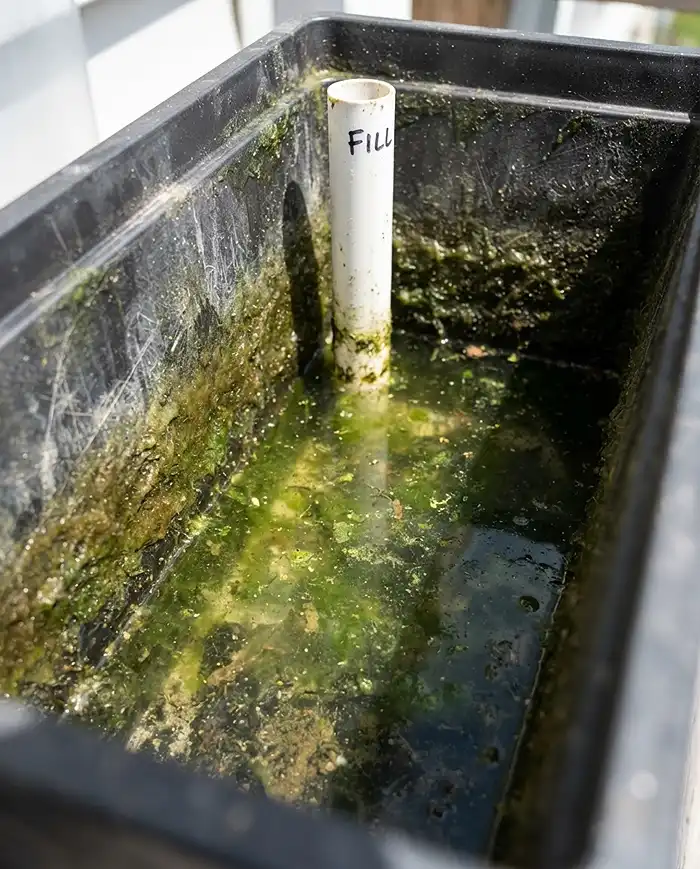
You’ll spot algae as a green tint on reservoir walls, often with a slimy, swampy smell near the fill tube. It thrives on light, so switch to opaque containers or cap your fill tube opening between waterings to block sunlight from reaching the water.
Root Rot from Overwatering
Yellowing leaves and mushy, dark stems near the soil line signal root rot. Check that your overflow hole isn’t clogged with soil or debris, and make sure your wicking material isn’t oversaturating the root zone by sitting too deep in the reservoir.
Wicking Failure and Dry Soil Despite Full Reservoir
If soil stays dry even with a full reservoir, your wicking material is probably compacted or your soil mix is too dense to pull water. Switch to a lighter, perlite-heavy mix and make sure the wicking basket has firm, unbroken contact with the soil above it.
Frequently Asked Questions
How often do I need to refill a self-watering planter?
Most self-watering planters need a refill every 5-14 days, depending on plant size, container volume, and season. Small herb pots in summer heat may need refills every 2-3 days, while larger reservoirs in cooler weather can go two weeks between fills.
Can I use a self-watering system for vegetables like tomatoes?
Yes, tomatoes do well in self-watering containers, especially compact determinate varieties. Choose a container with at least a 5-gallon reservoir capacity, since fruiting plants are heavy feeders and drink far more water than herbs or greens.
Do self-watering planters need drainage holes too?
No, self-watering planters use an overflow hole instead of traditional drainage holes. The overflow caps the reservoir’s water level and lets excess drain out, so standing water below that line is intentional, not a drainage failure.
What’s the cheapest way to make a self-watering planter?
The bucket-in-bucket method is the most budget-friendly DIY option, using two nested 5-gallon buckets with a perforated inner bucket to separate soil from a water reservoir below. Total materials typically cost under $15.
Can self-watering planters work indoors on a windowsill?
Yes, shallow self-watering trays or railing planters work well indoors as long as there’s enough light for whatever you’re growing. Indoor use also means less evaporation, so reservoirs often last longer than they would outdoors.
Conclusion
Self-watering planters for small spaces turn balcony and patio gardening from a daily chore into a weekly check-in. Once you understand the reservoir, wick, and overflow system, you can build or buy with confidence.
Start small: one DIY bucket or a single EarthBox is enough to test the system before you commit your whole balcony to it.
For more setup ideas, browse these self-watering ideas for small-space gardens or start with our apartment gardening guide for beginners if you’re just getting started.
Key Takeaways
- Self-watering planters for small spaces use a reservoir, wicking layer, and overflow hole to cut watering to once every 5-14 days
- DIY builds cost $15-35 and let you customize size, while store-bought options like EarthBox trade cost for convenience
- Match reservoir size to plant type: 5-gallon minimum for tomatoes and peppers, smaller for herbs and greens
- Refill frequency shifts by season and climate zone, so check reservoirs more often during summer heat waves
- Skip drought-loving plants like succulents and rosemary, since constant moisture will rot their roots