

Beginner Fertilizing Schedule for Small-Space Gardens
Your potting mix runs empty in 6 weeks — most beginners don’t know that. Get the exact 4-phase fertilizing schedule for pots & raised beds. Start here →
Let’s be honest — nobody gets into container gardening because they love measuring fertilizer. You got into it because you wanted tomatoes on your balcony, herbs by the kitchen window, or maybe just proof that you can keep something alive.
But here’s the thing nobody warns you about: that gorgeous potting mix you bought? It’s running on empty in about six weeks. And after that, your plants are basically living on hope and tap water.
That’s exactly why you need a beginner fertilizing schedule for small-space gardens — not some scaled-down version of what your uncle does on his half-acre plot, but a plan built specifically for the weird little world inside a container. Less soil. More drainage. Faster nutrient loss. Different rules entirely.
Table of Contents
Here’s the cheat sheet before we dive in:
| Growth Phase | When | What to Use | How Much |
|---|---|---|---|
| Phase 1: Pre-Planting | 2 weeks before planting | Organic granular (3-4-4 or 5-5-5) | 1–2 tbsp per 5-gal pot |
| Phase 2: Establishment | First true leaves (~2–3 weeks in) | Liquid at ¼ strength | ¼ tsp per gallon of water |
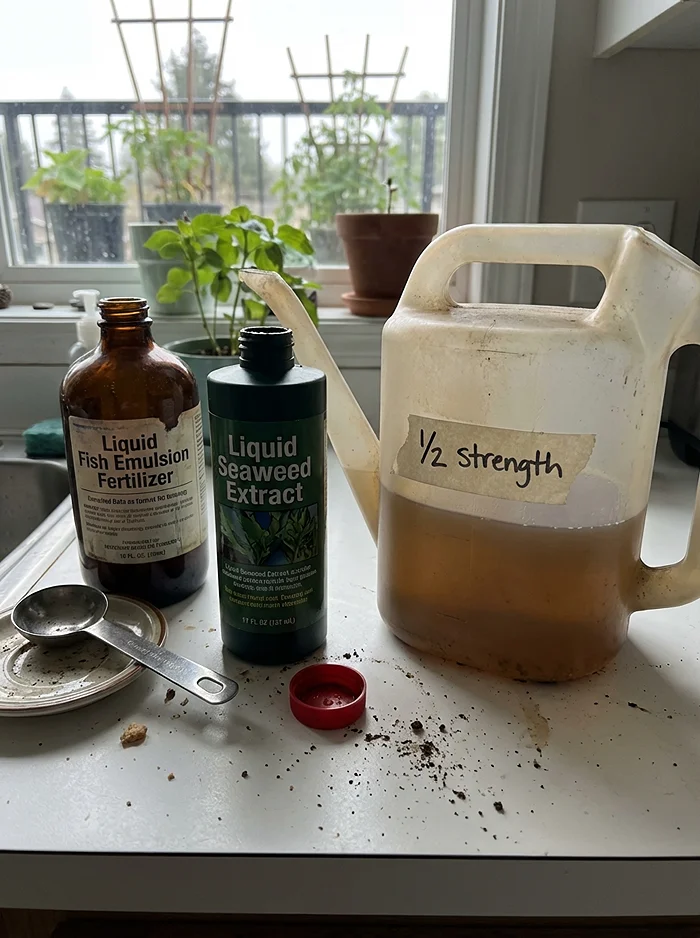
| Phase 3: Peak Summer | Every 3rd watering | Dilute liquid (fish emulsion or seaweed) | ½ label strength |
| Phase 4: Fall Wind-Down | 6–8 weeks before first frost | Potassium-only (kelp extract) | ¼ strength, then stop |
Bookmark that table. Seriously. You’ll come back to it all season.
What Those Three Numbers on the Bag Actually Mean (N-P-K Decoded)
You’ve seen those mysterious numbers on every fertilizer bag — 3-4-4, 10-10-10, 5-1-1. They look like a bad locker combination, but they’re actually the N-P-K ratio for vegetables, and they tell you exactly what’s inside. Let’s break them down without making it feel like a chemistry exam.
Nitrogen (N) — The “Grow More Leaves” Nutrient
Nitrogen is the engine behind every green thing your plant does. Chlorophyll, stems, new leaves — that’s all nitrogen’s department. If your greens look pale and sad, nitrogen is the first suspect. A balanced starter ratio like 3-4-4 or 5-5-5 gives you enough push without turning your tomato plant into an all-leaf, no-fruit monster.
Phosphorus (P) — The Underground MVP
Phosphorus handles the stuff you don’t see: root growth, cell division, and the early signals that tell a plant “hey, maybe start making some flowers.” In containers, your plant’s root zone is tiny — think studio apartment, not sprawling estate. Every root hair counts, and phosphorus is what builds them.
Potassium (K) — The Bodyguard
Potassium keeps water flowing through cells, fights off disease, and improves fruit quality. If you’re growing on an urban balcony or rooftop — where heat radiates off concrete and wind never stops — your plants burn through potassium faster than you’d expect. It’s the nutrient that keeps everything from falling apart when conditions get stressful.
The Bonus Nutrient Nobody Talks About — Silicon: It’s technically “non-essential,” but silicon strengthens cell walls and helps plants handle drought. Research from MDPI’s Water journal found that silicon-treated plants maintain better water balance under stress. If you garden on a scorching south-facing balcony, a potassium silicate foliar spray every 7–14 days is a small move that punches above its weight.
Why Your Containers Play by Different Rules (And Why That Matters for Your Beginner Fertilizing Schedule)
Here’s where most generic gardening advice falls apart. Your patio pots aren’t a miniature backyard — they’re a completely different ecosystem.
The Six-Week Cliff
That premium potting mix you splurged on? It comes pre-loaded with fertilizer, and most people assume it’ll last the whole season. It won’t. Most bagged mixes burn through their built-in nutrients in roughly six weeks — Oklahoma State Extension confirms that nutrients lasting 3–6 months in ground soil vanish in 4–6 weeks inside a container. The volume is just too small.
This is the moment beginners panic. Everything looked amazing for five weeks, and then suddenly the lower leaves turn yellow and the whole plant looks defeated. It’s not dying — it’s starving. And now you know to expect it.
The Leaching Problem (A.K.A. Where Your Nutrients Actually Go)
Every time you water your container until it drains from the bottom — which you should be doing — roughly 20% of the water-soluble nitrogen and potassium goes straight out the drainage hole. Do that daily in July, and you’re basically flushing your container gardening fertilizer investment down the drain. Literally.
This is why the “little-and-often” liquid feeding approach works so much better in small spaces than one big granular dump at the start of the season.
Your 4-Phase Beginner Fertilizing Schedule for Small-Space Gardens (Step by Step)
Alright, here’s the actual playbook. Pin this section.
Phase 1 — The Pre-Planting Setup (2 Weeks Before You Plant Anything)
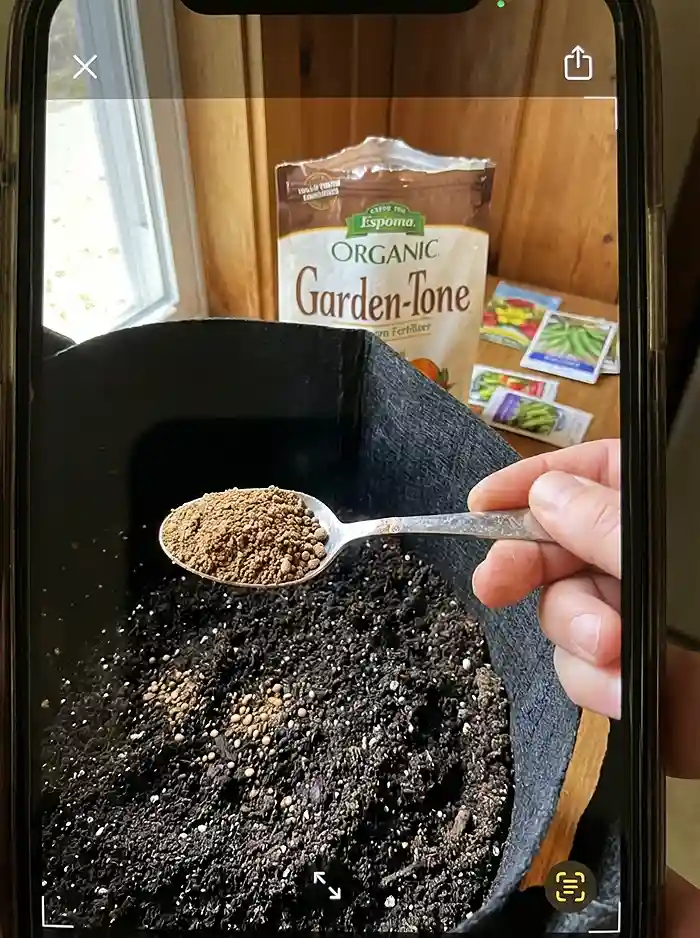
Two weeks before transplanting or sowing seeds, mix an organic granular fertilizer into the top 3–5 inches of your potting mix. Something OMRI-listed like Espoma Garden-Tone (3-4-4) is a solid, no-drama choice.
How much? The OSU Extension recommends 3 lbs of actual nitrogen per 1,000 sq ft. But you’re not farming a field, so here’s what that translates to:
- 4 × 8 ft raised bed: roughly ½ cup of a 5-5-5 granular
- 5-gallon pot: 1–2 tablespoons, mixed in well
That slow-release base is your six-week runway. It keeps roots fed while the plant settles in.
Phase 2 — Hands Off, Then Gentle (Seedling → First True Leaves)
I know, I know — you just planted something and you want to do something. But do not fertilize at transplant. Those tiny root hairs are already damaged from being moved, and hitting them with fertilizer salts right now is like pouring hot sauce on a paper cut.
Wait until you see the first set of true leaves — that’s usually 2–3 weeks after transplanting. Then, and only then, apply a liquid fertilizer diluted to ¼ label strength. Think of it as a gentle handshake, not a bear hug.
Phase 3 — Peak Summer and the “Every-Third-Watering” Rule
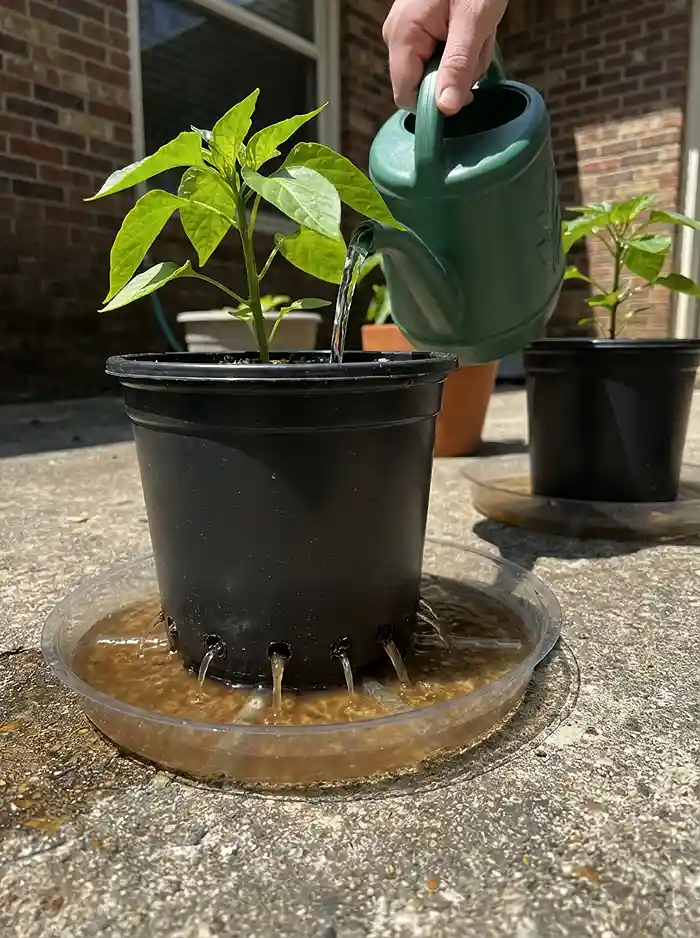
This is the heart of your beginner fertilizing schedule for small-space gardens, and it’s beautifully simple: when you’re watering daily in hot weather, fertilize every third time with a dilute liquid feed.
If you water Monday through Sunday, that means you’d feed on Monday and Thursday at half the label strength. Easy to remember, hard to mess up.
- Growing leafy stuff? Fish emulsion (5-1-1) is your friend.
- Fruit is setting? Switch to a higher-potassium formula (2-4-6). Neptune’s Harvest or Jobe’s Organics liquid are both OMRI-certified and widely available.
This rhythm keeps replacing what leaching steals without overwhelming the small soil volume. If you’re also tracking your other seasonal tasks, our Small-Space Gardening Monthly Maintenance Calendar for Beginners pairs perfectly with this feeding schedule.
Phase 4 — The Fall Slowdown (6–8 Weeks Before First Frost)
Here’s a mistake I see every year: gardeners keep feeding nitrogen right up until frost and then wonder why their plants turned to mush overnight. Late nitrogen pushes soft, tender new growth that freezes and dies, dragging the whole plant down with it.
Stop nitrogen feeds 6–8 weeks before your expected first frost. (Check the USDA Plant Hardiness Zone Map if you don’t know your frost date — it takes 30 seconds.)
You can continue potassium-only feeds like kelp extract at ¼ strength for two more weeks after dropping nitrogen. This helps harden off what’s already there without encouraging new growth that can’t survive.
Not All Veggies Eat the Same: Crop-Specific Fertilizing for Small-Space Gardens
Heavy Feeders — Tomatoes, Peppers, Brassicas
These are the golden retrievers of the vegetable world — always hungry, always asking for more. Give them steady nitrogen through vegetative growth, then switch to a high-phosphorus bloom booster when flowers appear. Side-dress container tomatoes every two weeks with a 3-4-6 formula, and toss in a calcium source (crushed eggshells or liquid CalMag) to dodge blossom-end rot.
The Self-Feeders — Peas, Beans, and Legumes
Legumes are the overachievers that bring their own lunch. They host Rhizobium bacteria in root nodules that convert atmospheric nitrogen into plant food. More nitrogen from you actually backfires — it stunts pod production and gives you bushes of leaves with nothing to pick. Inoculate seeds at planting and only fertilize with a low-N, higher-P-K blend if a soil test says you must.
Sensitive Roots — Carrots, Radishes, Root Crops
Too much nitrogen turns carrots “hairy” and makes radishes fork and split. Nobody wants a mutant carrot. Rely on your Phase 1 basal dose only — no mid-season nitrogen top-ups. A light potassium side-dress at mid-growth is perfectly fine and actually improves root quality and flavor.
Liquid vs. Granular Fertilizer: You Don’t Have to Choose One
The liquid vs granular debate in container gardening is kind of a false choice — you honestly want both, and here’s why:
| Factor | Liquid | Slow-Release Granular |
|---|---|---|
| How fast it works | Hours | 4–12 weeks |
| Leaching risk | High — reapply often | Low — coated pellets meter it out |
| Best use | Mid-season feeds, quick corrections | Pre-planting base, low-maintenance beds |
| Burn risk | Higher if you forget to dilute | Lower, but salt can build up over time |
| Season cost | Higher (you keep buying it) | Lower (fewer applications) |
The smart play: Granular for Phase 1 foundation work, liquid for Phases 2–4 maintenance. Think of granular as the slow-cooked stew and liquid as the espresso shot when energy dips.
One more thing — organic granulars like bone meal and feather meal depend on soil microbes to release nutrients, so they’re slower in cold weather. Organic liquids like fish emulsion and seaweed deliver a fast, gentle boost without the synthetic salt buildup that trashes soil health over time.
2026 Trends Worth Trying: Bokashi and Smart Sensors
Bokashi — Composting for People Without a Yard
If you’ve ever wanted to compost but thought “I live in an apartment, that’s not happening” — Bokashi is for you. It ferments kitchen scraps (yes, including meat and dairy) anaerobically in a sealed bucket. No smell, no outdoor space needed, no raccoon problems.
The liquid byproduct, called “Bokashi tea,” gets diluted 1:10 with water and works as a mid-season bio-stimulant. NC State Extension (2025) calls it one of the fastest, lowest-barrier composting methods for urban growers. Hard to argue with that.
Smart Fertigation — Let the Sensors Help
Soil sensors like the Yieryi 6-in-1 ($30–$50) now measure N-P-K, moisture, pH, and temperature straight from your phone. Pair one with a drip-irrigation timer and you can automate dilute liquid feeding based on what your soil actually needs — not what a calendar says.
It won’t replace knowing your plants, but it’s a useful safety net. Especially for fine-tuning that every-third-watering rule when weather patterns get weird.
Troubleshooting: What Your Leaves Are Trying to Tell You
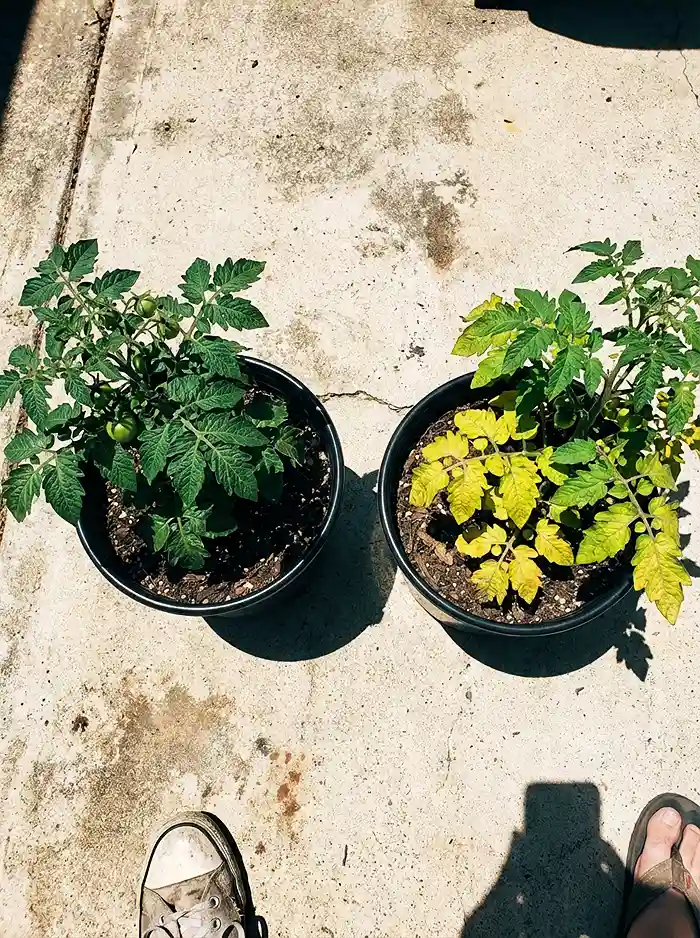
Plants can’t talk, but they’re surprisingly dramatic communicators. Here’s a quick diagnostic cheat sheet for your beginner fertilizing schedule for small-space gardens:
| What You See | What It Probably Means | What to Do |
|---|---|---|
| Yellowing lower leaves (older ones first) | Nitrogen deficiency | Fish emulsion at half-strength; repeat in 5 days |
| Purple or reddish leaf undersides | Phosphorus deficiency | Top-dress bone meal; check if soil is too cold (cold locks out P) |
| Brown, crispy leaf edges | Potassium deficiency | Kelp extract drench at ¼ label rate |
| White crust on the soil surface | Salt buildup from over-fertilizing | Flush with 3× the pot’s volume in plain water; skip 2 feed cycles |
| Dark green, gorgeous leaves but zero fruit | Nitrogen excess | Stop all N feeds; switch to a high-P-K bloom formula |
The universal panic button: When in doubt, flush the container with plain water, wait one full week, then resume feeding at half your normal strength.
The 5 Fertilizing Mistakes That Trip Up Every Beginner
- Feeding on planting day. Transplant shock plus fertilizer burn equals a very short gardening career for that seedling. Wait for true leaves.
- Grabbing lawn fertilizer off the shelf. It’s packed with way too much nitrogen and often contains broadleaf herbicides like 2,4-D — which will cheerfully murder your vegetables.
- Forgetting the six-week cliff. Everything looks fantastic for five weeks, then the bottom leaves go yellow because the potting mix ran out of gas. Now you know it’s coming.
- Treating every crop the same. A tomato’s fertilizer needs are the opposite of a carrot’s. Match the feed to the plant.
- Fertilizing dry soil. Always water with plain water first, then feed. Salts concentrate in dry media and torch roots on contact.
Frequently Asked Questions
Can I use lawn fertilizer in my vegetable garden?
Nope. Lawn fertilizers run hot with nitrogen and often hide broadleaf herbicides that will wreck your edible crops. Stick to something labeled for vegetables.
Do I need to fertilize every single year?
You do. Crops pull nutrients out of the soil every season. A soil test every 2–3 years (usually free or cheap through your local Land-Grant Extension lab) tells you exactly what’s missing. Without a test, a balanced organic vegetable fertilizer applied each spring is a safe annual habit.
Is organic fertilizer actually “safer”?
It’s generally gentler on soil biology and less likely to leach into waterways. But concentrated organics like blood meal (12-0-0) can absolutely burn roots if you get heavy-handed. “Organic” isn’t a synonym for “unlimited.”
What exactly is the six-week rule?
Most bagged potting mixes include enough built-in fertilizer for roughly six weeks of growth. After that, supplemental feeding isn’t optional — it’s survival. Plan for it and your plants won’t hit that sudden, confusing decline.
How do I know my containers need fertilizer right now?
Watch the oldest, lowest leaves. If they’re turning yellow while the newer growth up top stays green, the plant is cannibalizing nutrients from old tissue to feed new growth — a classic “feed me” signal. A $30 soil NPK sensor can catch the deficiency before you even see symptoms.