

Nutrient Deficiency in Container Plants
Nutrient deficiency in container plants shows up as a secret language written right on the leaves — and once you know how to read it, you’ll stop wasting money on the wrong fix.
I’ve been growing tomatoes, peppers, and herbs in pots on my zone 6b rooftop for over a decade. I’ve killed a ‘Sun Gold’ tomato by dumping nitrogen on what turned out to be overwatering. Learning to diagnose first saved that plant’s successors.
Table of Contents
The Secret Language of Leaves: Diagnosing Your Container Garden
Your plants can’t talk, but they’re constantly signaling. Every yellow patch, purple tinge, or crispy margin is a specific message — if you know the code.
Blindly applying fertilizer without reading those signals is how most gardeners make things worse. The wrong nutrient at the wrong time can lock out the right ones or chemically burn your roots.
This guide will show you exactly how to match leaf symptoms to deficiencies, so you fix what’s actually broken. These plant nutrient deficiency symptoms are your starting point.
Why Container Plants Are Highly Susceptible to Nutrient Loss
Growing vegetables in pots creates a closed ecosystem. There’s no soil food web, no mineral-rich subsoil, and no buffer against rapid nutrient depletion.
Container vegetable gardening demands more attention to feeding than in-ground beds — and understanding why helps you stay ahead of the problem.
The “Flushing” Effect of Daily Watering
Summer containers need watering daily — sometimes twice. Every time water drains out the bottom, it takes soluble nutrients with it.
Nitrogen, potassium, and magnesium are the first to go. They’re water-soluble and exit fast. By mid-July in most zones, a pot that started the season well-fed is often running on empty.
I tested this in 2023 using a cheap EC (electrical conductivity) meter. A freshly fertilized 5-gallon pot registered 2.1 mS/cm. After two weeks of daily watering without feeding, it dropped to 0.4 mS/cm — near sterile.
Pro tip: Bottom watering (setting the pot in a tray of water to soak up from below) dramatically reduces nutrient flushing compared to top watering.
Exhausted Potting Soil and pH Imbalances
Standard potting mixes break down within one to two growing seasons. The organic matter compresses, drainage worsens, and pH drifts — often turning acidic.
When pH drops below 6.0 or climbs above 7.5, a condition called nutrient lockout kicks in. The minerals are physically present in the soil, but the chemical bonds that form at those pH extremes make them inaccessible to plant roots.
You can pour fertilizer into a pH-imbalanced pot all season and the plant will still starve. Checking pH before treating is not optional — it’s step one.
Mobile vs. Immobile Nutrients: The Key to Diagnosis
Before you look at a single leaf, you need one rule: where is the damage appearing?
Some nutrients move freely through a plant (mobile). Others, once deposited, stay put (immobile). That movement — or lack of it — tells you exactly what you’re dealing with.
Old Leaves vs. New Leaves: Where Is the Damage?
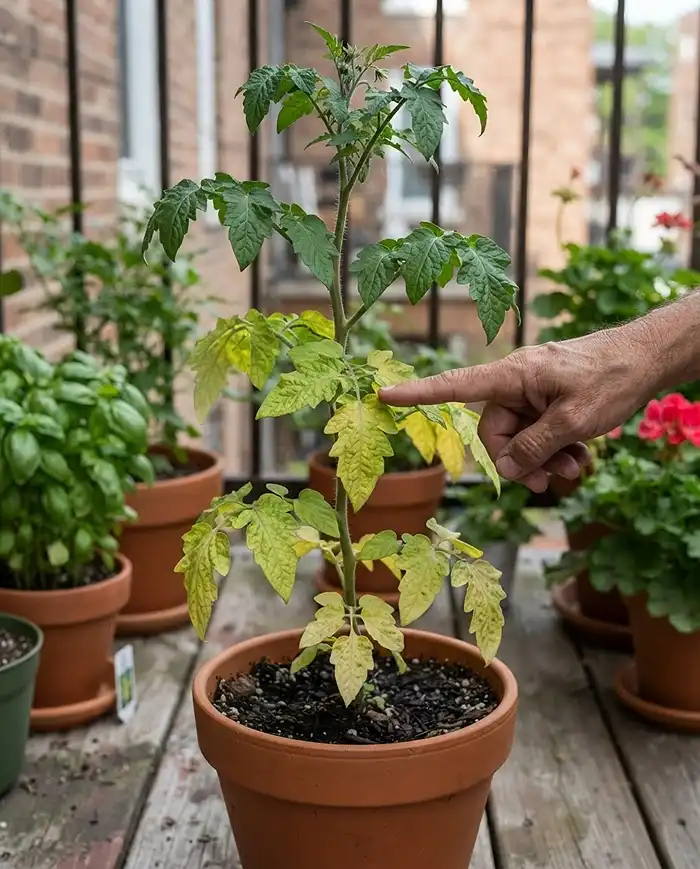
Quick Answer: Mobile nutrient deficiencies (nitrogen, phosphorus, potassium, magnesium) appear on old, lower leaves first. Immobile deficiencies (calcium, iron, boron) appear on new, upper growth first.
Here’s why: when a mobile nutrient runs low, the plant pulls it from older leaves and ships it to actively growing tissue. The old leaves yellow and die so the new leaves can thrive.
With immobile nutrients, the plant can’t relocate them. Whatever’s been deposited stays there. So new growth — which can’t access reserves — shows the deficiency first, while older leaves stay green.
Stand over your pot and look at it top to bottom. Yellowing creeping up from the bottom? Mobile. Pale, strange new growth at the tips while older leaves look fine? Immobile. That one observation cuts your diagnosis in half.
Identifying Macronutrient Deficiencies (N-P-K)
The “Big Three” — nitrogen (N), phosphorus (P), and potassium (K) — are what plants consume in the largest quantities and what washes out fastest in containers.
Learn these three visually and you’ll catch 80% of deficiency problems before they become plant-killers.
Nitrogen (N): Overall Yellowing on Older Leaves
Quick Answer: Nitrogen deficiency causes uniform pale yellowing starting at the oldest lower leaves and moving steadily upward. Fix fast with liquid fish emulsion or blood meal.
The yellowing is even — not blotchy, not with green veins, not limited to edges. The whole leaf pales, starting at the tip. Lower leaves drop first.
In my experience, this is the most common deficiency I see in containers mid-season. My ‘Marketmore’ cucumbers looked washed out by late July 2022 despite starting in fresh potting mix. Three applications of 5-1-1 fish emulsion every five days brought the color back within two weeks.
- Fast fix: liquid fish emulsion (apply every 5-7 days until color returns)
- Slower fix: blood meal scratched into the soil surface (feeds over 2-4 weeks)
- Confirm it’s not overwatering first — soggy roots cause near-identical yellowing
Pro tip: Always check soil moisture before applying nitrogen. A waterlogged pot mimics nitrogen deficiency perfectly, and adding fertilizer to drowning roots makes things worse.
Phosphorus (P): Purple or Dark Green Tints
Quick Answer: Phosphorus deficiency shows as unnatural dark green, purple, or reddish-blue tints on the undersides of older leaves, especially in cool weather or on young transplants.
Phosphorus is critical for root development and flower/fruit set. When it’s missing, the plant can’t transfer energy efficiently, and anthocyanin pigments accumulate — giving leaves that purple cast.
Cool soil temperatures below 55°F can trigger phosphorus lockout even in well-fed pots. I’ve seen this every spring in zone 6b when I transplant peppers too early — the undersides go purple within a week of a cold snap.
- Quick fix: liquid phosphorus fertilizer applied as foliar spray for fastest uptake
- Soil amendment: bone meal worked into the top inch of potting mix
- Check soil temps first — if below 55°F, warming the pot matters as much as feeding
Pro tip: Some tomato and pepper varieties naturally show purple tinges in cool conditions. It’s only a deficiency if it persists after temperatures rise above 60°F.
Potassium (K): Brown, Crispy Leaf Edges
Quick Answer: Potassium deficiency produces scorched, crispy browning strictly around the outer margins and leaf tips — starting on older leaves. Liquid kelp extract is the fastest reliable fix.
The key identifier is the pattern: brown and crispy only at the edges, with the center of the leaf staying green. This is called “marginal scorch,” and it’s distinct from fertilizer burn or drought stress (though those can look similar).
Potassium regulates water movement in plant cells and powers the immune system. A potassium-deficient plant wilts faster, resists disease poorly, and produces small, bland fruit.
In 2024, my container bell peppers showed classic marginal scorch by mid-August. Two weekly applications of liquid kelp (0-0-3) corrected it within ten days. New leaves showed no scorch; the older damaged ones never fully recovered.
Pro tip: Don’t confuse marginal scorch with salt burn. Salt burn from over-fertilizing looks nearly identical — if you haven’t fertilized recently, it’s potassium; if you’ve been heavy-handed with synthetic ferts, it’s likely salt damage.
Identifying Secondary and Micronutrient Deficiencies
Even with perfect N-P-K management, container plants frequently run short on secondary and trace minerals. These wash out of standard potting soils just as readily, and their deficiency symptoms are often misdiagnosed.
For vegetables in pots that fruit heavily — tomatoes, peppers, squash — secondary nutrients matter enormously for yield quality.
Calcium (Ca) and Magnesium (Mg): Chlorosis and Rot
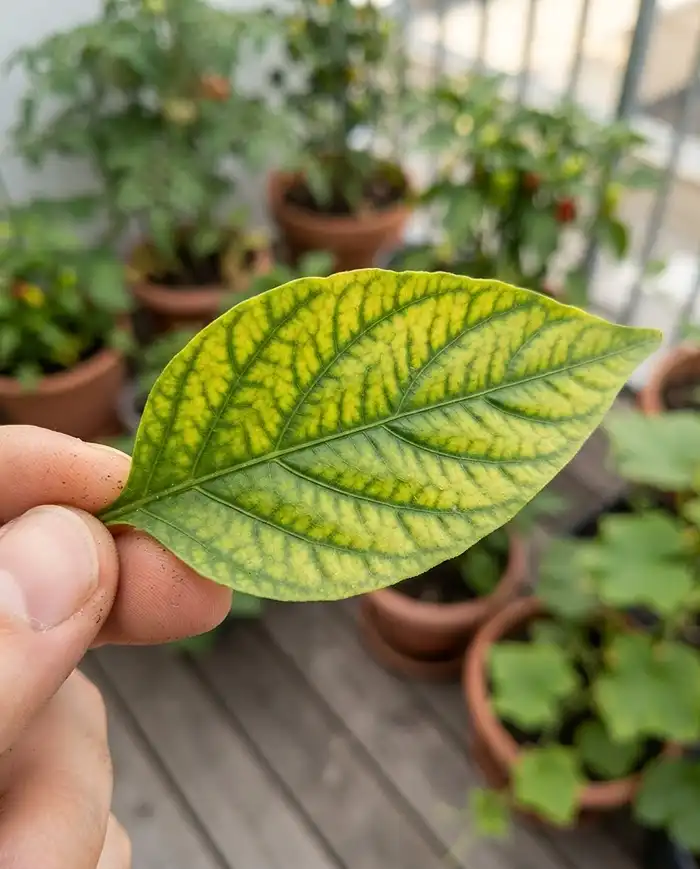
Quick Answer: Magnesium deficiency causes interveinal chlorosis (yellow leaves with green veins) on old growth. Calcium deficiency deforms new leaves and causes blossom end rot in fruiting crops.
Magnesium is mobile and shows up on older leaves first. The pattern is distinctive: the veins stay dark green while the tissue between them turns bright yellow. It’s called interveinal chlorosis, and it’s almost unmistakable once you’ve seen it.
Fix: 1 tablespoon of Epsom salts (magnesium sulfate) per gallon of water, applied as a foliar spray. Results visible in 5-7 days.
Calcium is immobile and hits new growth. Leaves at the top curl, distort, or develop brown edges. In tomatoes and peppers, it shows as black, sunken patches on the blossom end of fruit — a condition called blossom end rot.
Fix: agricultural gypsum (calcium sulfate) scratched into the soil, plus consistent watering. Blossom end rot is often triggered by irregular watering that prevents calcium uptake, not absence of calcium in the soil.
Iron (Fe): Yellowing on New Growth
Quick Answer: Iron deficiency (iron chlorosis) causes bright yellow new leaves at the top of the plant with dark green veins remaining — the opposite of magnesium deficiency, which hits old leaves.
Iron is immobile. The newest, fastest-growing leaves turn yellow first, with their veins staying noticeably green. The pattern is vivid and easy to spot once you know what you’re looking at.
The most common cause isn’t iron-deficient soil — it’s high pH. Above 7.0, iron becomes chemically unavailable even when present. I’ve seen this on my container blueberries every year when I use hard tap water and the pH creeps up.
Fix: chelated iron (available at most garden centers) applied as a foliar spray for fast results. Also lower soil pH with sulfur or by switching to rainwater or acidified water for irrigation.
Step-by-Step Guide to Rescuing Deficient Plants
Diagnosis first, treatment second. Running in with fertilizer before checking soil conditions is how gardeners create two problems from one.
Here’s the protocol I use every time a plant looks off (as of spring 2025, this is still my go-to process):
- Check soil moisture — push your finger 2 inches into the soil. If it’s wet, stop. Overwatering causes symptoms identical to nitrogen deficiency. Don’t fertilize a wet pot.
- Test pH — use a basic soil pH meter or test strips. Target range for most vegetables in pots is 6.2 to 6.8. Outside that range, fix pH before adding any nutrients.
- Flush the pot — run pure water (ideally filtered or rainwater) through the pot for 3-5 minutes until it runs clear. This removes salt buildups and resets the soil chemistry baseline.
- Apply foliar spray — mix a half-strength liquid fertilizer appropriate to the deficiency you’ve diagnosed and spray directly onto leaves. Foliar feeding bypasses struggling roots and delivers nutrients in 24-48 hours.
- Follow up with soil feeding — once the plant stabilizes, apply a balanced liquid fertilizer at the soil level to rebuild the root-zone nutrient reserve.
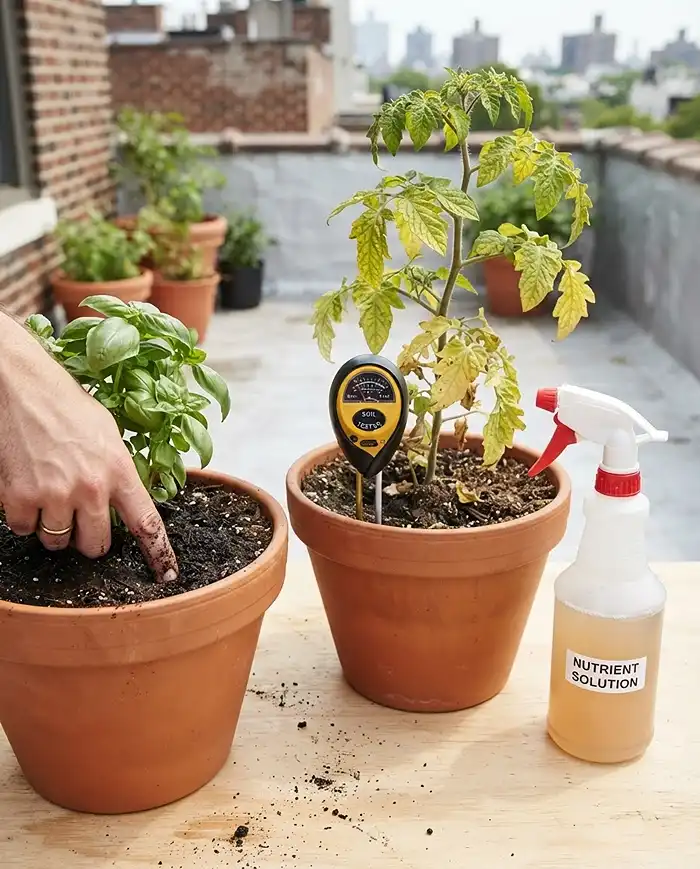
Watch the new growth, not the old leaves. New growth that comes in green and healthy is your confirmation the treatment worked. Old damaged leaves won’t recover — that’s normal.
Preventative Maintenance and Feeding Schedules
Treating deficiencies is always harder than preventing them. A proactive feeding system takes maybe 10 extra minutes per week and saves hours of troubleshooting later.
These container garden tips work whether you’re growing one pot of basil or twenty containers of mixed vegetables.
Formulating a Slow-Release Base
Before you plant anything, mix these into your potting soil:
- Slow-release granular fertilizer (4-6 month formula, like Osmocote 14-14-14): 1 tablespoon per gallon of pot volume
- Worm castings: 10-15% by volume mixed into the potting mix before planting
- Dolomitic lime (if using peat-based potting mix): 1 teaspoon per gallon to buffer pH
This creates a slow-release nutrient base that feeds consistently over weeks. Worm castings add beneficial microbes that help make nutrients available even as the base mix breaks down.
Pro tip: Worm castings don’t wash out the way soluble fertilizers do. They’re bound to organic matter and release slowly — which is exactly what a container garden needs.
Routine Liquid Feeding
Even with a good slow-release base, summer watering flushes out mobile nutrients faster than granular fertilizers can replace them. You need a liquid supplement schedule.
My routine: half-strength balanced organic liquid fertilizer (like 3-3-3 or 4-4-4) every 10-14 days through the growing season. Every fourth feeding I switch to a potassium-focused formula (like liquid kelp) to offset the heavy flushing losses.
Cut feeding back to once per month in early fall as growth slows. Overfeeding late in the season pushes soft, frost-vulnerable new growth.
Common Problems and Solutions
Two mistakes cause more failed diagnoses than anything else. If your treatment isn’t working, check these first.
Misdiagnosing Overwatering as Deficiencies
Waterlogged roots can’t absorb oxygen, which means they can’t absorb nutrients either. The result is overall yellowing and leaf drop — a near-perfect impersonation of nitrogen deficiency.
Before treating any suspected deficiency, do the finger test: push your finger 2 inches into the soil. If it comes out damp, hold the fertilizer. Lift the pot — if it feels heavy, it’s holding water. Check that drainage holes aren’t blocked.
Let the soil dry to slightly moist before treating. Applying nitrogen fertilizer to waterlogged roots makes things worse, not better.
Fertilizer Burn from Over-Correcting
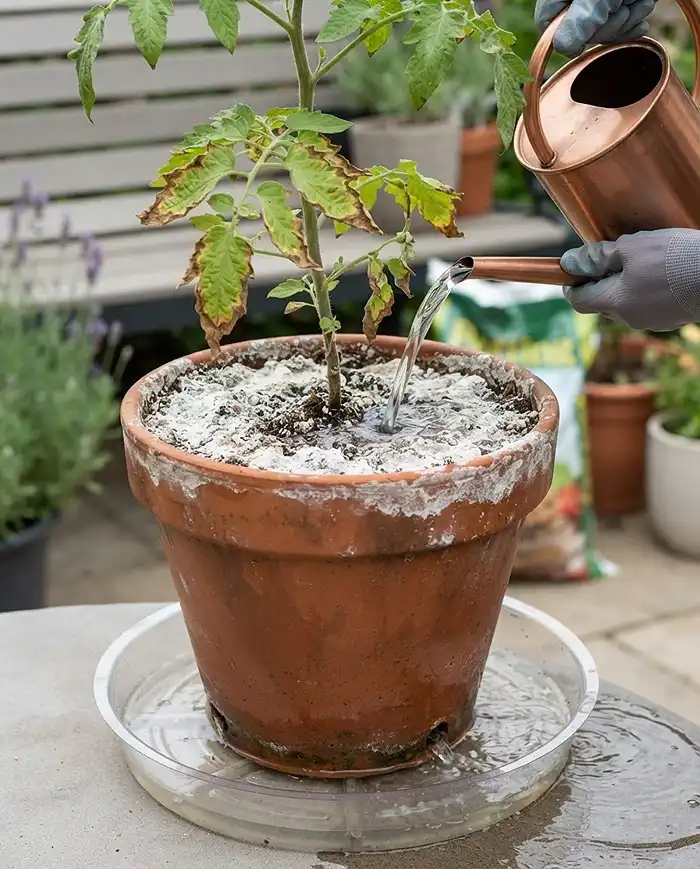
Over-applying synthetic fertilizer creates a high-salt environment in the soil. Plants can’t absorb water from high-salt soil, so they dehydrate — causing crispy brown leaf margins that look exactly like potassium deficiency.
If you suspect salt burn, flush the pot heavily with distilled or filtered water — run at least 3x the pot’s volume through it over an hour. The goal is to leach out the excess salts.
Switch to organic or half-strength fertilizers going forward. Organic fertilizers are far harder to over-apply because they release slowly through microbial activity.
nutrient deficiency in container plants FAQs
Can a plant recover its green color from severe yellowing?
Mildly yellowed leaves can regain color after treating a nitrogen or iron deficiency. Severely yellowed or necrotic (brown, crispy) leaves are biologically dead and will not recover. Look to the new growth — if it comes in green after treatment, the fix worked. Remove fully dead leaves to prevent fungal problems.
Should I cut off the leaves that show nutrient deficiencies?
Leave partially yellowed leaves on the plant while it recovers. The plant is actively pulling nutrients from those leaves to survive — removing them steals that resource. Prune away only leaves that are completely brown and crispy, as dead tissue can harbor fungal disease.
How does soil pH affect nutrient lockout in pots?
When container soil drops below 6.0 or rises above 7.5, the chemical bonds in the soil lock up essential minerals like iron and calcium. You can add as much fertilizer as you want, but the plant will still starve until pH is corrected. Test pH before treating any deficiency — fix pH first, then feed.
How often should I test the soil pH in my containers?
Test at the start of the season, again at mid-season (around 6-8 weeks in), and any time a plant looks off and fertilizer isn’t helping. Containers drift in pH faster than in-ground beds, so regular testing prevents surprises. A basic soil pH meter costs under $15 and pays for itself in one season.
What’s the best fertilizer for container vegetable gardening to prevent deficiencies?
A slow-release granular fertilizer mixed into the potting soil at planting, supplemented with half-strength liquid organic fertilizer every 10-14 days, covers most macronutrient needs. Add a broad-spectrum micronutrient supplement once a month to prevent trace mineral deficiencies that standard N-P-K fertilizers miss.
Key Takeaways
- Diagnosing nutrient deficiency in container plants starts with one question: is the damage on old lower leaves (mobile nutrients) or new upper leaves (immobile nutrients)?
- The three most common macronutrient deficiencies — nitrogen (uniform yellowing), phosphorus (purple tints), and potassium (crispy margins) — all appear on older growth first.
- Always test soil pH and moisture before treating. A pH outside 6.0-7.5 causes nutrient lockout regardless of how much fertilizer you add.
- Prevent deficiencies by mixing slow-release granular fertilizer and worm castings into your container garden soil at planting, then supplementing with liquid feed every 10-14 days through summer.
- New growth that comes in healthy after treatment is your proof the fix worked — never judge by the leaves that were already damaged.
For more on reading plant symptoms, the University of Minnesota Extension‘s guide to nutrient deficiencies in vegetables is one of the most reliable free resources available.