

Summer Container Garden Care
Let me be honest with you: I’ve killed more container plants in July than I care to admit. Not from neglect — from doing the wrong things at the wrong time. Watering at noon. Fertilizing during a heat wave. Leaving a black plastic pot on south-facing concrete like some kind of botanical crime scene.
Here’s the thing about summer container garden care — it’s a completely different game than growing in the ground. Your pots are basically tiny pressure cookers with drainage holes.
The soil heats up faster, dries out faster, and there’s nowhere for roots to escape when things go sideways. But once you understand why containers struggle in summer, keeping them alive (and even thriving) becomes surprisingly straightforward.
This is everything I wish someone had told me before my first July wipeout.
Table of Contents
Why Containers Are Basically Playing Summer on Hard Mode
Here’s a mental image for you: while your neighbor’s in-ground tomatoes are sitting in cool, deep earth with billions of microorganisms buffering temperature swings, your container tomato is perched on a broiling patio in what amounts to a ceramic cereal bowl of soil.
That’s the fundamental problem. Containers have tiny soil volumes, zero thermal mass, and walls that absorb direct sunlight. On a 95°F afternoon, soil temperature inside a dark pot can blow past 130°F — and that’s not an exaggeration. At those temps, the fine feeder roots responsible for absorbing water and nutrients literally cook.
And once those roots are damaged? Your plant can’t hydrate even when the soil is soaking wet. That’s why summer container garden care starts with understanding this one reality: everything that goes wrong traces back to heat and the small, exposed environment your plants are living in.
The good news? Every single problem has a fix. Let’s walk through them.
Your Pot Is Either Helping or Hurting — There’s No Middle Ground
Dark Pots Are Basically Solar Ovens
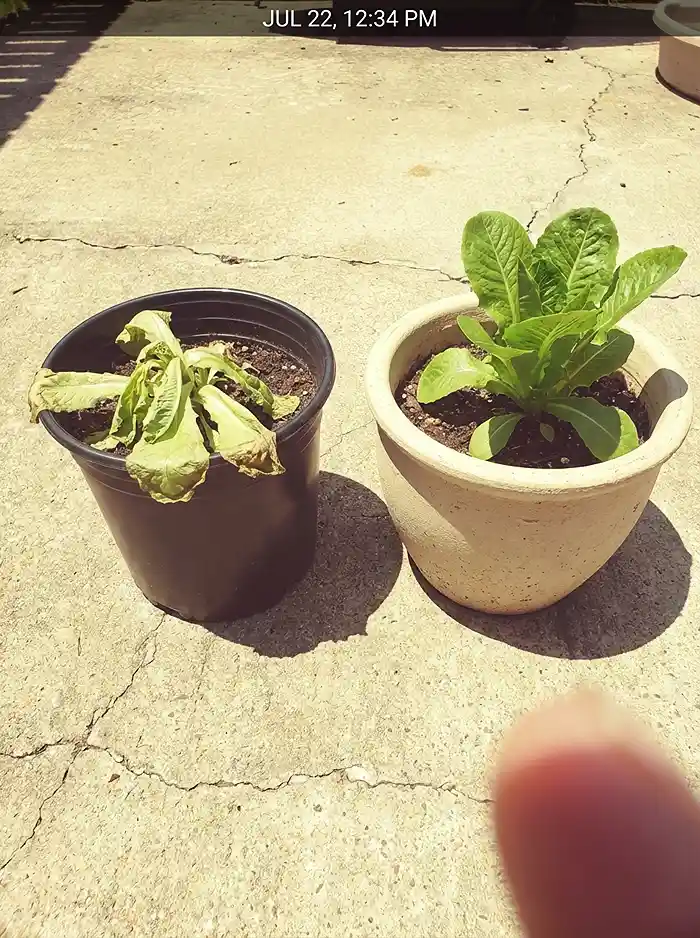
I’m not going to sugarcoat this: if you’re growing in black nursery pots sitting in full sun, you’re making summer 10x harder than it needs to be.
Dark plastic and metal containers act as solar collectors. Black plastic can push internal soil temperatures 20–30°F above the air around them. Metal? Even worse. A galvanized steel planter on concrete in July is essentially slow-cooking your plant’s root system from the outside in.
If you already own dark pots and don’t want to replace them, don’t panic — I’ve got a workaround below. But for new purchases, color matters more than you think.
Picking the Right Material (A Quick, Honest Comparison)
Not all pots are created equal, and how they perform in heat varies wildly:
- Unglazed terra cotta is a personal favorite. Moisture wicks through the porous walls and evaporates, naturally cooling the pot. The catch? It dries out faster, so you’ll water more. Fair trade, in my opinion.
- Glazed ceramic is probably the best all-around summer performer. It insulates roots, and light-colored glazes bounce solar radiation instead of soaking it up.
- Thin plastic does almost nothing to protect roots from heat. It’s fine for shade positions, but on a sunny deck? You’re asking for trouble.
- Fabric grow bags breathe beautifully and air-prune roots (which is great for plant health), but they can dry out twice a day in extreme heat. I love them for spring and fall — summer’s a tougher sell unless you’re very committed to watering.
The “Pot-in-Pot” Trick That Changed My Summer Game
This is one of those tips that sounds too simple to work, but it genuinely does.
Take your planted pot and slide it inside a slightly larger decorative container. That air gap between the two walls acts as insulation — the same principle behind double-walled travel mugs. The inner pot stays significantly cooler than it would sitting exposed.
Don’t have a spare outer pot? Wrap your containers in damp burlap or hessian fabric. As the burlap dries, it pulls heat away through evaporative cooling. It’s low-tech, nearly free, and surprisingly effective. For maximum benefit, make the outer pot (or the wrap) a light color — white, cream, or pale terracotta — to reflect solar radiation.
Watering Container Plants in Heat: It’s Not Just “Add More Water”
Why the 5 AM–9 AM Window Isn’t Optional
If there’s one piece of summer container garden care advice that every horticulturist, extension agent, and seasoned gardener agrees on, it’s this: water in the morning.
Between 5 AM and 9 AM, your plant gets maximum uptake before transpiration kicks into high gear at midday. The soil warms gradually. Wet foliage dries before evening, which keeps fungal problems at bay.
Now here’s where I’ll push back on conventional wisdom a little: during genuine heat waves — we’re talking sustained temps above 95°F (35°C) — a second, lighter watering in the late afternoon or early evening is not just acceptable, it’s often necessary. The old “never water in the evening” rule was written for cooler climates. When your pots are baking, the risk of dehydration far outweighs the risk of a little fungus.
“False Watering” — The Problem You Don’t Know You Have

This one drives me nuts because it’s invisible. And I’d bet money most gardeners have experienced it without realizing.
When potting mix dries out completely, the peat or coir in the blend turns hydrophobic — it repels water instead of absorbing it. The soil shrinks, pulls away from the pot walls, and creates a gap around the inside edge. When you water from the top, the water zips straight down that gap, pours out the drainage holes, and you walk away thinking the job’s done.
Meanwhile, the actual root ball is still bone dry.
The telltale sign: look at the inside edge of your pot. If you see a visible gap between the soil and the pot wall, you’ve got hydrophobic soil — and top watering alone won’t fix it.
How to Actually Fix It: The Bottom-Watering Recovery Protocol
When soil goes hydrophobic, you need to rehydrate from the bottom up. Here’s the step-by-step:
- Place the pot in a basin, tub, or even a large bucket of room-temperature water (cold water can shock heat-stressed roots — don’t skip this detail).
- The water level should come about halfway up the pot.
- Walk away for 15–30 minutes. Let capillary action do the work. Come back when the soil surface feels damp.
- Remove the pot and let it drain completely.
Got a massive planter you can’t lift? Grab a chopstick or wooden skewer, poke 8–10 holes down through the soil mass, then water on a slow, gentle trickle. Pause. Repeat three or four times. Those holes break the hydrophobic barrier and let water reach the core.
Self-Watering Setups and Other Lifesavers
If you’re growing heavy feeders like tomatoes and peppers in containers, I’ll just say it: self-watering planters are worth every penny. The built-in reservoir delivers consistent moisture right to the root zone, which prevents the wet-dry swings that cause problems like Blossom End Rot.
For balcony or patio setups with multiple pots, a simple drip irrigation system on a battery timer takes the guesswork out entirely. It waters at the same time every morning whether you’re home or sleeping in — and that consistency is what container plants crave.
Water-retaining crystals (hydrogels) mixed into your potting soil are another option. They do extend watering intervals, though they lose effectiveness after a season and need replenishing.
If you’re juggling a lot of pots in a tight space, our Small-Space Gardening Monthly Maintenance Calendar for Beginners breaks down exactly what to do each month so nothing slips through the cracks.
The 90°F Rule: When Fertilizing Your Containers Will Backfire
Your Plants Aren’t Hungry — They’re Just Hot
This section might save your garden this summer, so stick with me.
When temperatures climb above 90°F (32°C), most common garden plants don’t slow down because they’re underfed. They slow down because they’re surviving. Photosynthesis drops. Growth stalls. The plant is conserving every bit of energy and moisture it has.
Now imagine dumping nitrogen-heavy fertilizer on that plant. You’re essentially forcing it to push out new growth it doesn’t have the metabolic resources to sustain. The result? Weak, leggy, soft tissue that’s even more vulnerable to heat damage than the older leaves.
I’ve done this. It’s not pretty. The plant looks worse within days, and you’re left wondering what went wrong.
The Fertilizer Salt Problem Nobody Talks About Enough
Here’s the ugly chemistry. Every time you fertilize, you’re adding mineral salts to a very small volume of soil. Between waterings, water evaporates — but those salts don’t. They concentrate.
In the heat of summer, when containers are drying out fast and you’re watering frequently, salt levels can build to toxic concentrations shockingly quickly. Those salts then burn the already-compromised root hairs your plant is desperately relying on for moisture uptake.
The visible result: scorched leaf tips, brown edges, and sometimes a rapid, heartbreaking decline that looks like disease but is really chemical burn.
One non-negotiable rule for summer container fertilizing: never apply fertilizer to dry soil. Always water thoroughly first, then feed. And if your plants are showing any signs of heat stress, skip the feeding entirely.
According to the University of Minnesota Extension’s guide on gardening in hot weather, the safest approach is to wait until cooler temperatures return and avoid fertilizing or transplanting during heat events — a recommendation that applies doubly to the confined environment of containers.
The “Low and Slow” Strategy That Actually Works
After years of trial and error (heavy on the error), here’s the summer container garden care feeding schedule I swear by:
- At planting in spring: Mix slow-release granules into the potting soil. These provide a gentle, steady nutrient baseline while temps are still moderate.
- As summer arrives: Switch to half-strength liquid feed — I like seaweed or kelp-based formulas, or a balanced low-NPK ratio like 3-4-4 — applied every 7–14 days. But only when daytime highs stay below 90°F.
- During heat waves: Stop. All. Fertilizing. Seriously. Just stop. Resume only after temps drop below 90°F for three consecutive days.
- Mid-summer shift: Back off nitrogen. Bump up phosphorus and potassium to support flowers and fruit rather than leafy growth the plant can’t sustain.
Tactical Heat Shielding — Because Prevention Beats Rescue
Mulch: The Cheapest Insurance Policy You’ll Ever Buy
Think of a 1–3 inch layer of organic mulch on your container’s soil surface as a “sunhat for roots.” It’s low-tech, it’s cheap, and it works incredibly well.
Arborist wood chips, straw, coconut coir, or even light-colored decorative gravel all do the job. Mulch can reduce surface soil temperature by up to 10°F while dramatically slowing evaporation — meaning you water less and your roots stay cooler. That’s a two-for-one deal.
One thing to avoid: dyed black mulch. It absorbs heat like crazy (defeating the whole purpose) and some dyed products leach chemicals into the soil. Hard pass.
Grouping Pots Creates Its Own Mini Climate
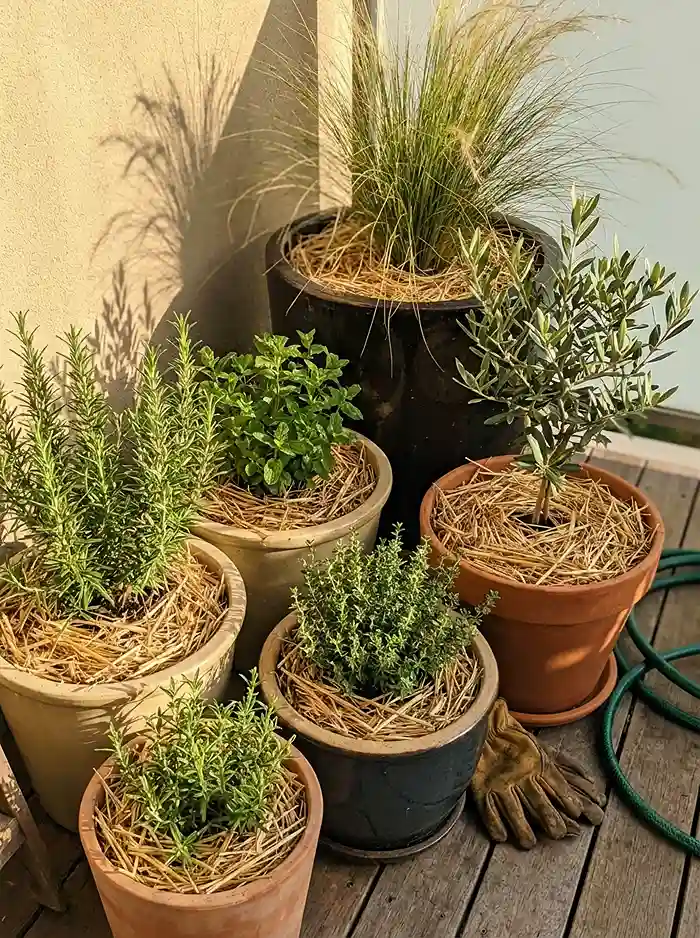
Here’s a trick borrowed from nature: plants in clusters create their own humid microclimate through collective transpiration.
When you group containers together instead of spacing them out individually, each plant’s moisture loss contributes to a shared pocket of higher humidity. This buffers all of them against heat and drying wind. It’s basically teamwork, plant-style.
Take it a step further: place a large shade-casting container — maybe a 15-gallon olive tree or a big ornamental grass — among your smaller, heat-sensitive pots. The big plant acts as a living umbrella. Position your most vulnerable containers near north-facing walls, under pergolas, or in dappled tree shade during the brutal 1–4 PM window.
Get Your Pots Off the Ground
This one’s easy to overlook and easy to fix.
Hot pavement and decking radiate heat upward. A pot sitting directly on dark concrete absorbs conducted heat from below and radiated heat from the surface — it’s getting cooked from both directions.
Elevate your containers on pot feet, bricks, or gravel-filled saucers. Even 2 inches of clearance makes a genuine difference in root zone temperature while improving drainage airflow underneath. It takes five minutes and costs almost nothing.
Reading Your Plants: What Heat Stress Actually Looks Like
A Quick Visual Diagnostic Guide
Your plants are constantly telling you what they need. Here’s how to decode the signals:
- Wilting despite moist soil → Transpiration is outrunning root uptake. This plant needs shade, not more water.
- Crispy or brown leaf edges → Root burn from heat damage or fertilizer salt buildup.
- Yellowing lower leaves → Could be nitrogen deficiency (nutrients leach fast from containers), overwatering, or denitrification in soggy soil. Don’t just fertilize — diagnose first.
- Bud or flower drop → Heat-induced abscission. Super common in tomatoes, peppers, and hibiscus when temps push above 90°F. It’s frustrating, but it’s the plant protecting itself.
- No new growth at all → Metabolic shutdown. The plant has hit pause. This is not a fertilizer deficiency — it’s survival mode.
- Soil pulling away from pot walls → Critically dehydrated, hydrophobic media. Time for the bottom-watering protocol above.
Heat Stress vs. Underwatering vs. Overwatering — How to Tell the Difference
These three problems produce maddeningly similar symptoms. This quick comparison helps you avoid treating the wrong issue:
| Symptom | Heat Stress | Underwatering | Overwatering |
|---|---|---|---|
| Wilting pattern | Midday drooping, partial evening recovery | Progressive wilt with no bounce-back | Persistent, mushy limpness |
| Leaf appearance | Bleached, pale, scorched edges | Dry, crispy, curling inward | Yellow, soft, translucent |
| Soil condition | May actually be moist | Bone dry, gap at pot edges | Soggy, possibly sour-smelling |
| Root health | Brown tips, otherwise okay | Dry and brittle | Mushy, dark, rotting |
| Response to shade | Improvement within hours | No change without water | No change |
The fastest diagnostic tool you have? Your finger. Push it 1–2 inches into the soil. Dry? Water. Wet? Don’t. It sounds laughably simple, but it prevents more plant deaths than any gadget I’ve ever used.
Species Spotlight: The Plants That Need Extra Summer Attention
Tomatoes and Peppers

Blossom End Rot — that nasty brown, sunken patch on the bottom of your tomatoes — is the number-one summer complaint from container growers. And most people misdiagnose it as a calcium deficiency.
It’s actually a calcium uptake failure, caused by inconsistent moisture. The soil swings between too wet and too dry, calcium transport to the fruit gets interrupted, and you end up with ruined tomatoes and a lot of frustration. Self-watering containers with reservoirs fix this beautifully.
One more thing: if nighttime temperatures stay above 75°F, don’t panic when fruit set stalls. Tomato pollen becomes non-viable in sustained overnight heat. The plant isn’t broken — it’s waiting for cooler nights to resume production.
Tropical Ornamentals (Hibiscus, Mandevilla)
These guys actually love heat — but they hate erratic care. Bud drop in hibiscus is almost always tied to root overheating or irregular watering, not the air temperature itself.
Give them 5–7 hours of morning sun and shield them from the harshest afternoon exposure. Feed with a bloom-boosting fertilizer higher in phosphorus, following the temperature guidelines above.
Herbs
Basil, rosemary, and thyme handle summer heat reasonably well, but they’ll bolt or turn bitter in sustained temperatures above 95°F. Your best defense? Harvest aggressively and often. Regular cutting delays bolting and encourages fresh, flavorful new growth.
Cilantro and lettuce? Be honest with yourself. These are cool-season crops. In peak summer, you can try moving them to full shade, but in most climates, they’re simply done until fall. Let them go and replant when nights cool down.
Frequently Asked Questions
Can I water container plants in the middle of a hot day?
Yes — and you should if they’re severely wilting. A struggling plant that gets midday water survives; one that doesn’t might not make it to evening. Use room-temperature water, pour it directly onto the soil (not the foliage), and don’t worry about efficiency. Saving the plant trumps saving water.
Why are my container plant’s lower leaves turning yellow?
Several possibilities: nitrogen washing out through frequent watering (very common in containers), overwatering starving roots of oxygen, or heat-induced metabolic slowdown. Resist the urge to immediately fertilize. Check soil moisture and inspect the roots first.
Should I fertilize container plants during a heat wave?
No. Full stop. When temps exceed 90°F for consecutive days, put the fertilizer away. Feeding heat-stressed container plants risks salt burn on damaged roots and pushes growth the plant can’t support. Wait for three consecutive days below 90°F, then resume at half strength.
How often should I water container plants in summer?
Most need daily watering at minimum. Small pots, fabric bags, and terra cotta may need twice-daily attention. The finger test — dry at 1–2 inches down means water now — beats any fixed schedule. Mulch and self-watering reservoirs buy you more time between waterings.
What’s the best pot material for hot climates?
Light-colored glazed ceramic gets my vote for the best all-around summer performer. Terra cotta is a close second — it breathes and cools itself, but demands more frequent watering. Avoid thin black plastic and metal containers in any full-sun position. They turn into root ovens.
Your Containers Want to Bounce Back
Here’s something reassuring after all that: plants are incredibly resilient. They’re expressive — they show stress clearly, and they telegraph exactly what they need if you know what to look for. And they respond to correction fast.
A wilted container plant that gets afternoon shade, a deep bottom-watering soak, and a fertilizer pause can look like a completely different plant by the next cool morning. I’ve seen it happen dozens of times in my own garden.
Summer container garden care really comes down to three pillars: pick the right pot, water with intention, and know when not to fertilize. Get those three right, and you’ve solved 90% of summer’s container problems before they start.
Proactive beats reactive every time. Mulch your pots. Group them together. Elevate them off hot surfaces. Set up a watering system you can stick with. Do the prep work now, and you’ll spend the rest of summer enjoying your containers instead of resuscitating them.
Your plants are counting on you — and honestly, after reading this far, you’re more than ready.