

How to Grow Sprouts in a Jar
Learn how to grow sprouts in a jar for just $0.25 per batch vs $4 retail. Get 30x more nutrients with our foolproof 5-day method. Start sprouting today!
I’m not kidding when I say this might be the most important skill you’ll learn this year. With food prices climbing and supply chains getting wonky, sprouting in a jar is a 3- to 7-day biogenic process where dormant seeds are hydrated and rinsed to activate enzymes, increasing nutrient bioavailability by up to 30 times while providing living enzymes for optimal digestion.
Whether you’re chasing that legendary broccoli sprout sulforaphane everyone’s talking about or just want something crunchy that didn’t travel 2,000 miles to reach your plate, Mason jar sprouting puts you in complete control. Plus, there’s something weirdly satisfying about watching tiny seeds transform into food right before your eyes.
Table of Contents
What Are Sprouts? Understanding Living Biogenic Foods
Here’s the thing about sprouts: they’re basically baby plants caught at the exact moment they’re bursting with life and nutrients—like capturing lightning in a jar, except it’s food.
When you grow sprouts in a jar, you’re harvesting them super early—within 3-7 days of germination. You eat the whole thing: root, shoot, and whatever’s left of the seed. It’s all edible and absolutely packed with nutrition that your body can actually use.
Don’t confuse sprouts with their cousins, though. Sprouts are different from microgreens (which grow in soil for 7-21 days) and mature plants (which take weeks or months). If you’re curious about the differences and which might work better for your lifestyle, I’ve got a detailed breakdown here: Sprouts vs Microgreens: Differences, Benefits, and Which One to Grow.
The germination process is actually pretty amazing when you break it down. Seeds start in dormancy—basically hibernation mode. When you soak them (called imbibition), water wakes them up and activates their enzymes. Then the radicle (that’s the baby root, not a political statement) breaks through the seed coat. Finally, those little cotyledon leaves unfold, and if you give them light, they’ll start photosynthesizing.
Here’s why the “biogenic” thing matters so much: Sprouts contain living enzymes that do some of your digestive work for you. Your body doesn’t have to work as hard breaking down the food, which means more energy for actually living your life instead of digesting lunch.
The nutritional transformation during sprouting is honestly mind-blowing. Proteins break down into amino acids your body can absorb way easier. Vitamin C can increase by 500-600% in just a few days. And that annoying phytic acid that blocks mineral absorption? It drops by 50-70%, freeing up iron, zinc, and calcium.
Common varieties you can sprout include: alfalfa (mild and nutty), broccoli (spicy kick with serious health benefits), mung beans (sweet and crunchy—the classic Asian stir-fry sprout), lentils (earthy and protein-packed), radish (peppery bite that gets stronger with age), and clover (delicate and mild).
Why Growing Sprouts in a Jar Is Essential for 2026 Food Independence
Let’s talk numbers: homegrown sprouts cost about $0.25 per serving versus $4.00 at the store. That’s not a typo, and the math gets even better.
The Sulforaphane Revolution (Or Why Everyone’s Obsessed with Broccoli Sprouts)
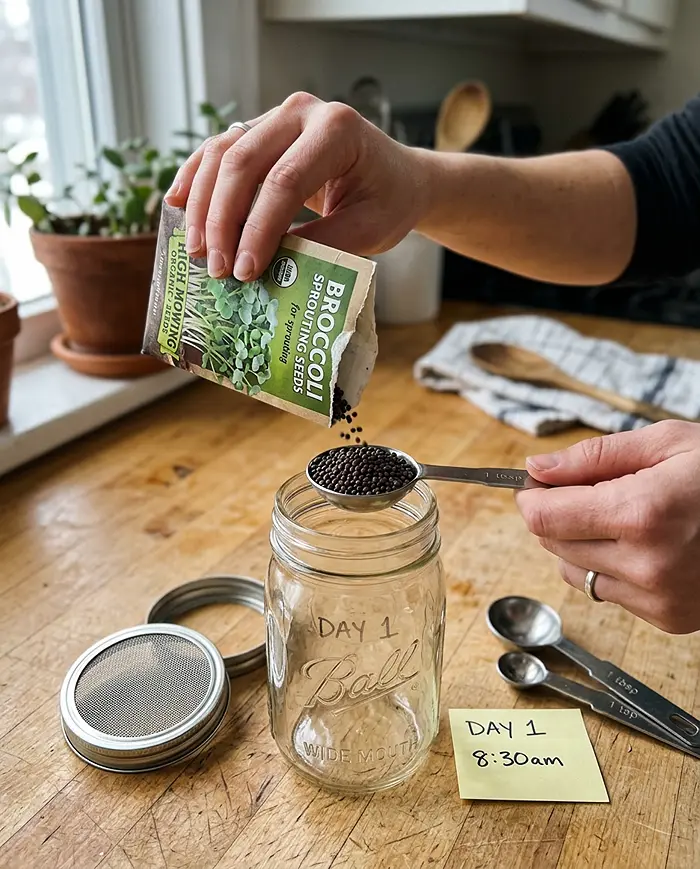
Broccoli sprout sulforaphane sounds like something from a chemistry textbook, but stick with me here. According to Johns Hopkins research, 3-day-old broccoli sprouts pack 10-50 times more sulforaphane than full-grown broccoli. That’s like eating one serving of sprouts and getting the benefits of an entire head of broccoli.
Sulforaphane activates your body’s detox pathways (the Nrf2 pathway if you want to sound smart at parties) and helps protect cells from oxidative stress. The myrosinase enzyme in the sprouts converts glucoraphanin into active sulforaphane when you chew or blend them—nature’s perfect delivery system.
Here’s the kicker when you grow sprouts in a jar: you need to harvest broccoli sprouts on day 4-5 when sulforaphane peaks. After that, the plant redirects resources to leaf growth and the concentration drops. Store-bought sprouts? They’re harvested for shelf life, not nutrient timing.
Economic Analysis: The Math Actually Makes Perfect Sense
I’m not usually one for spreadsheets, but these numbers are too good to ignore. Store-bought organic sprouts run about $4.00 for a tiny 4-ounce container. When you grow sprouts in a jar at home using bulk organic seeds ($12/pound), each batch costs roughly $0.25.
Here’s the breakdown that’ll make your wallet happy:
| What You’re Buying | Store Cost | DIY Cost |
|---|---|---|
| One 4oz container | $4.00 | $0.25 |
| Three batches weekly | $12.00 | $0.75 |
| Annual cost | $624.00 | $39.00 |
Your yearly savings calculation:
Annual Savings: ($4.00 − $0.25) × 3 batches/week × 52 weeks = $585
That’s $585 back in your pocket every year. You could buy a really nice blender with that savings, or better yet, more sprouting seeds and become the sprout person in your friend group (trust me, it’s a good reputation to have).
The Digestive Advantage Nobody Talks About
If beans usually make you gassy (no judgment—they make everyone gassy), sprouting safety includes this hidden benefit: sprouting changes the game completely. During germination, the sprout consumes those complex sugars (oligosaccharides) that cause digestive drama. What you’re left with is way easier on your gut.
This makes sprouted legumes perfect for people dealing with IBS, SIBO, or general digestive sensitivity. The living enzymes help pre-digest proteins and starches, and that phytic acid reduction means your body can actually absorb the minerals instead of just passing them through.
Essential Equipment for Growing Sprouts in a Jar
You need three things: a jar, a lid, and seeds. That’s it. But getting the right versions of those three things prevents 90% of beginner mistakes and moldy disasters.
Choosing the Right Jar for Mason Jar Sprouting
Wide-mouth 32-ounce Mason jars are the gold standard for Mason jar sprouting, and there are legit reasons why. The wide mouth isn’t just about convenience (though reaching in to clean is nice)—it’s about airflow. Better air circulation means less chance of that funky smell that signals something’s gone wrong.
Here’s what you need to know about capacity: 2 tablespoons of small seeds (alfalfa, broccoli) will give you about 2 cups of finished sprouts. A quarter-cup of bigger seeds (mung beans, lentils) produces similar volume. Don’t overcrowd your jar or you’ll restrict airflow and end up with a sad, moldy mess instead of crunchy sprouts.
Lid Selection: Why Your Grandma’s Cheesecloth Method Isn’t Great
I know, everyone’s grandma used cheesecloth and it was fine. But we can do better now for sprouting safety. Cheesecloth traps moisture in its fibers, creating little bacterial playgrounds you definitely don’t want.
Here’s what actually works for growing sprouts in a jar:
316-grade stainless steel mesh lids contain molybdenum, which sounds fancy but basically means they won’t rust even in constant moisture. They’re worth the $10-15 investment because they’ll last forever and keep your sprouting operation safe.
304-grade stainless steel is cheaper and works fine, but it’ll show wear faster if you’ve got chlorinated tap water.
Mesh size matters: Use 2500 micron (coarse) for big seeds like chickpeas and mung beans. Go with 635 micron (fine) for tiny seeds like alfalfa and broccoli so they don’t escape during rinsing.
Seed Sourcing: Don’t Mess This Up
Critical warning: Never, ever use seeds from the garden center when you grow sprouts in a jar. Those are treated with fungicides and pesticides that are fine for soil but toxic when you eat them. This is serious sprouting safety stuff.
You need seeds with USDA Organic certification that have been tested for E. coli and Salmonella. The warm, moist environment that grows sprouts also grows bacteria if contamination sneaks in.
Reputable suppliers include:
- Mumm’s Sprouting Seeds
- Sproutpeople
- True Leaf Market
These companies test their seed lots and provide germination rate guarantees. Store your seeds in airtight containers somewhere cool and dark—they’ll stay viable for 1-3 years, though germination rates slowly decline over time.
How to Grow Sprouts in a Jar: The Actual Method
Success when you grow sprouts in a jar comes down to two things: rinsing every 12 hours and proper drainage. Nail those and you’re golden.
Step 1—Prep Your Seeds (And Optional Sanitization)
Start by measuring your seeds carefully. For small ones (alfalfa, broccoli, clover), use 1-2 tablespoons per quart jar. For bigger seeds (mung beans, lentils, chickpeas), measure out a quarter-cup. This gives them room to expand without turning into a compressed seed brick.
If you’re in a high-risk group (pregnant, elderly, immunocompromised), consider an optional sanitization step for extra sprouting safety. Mix food-grade hydrogen peroxide at 1:10 dilution (one part 3% hydrogen peroxide to ten parts water). Swirl your seeds in this for 5 minutes, then rinse thoroughly three times.
Give your seeds an initial rinse with cool water to remove dust and broken bits. Drain completely through your mesh lid.
Step 2—The Critical Soak (Imbibition Phase)
This is where dormant seeds wake up and the magic begins when you grow sprouts in a jar. Soak times vary by seed size, and getting this right sets you up for success:
Timing guide:
- Small seeds (alfalfa, clover, broccoli): 4-8 hours
- Medium seeds (radish, fenugreek): 8-10 hours
- Large seeds (mung beans, lentils, chickpeas): 8-12 hours
Room temperature between 65-75°F is perfect. Cooler slows things down, warmer speeds them up but increases contamination risk. If you’ve got heavily chlorinated tap water, use filtered water—high chlorine can mess with germination and create weird flavors.
Step 3—The Rinse-and-Drain Cycle (This Is Where Most People Mess Up)
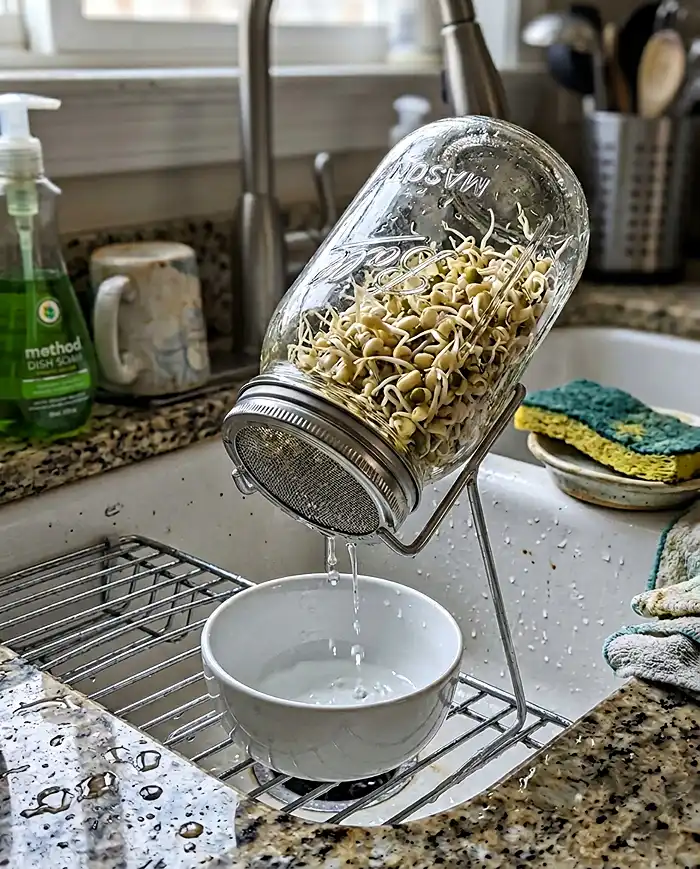
For the next 3-7 days while you grow sprouts in a jar, you’ll rinse your sprouts every 8-12 hours. Twice daily works great for most people—once in the morning, once at night. Set phone reminders if you need to because consistency matters here.
The high-pressure rinse technique is your secret weapon. Fill the jar completely with water, swirl it vigorously, and drain thoroughly. That forceful water physically knocks off any biofilm trying to form. Biofilm is that slimy coating that means bacteria’s having a party you weren’t invited to.
The 45-degree drainage rule prevents pooling. After rinsing, position your jar mouth-down at a 45-degree angle using a dish rack or bowl. This angle lets water drain completely while air circulates around your growing sprouts. Water pooling at the bottom equals rot city.
Keep your jars somewhere dark or in indirect light during this phase. Direct sunlight heats up the jar and can damage developing sprouts.
Step 4—Optional Greening Phase
During the final 6-24 hours before harvest, you can expose your sprouts to indirect light to activate chlorophyll production. This increases vitamin C and carotenoids and makes them look prettier with bright green leaves.
Important exception: If you’re growing broccoli sprouts for sulforaphane, skip this step. Greening may actually reduce sulforaphane concentration. Harvest those bad boys on day 4-5 regardless of color for maximum health benefits.
Step 5—Harvesting and Storage
You’ll know sprouts are ready when they’ve reached your desired length and the cotyledon leaves have opened. Time to harvest!
The de-hulling trick makes your sprouts way better. Transfer them to a large bowl of cold water and swish them around gently. The seed hulls float to the top where you can skim them off with a strainer. This reduces bitterness, looks nicer, and extends fridge life by 2-3 days.
Give them a final rinse, then dry them gently. A salad spinner works great, or just pat them dry with clean kitchen towels. Drying before storage is clutch for extending shelf life.
Growth Duration: When to Harvest Each Variety
Timing determines both nutrient content and texture when you grow sprouts in a jar, so knowing when to harvest matters more than you’d think.
| Seed Type | Soak Time | Total Days | When to Harvest | Flavor Profile |
|---|---|---|---|---|
| Alfalfa | 6-8 hours | 5-6 days | Small green leaves show | Mild, nutty, crisp |
| Broccoli | 8-12 hours | 4-5 days | Yellow-green cotyledons | Spicy, fresh, crunchy |
| Mung Bean | 8-12 hours | 3-5 days | 1-2 inch white tails | Sweet, crunchy |
| Radish | 4-6 hours | 4-6 days | Purple-stemmed leaves | Peppery (gets stronger) |
| Lentils | 8-12 hours | 3-4 days | Short tails, no leaves | Earthy, nutty, firm |
| Chickpeas | 8-12 hours | 2-3 days | Minimal tail growth | Nutty (harvest early!) |
| Clover | 6-8 hours | 5-6 days | Small trifoliate leaves | Mild, slightly sweet |
Environmental factors mess with timing. Warmer temps (70-75°F) speed things up by 20-30%. Higher humidity accelerates germination but increases mold risk. In hot weather, bump your rinse frequency to three times daily when it’s over 75°F outside.
Food Safety: How to Know Your Sprouts Are Safe
Most sprouting failures happen because of contamination, not technique mistakes. Learning to spot problems early saves you from eating sketchy sprouts.
Safe vs. Unsafe: Visual Guide for Sprouting Safety
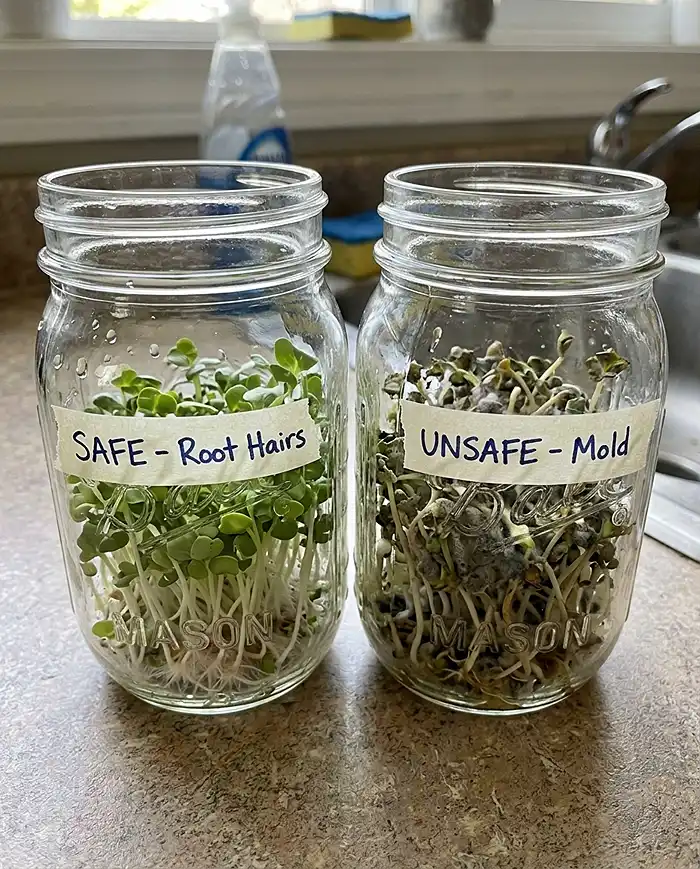
Normal root hairs look like white, fuzzy projections coming from the main root. They’re uniform, fine, and often disappear when you mist them with water. These are totally safe—they’re how the sprout absorbs water and nutrients.
Mold looks different: gray, black, or colored fuzzy growth that spreads across multiple sprouts instead of projecting from individual roots. It comes with a musty smell that’s unmistakable.
Healthy sprouts feel crisp and firm with a fresh, grassy smell. Red flags requiring immediate disposal:
- Slimy coating anywhere
- Sour or ammonia smells
- Dark discoloration (beyond normal seed coat color)
- Weblike growth patterns
The Smell Test Never Lies
Your nose is your best safety tool when you grow sprouts in a jar. Safe sprouts smell fresh, grassy, nutty, or earthy—basically like food you’d want to eat. Unsafe sprouts smell sour, rotten, or funky in a way that makes you instinctively pull back.
The rule: When in doubt, throw it out. The $0.25 worth of seeds isn’t worth potential food poisoning.
High-Risk Groups: Real Talk About Sprouting Safety
Some people need to be extra careful with raw sprouts because of immune system factors:
Skip raw sprouts if you’re:
- Pregnant (Listeria risk is real)
- Under 5 years old (developing immune system)
- Over 65 (age-related immune decline)
- Immunocompromised (cancer treatment, organ transplant, HIV/AIDS)
Safe alternative: Light steaming for 30-60 seconds kills 99% of pathogens while keeping most nutrients and decent texture.
Advanced Techniques and Optimization
Professional De-Hulling: The Bowl-Swish Method
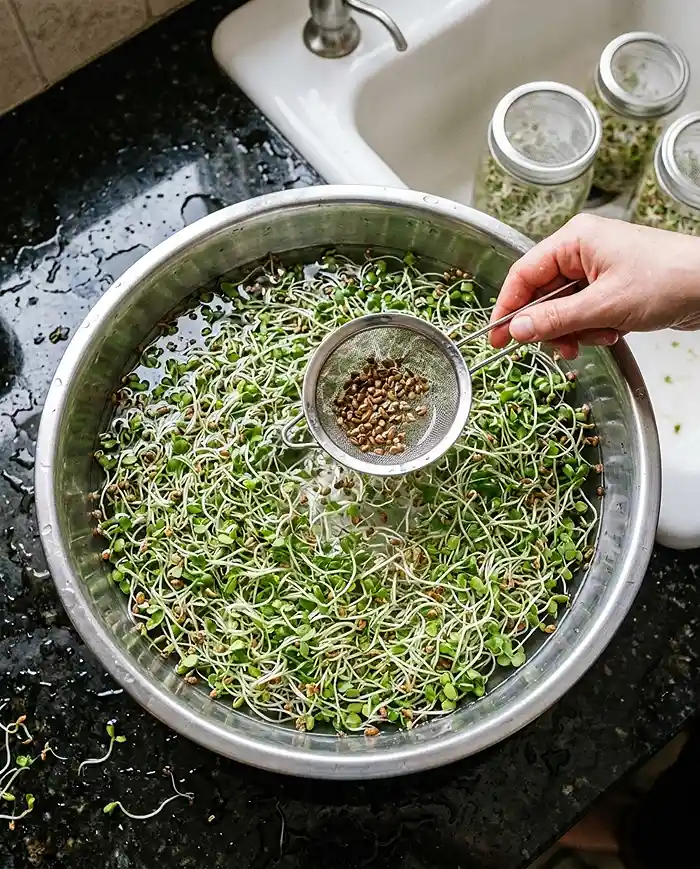
The bowl-swish method improves appearance, reduces bitterness, and adds 2-3 days to fridge life when you grow sprouts in a jar. Dump your finished sprouts in a big bowl of cold water. Swish them around gently and the hulls float to the top because they’re less dense. Skim them off with a strainer and repeat until most hulls are gone.
This works especially well for alfalfa, clover, and broccoli sprouts where hull removal makes a noticeable difference in eating quality.
Smart-Home Integration (Because It’s 2026)
If you want to get fancy with the greening phase, grab a Wi-Fi smart plug (Kasa and Wemo are solid brands) and set it to run grow lights on a 4-6 hour timer. Costs $15-25 and ensures consistent chlorophyll activation without you having to remember.
Storage That Actually Works
Use airtight containers with a paper towel layer to absorb moisture without creating anaerobic conditions. Store them in your fridge’s crisper drawer where humidity stays around 90-95%.
Properly stored sprouts last 5-7 days. De-hulled varieties can push 7-10 days at optimal fridge temp (35-38°F). Label your containers with harvest dates so you’re not playing “smell test roulette” a week later.
Troubleshooting Common Problems
Most issues when you grow sprouts in a jar come from drainage or environmental factors, not your technique being terrible.
Problem-Solution Quick Reference
Musty or sour smell:
- What went wrong: Poor drainage, not rinsing enough, too warm
- Fix it: Check that 45-degree angle, rinse every 8 hours, verify complete water drainage
Mold growth:
- What went wrong: Stagnant air, dirty equipment, too much moisture
- Prevention: Use proper mesh lids (not fabric), stick to your rinse schedule, sanitize equipment between batches
Slow or no germination:
- What went wrong: Old seeds, too cold, didn’t soak long enough
- Fix it: Buy fresh seeds with high germination rates, keep things 65-75°F, extend soak time by 2-4 hours
Bitter or tough texture:
- What went wrong: Over-matured, variety-specific
- Fix it: Harvest earlier, try different seed types, make sure you’re de-hulling properly
Frequently Asked Questions
Do I need grow lights to grow sprouts in a jar?
Nope! Sprouts actually prefer darkness during germination. Light only matters for the final 6-24 hours if you want that chlorophyll greening. Most varieties do perfectly fine on a dark countertop.
Can I just use dried beans from the grocery store?
Maybe, but success rates are low. Many commercial beans get heat-treated or irradiated for longer shelf life, which kills their ability to germinate. Test small batches if you want to experiment, but certified sprouting seeds give you reliable results.
What are those white fuzzy things on my sprouts?
Those are root hairs (geotropic projections) that help absorb water and nutrients. Completely normal and safe. Real mold looks gray or black with a musty smell. Root hairs mean your sprouts are thriving.
How long do homegrown sprouts last in the fridge?
Properly stored in airtight containers with paper towels, expect 5-7 days. De-hulled sprouts can push 10 days at optimal fridge temp (35-38°F). Always smell-test before eating if you’re pushing the limits.
What if it’s really hot in my kitchen?
When temps exceed 75°F, bump your rinse frequency to every 6-8 hours. Hot weather speeds up both growth and potential spoilage, so you need to stay on top of it.
Your Next Steps to Growing Sprouts in a Jar
Start simple with beginner-friendly varieties like alfalfa or mung beans when you first grow sprouts in a jar. Take daily photos to build your pattern recognition for what healthy growth looks like at each stage. Join online sprouting communities to share wins and troubleshoot challenges.
This skill gives you year-round access to fresh, nutrient-dense food regardless of season, weather, or supply chain weirdness. The time investment is minimal—maybe 5 minutes twice a day—but the payoff in nutrition, cost savings, and food independence is huge.
Grab a jar, some seeds, and a mesh lid. Start your first batch today. Worst case? You’re out $0.25 and learned something. Best case? You discover that growing sprouts in a jar is way easier than you thought, and suddenly you’re that person who always has fresh sprouts in the fridge. Trust me, it’s a good reputation to have.