

Growing Sprouts Safely at Home
Grow sprouts safely at home with simple steps to prevent mold, bacteria, and contamination, including rinsing, airflow, and clean storage.
Look, I’ll be straight with you—growing sprouts safely at home sounds about as exciting as watching paint dry until you realize one tiny mistake could turn your innocent mason jar into a bacterial theme park. But here’s the thing that’ll blow your mind: once you nail the basics, you’ll be cranking out nutrient-packed superfoods that make those sad, overpriced store sprouts look like a complete joke.
The difference between “wow, these broccoli sprouts are life-changing” and “why does my stomach feel like it’s staging a revolt” comes down to following a few key rules that most people completely ignore. So let’s talk about growing sprouts safely at home the right way, because honestly? Your health is worth more than winging it with some seeds and hoping for the best.
Table of Contents
Why Growing Sprouts Safely at Home Is Both Amazing and Slightly Terrifying
Here’s the wild part about sprouting: you’re basically creating the perfect environment for life to explode. And I mean all life—the incredible stuff you want (hello, broccoli sprouts sulforaphane!) and the nasty bacteria you definitely don’t want crashing the party.
Think about it for a second. You’re keeping seeds warm (around $$70°F-90°F$$), constantly moist, and cozy. That’s like running a five-star resort for both plant enzymes and potentially dangerous pathogens like E. coli and Salmonella. Food scientists literally call sprouting environments “laboratory-grade incubators,” which should tell you everything you need to know about taking this seriously.
Unlike regular gardening where you’ve got soil health, natural predators, UV light, and drying cycles keeping the bad guys in check, your sprouting jar has none of those safety nets. It’s just you, your seeds, and whatever bacteria decided to hitch a ride from the farm.
The Nutritional Payoff That Makes Growing Sprouts Safely at Home Worth It
Before you bail on this whole idea because it sounds complicated, let me remind you why growing sprouts safely at home is absolutely worth the effort. The nutrient density in fresh sprouts compared to mature plants is absolutely bonkers:
| What You’re Growing | The Good Stuff | How Much More Than Grown-Up Plants |
|---|---|---|
| Broccoli sprouts | Sulforaphane (the cancer-fighting superstar) | 10-50× higher |
| Alfalfa sprouts | Saponins | 3-5× higher |
| Radish sprouts | Glucosinolates | 4-10× higher |
| Lentil sprouts | Vitamin C | 2-4× higher |
| Mung bean sprouts | Digestible protein | 600% improvement |
Just one ounce of 3-day-old broccoli sprouts gives you the sulforaphane equivalent of eating 1-3 pounds of regular broccoli. That’s not a typo—we’re talking serious nutritional bang for your buck here.
But here’s the catch: these benefits only matter if you don’t accidentally create a petri dish of doom. Those same warm, moist conditions that boost nutrients? Bacteria absolutely love them too.
The Math That’ll Make You Respect Growing Sprouts Safely at Home
Alright, quick science moment that’ll either motivate you or terrify you into following the rules. Under ideal sprouting conditions (around $$75°F-85°F$$ with good moisture), bacteria double their population every 20 minutes. Every. Twenty. Minutes.
That means one lonely E. coli cell becomes over a million cells in just seven hours. The math looks like this:
Bacterial Population = Starting Amount × 2(Minutes ÷ 20)
So if your seeds start with just 100 bacterial cells (which is basically nothing), you’re looking at over 100 million cells within 24 hours. Yeah, that escalates quickly.
This is why your buddy who says “I just rinse mine with water and they’re fine” is either really lucky or hasn’t gotten sick yet. Growing sprouts safely at home requires multiple safety barriers, not crossed fingers and good vibes.
Growing Sprouts Safely at Home: The Sterilization Steps That Actually Work
Here’s where we separate the pros from the people posting on Reddit about mysterious stomach issues. Simple water rinsing only kills about 90% of surface bacteria (1-log reduction in science speak). Proper seed disinfection? That eliminates 99.99% (4-log reduction). See the massive difference?
The problem is bacteria don’t just hang out on seed surfaces where water can reach them. They burrow into microscopic cracks and crevices in the seed coat, setting up shop where your gentle rinse can’t touch them. You need something stronger.
Method 1: The UC Davis $$140°F$$ Hydrogen Peroxide Protocol for Growing Sprouts Safely at Home
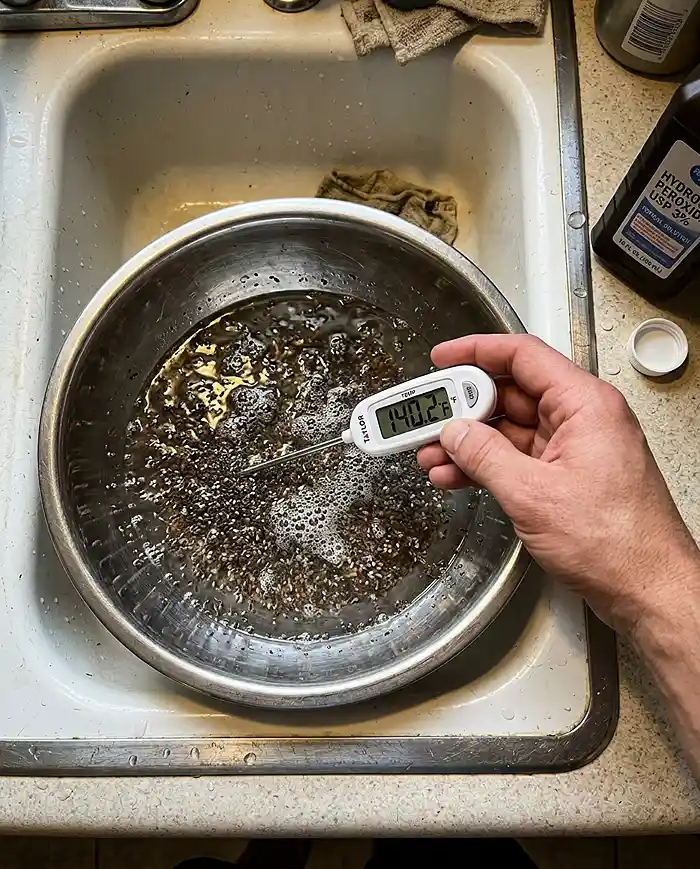
UC Davis researchers figured out the gold standard for home seed disinfection, and it’s actually pretty straightforward. You’re giving your seeds a hot peroxide bath at exactly $$140°F$$ for 5 minutes.
What you need:
- Regular 3% hydrogen peroxide from any drugstore
- A cooking thermometer (accuracy matters—don’t guess)
- A heat-safe glass bowl
- A fine-mesh strainer
The step-by-step process:
- Rinse your seeds under running water for 30 seconds to remove surface dirt and debris
- Heat the peroxide to exactly $$140°F$$ ($$60°C$$)—use that thermometer, seriously
- Submerge your seeds completely and let them soak for exactly 5 minutes, stirring gently every minute
- Immediately rinse with cold water 3-4 times until the water runs completely clear
- Drain thoroughly and start your sprouting process within 2 hours
Why this works like magic: The heat plus peroxide creates an oxidative one-two punch that destroys bacterial cell walls and DNA. But it stays below $$150°F$$, so your seeds don’t get cooked and can still germinate. Pretty clever science, right?
Method 2: The Vinegar Alternative for Growing Sprouts Safely at Home
If the temperature thing stresses you out, plain white vinegar works too. It’s not quite as effective (99.9% kill rate versus 99.99%), but it’s still really solid for growing sprouts safely at home.
Here’s the simple process:
- Cover your seeds completely with undiluted white vinegar (the standard 5% stuff)
- Let them sit for exactly 15 minutes, stirring occasionally to ensure even coverage
- Rinse like your life depends on it—3-4 times minimum until you can’t smell vinegar anymore
- Do the sniff test: Your seeds should smell neutral, not like a pickle factory
The vinegar creates a low pH environment that bacteria absolutely hate. Fair warning: broccoli seeds sometimes take 6-12 hours longer to germinate after a vinegar bath, but they’ll catch up.
Equipment Selection for Growing Sprouts Safely at Home
Not all sprouting setups are created equal when it comes to contamination risk, and choosing the right gear is crucial for growing sprouts safely at home.
Wide-Mouth Glass Jars: Your Best Friend for Growing Sprouts Safely at Home
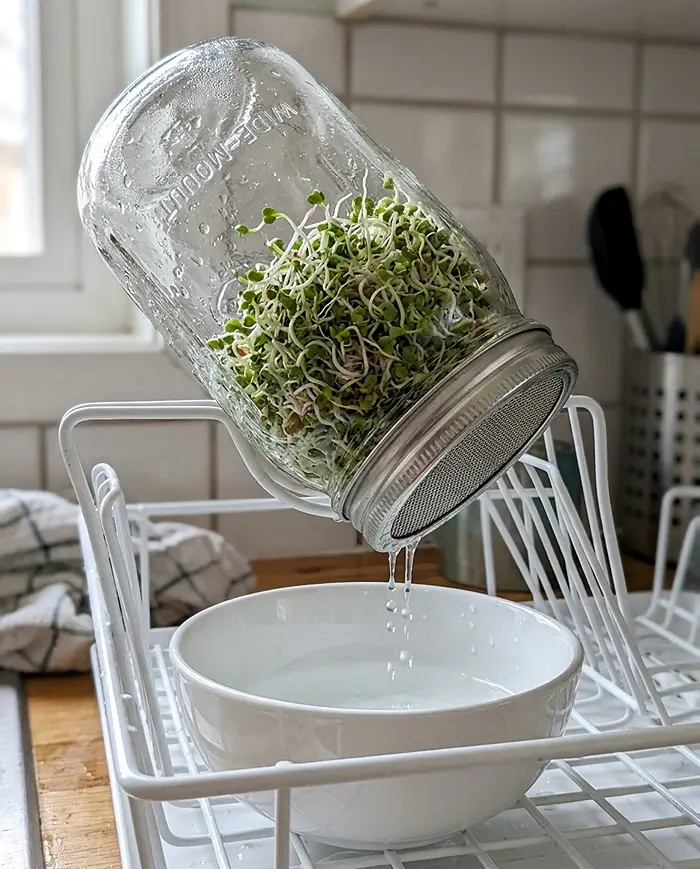
If you’re just starting with growing sprouts safely at home, glass jars are your safest bet.
Why they’re perfect:
- You can see everything happening inside—no surprises
- They handle boiling water and dishwasher sanitize cycles like champs
- Easy to position at a 45-degree angle for perfect drainage
- Use 40-60 mesh stainless steel screens for small seeds (broccoli, alfalfa), 20-30 mesh for bigger ones
Automatic Sprouters: Convenient But High-Maintenance
These can help with consistent watering, but they come with hidden risks for growing sprouts safely at home.
The reality check:
- Disassemble and flush with vinegar weekly—no exceptions
- Biofilm loves hiding in tubes and reservoirs
- Replace tubing every 3 months regardless of how clean it looks
They’re not bad, just needier than you’d expect. If regular deep-cleaning isn’t your thing, stick with simple jars.
Hemp/Cloth Bags: The Risky Traditional Option
Look, I get the rustic appeal, but these are the riskiest option for growing sprouts safely at home. You literally cannot sterilize fabric between uses—mold spores laugh at your cleaning attempts and set up permanent residence in the fibers.
Growing Sprouts Safely at Home: Temperature and Environmental Controls
Keep your sprouting setup between 68°F-72°F—that’s the sweet spot for growing sprouts safely at home. Go above 75°F and bacteria start doubling every 10 minutes instead of 20. That’s not twice as bad—it’s exponentially worse.
Don’t put your sprouting containers:
- Next to the stove or oven
- On top of the refrigerator (it’s warmer up there than you think)
- Near dishwasher exhaust vents
- In cabinets with zero air circulation
Even indirect heat from appliances can raise your jar temperature by $$5°F-10°F$$, and that’s enough to turn your healthy sprouts into a bacterial playground.
The Common Mistakes That Sabotage Growing Sprouts Safely at Home
Let me save you from the classic errors that ruin batches and leave people confused about why growing sprouts safely at home went wrong.
Mistake #1: “These Seeds Look Clean Enough”
Remember the 2011 German E. coli outbreak? 53 people died from contaminated fenugreek sprouts. The bacteria came from the seeds themselves, not poor growing practices.
“Organic” doesn’t mean “sterile.” “Sprouting seeds” doesn’t mean “pre-cleaned.” Every single seed batch needs proper disinfection for growing sprouts safely at home—no exceptions, no shortcuts.
Mistake #2: The Overnight Soak That Went Too Long
Soak your seeds for 8-12 hours maximum. Going longer creates oxygen-depleted water where dangerous anaerobic bacteria throw their own little party. Plus, stressed seeds become more vulnerable to fungal infections.
Mistake #3: Freaking Out Over Root Hairs (The False Mold Alarm)
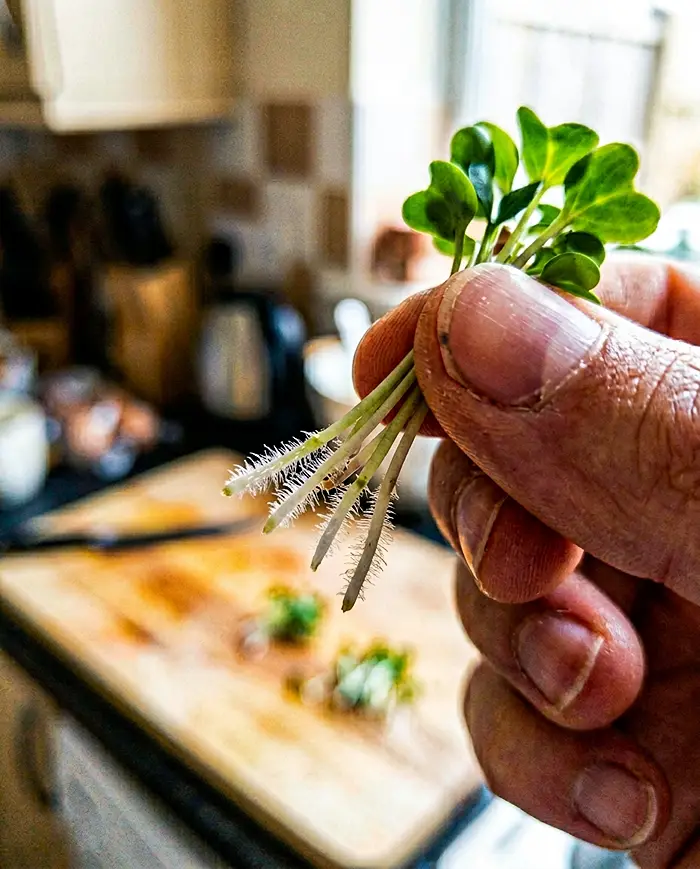
Those fuzzy white things on your sprouts? Probably just root hairs, not mold. Here’s the definitive test for growing sprouts safely at home:
The rinse test: Spray them with water. Root hairs collapse and become transparent. Real mold stays fuzzy and might show colors.
The distribution test: Root hairs grow along roots in natural patterns. Mold appears in random patches on surfaces.
Mistake #4: Ignoring Your Nose During Growing Sprouts Safely at Home
Healthy sprouts smell fresh, grassy, earthy—like spring morning. Contaminated batches smell like sulfur, ammonia, or decay. That funky smell shows up 12-24 hours before you can see anything wrong.
Trust your nose. If something smells off, toss the entire batch immediately.
Mistake #5: Poor Drainage (The Silent Killer)
If your sprouts feel wet to the touch 5 minutes after rinsing, you’ve got a drainage problem. That excess moisture is basically a bacterial swimming pool that ruins your efforts at growing sprouts safely at home.
Do the squeeze test: gently press sprouts between clean fingers. They should spring back without releasing water droplets.
Growing Sprouts Safely at Home: Advanced Nutrition Optimization
Want to supercharge your results while maintaining safety? Here are some pro tips for growing sprouts safely at home.
The LED Light Enhancement Trick
Expose your sprouts to blue LED light (450-470 nanometers) during the final 24 hours before harvest. This increases phenolic compounds and antioxidants by 15-25% while keeping temperatures safe for growing sprouts safely at home.
Position LED strips 6-8 inches above your sprouts for 12-16 hours. Just monitor the temperature—you don’t want light heat pushing you over $$72°F$$.
The Sugar Water Secret for Maximum Nutrition
Mist your sprouts with a 3% sucrose solution during the final 48 hours. This mild stress response bumps GABA content by 30-40% and vitamin C by 20-25%.
How to do it safely:
- Mix 3 grams white sugar in 100ml filtered water
- Mist twice daily for the last two days
- Maintain your normal rinse schedule to prevent fermentation
Post-Harvest: Don’t Blow It at the Finish Line of Growing Sprouts Safely at Home
You’ve successfully grown them safely—now let’s store them properly to maintain that safety.
De-Hulling Makes a Real Difference
Remove those seed coats (hulls) after harvest. They’re bacterial hangout spots, and getting rid of them cuts contamination sites by about 60%.
The easy flotation method:
- Submerge harvested sprouts in cold water and swish gently
- Hulls float to the top—skim them off with a spoon
- Rinse multiple times to remove all debris
- Pick out any damaged or discolored sprouts
Proper Drying for Storage Success
This step is crucial for maintaining the safety you achieved through growing sprouts safely at home:
- Salad spinner treatment: 30 seconds of gentle centrifugal water removal
- Air dry properly: Single layer on clean towels for 8-12 hours
- Check thoroughly: They should feel dry to touch but not brittle
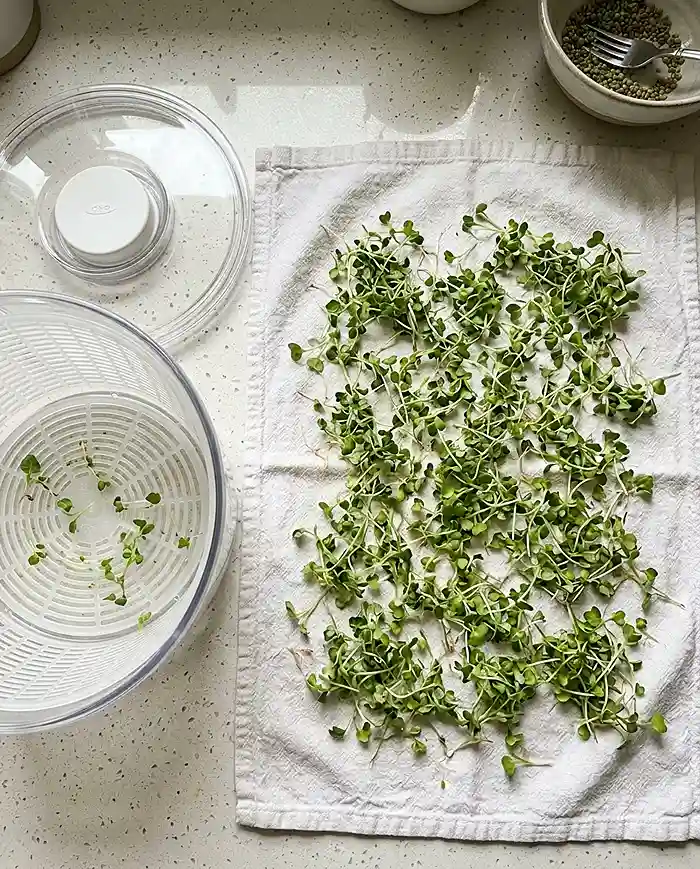
Surface moisture equals bacterial growth, which means sprouts that go bad in 2 days instead of 7.
When Growing Sprouts Safely at Home Isn’t Recommended
Real talk: some people shouldn’t eat raw sprouts at all, no matter how perfectly you follow these sprout safety protocols.
Skip home sprouting if you’re:
- Pregnant (Listeria crosses the placenta—not worth any risk)
- Immunocompromised (chemo patients, HIV/AIDS, transplant recipients)
- Over 65 (reduced stomach acid lets bacteria survive digestion)
- Under 5 (immature immune systems can’t handle the challenge)
If that describes you, consider microgreens instead. They’re grown differently and have significantly lower contamination risk. Check out this detailed comparison of sprouts vs microgreens to see which method fits your situation better.
For official guidance on produce safety, the FDA’s recommendations provide additional context for making informed decisions about fresh produce consumption.
Your Quick Safety Checklist for Growing Sprouts Safely at Home
Before starting each batch:
- [ ] Seeds disinfected using hydrogen peroxide, vinegar, or hypochlorous acid
- [ ] Equipment sterilized through boiling or dishwasher sanitize cycle
- [ ] Everything completely dry before assembly
- [ ] Workspace clean and away from heat sources
Daily monitoring for growing sprouts safely at home:
- [ ] 8-hour rinse cycle maintained religiously
- [ ] Temperature verified between $$68°F-72°F$$
- [ ] Smell check completed (fresh, grassy scent)
- [ ] Complete drainage confirmed—no standing water anywhere
- [ ] Root hair vs. mold assessment if needed
At harvest time:
- [ ] Hulls removed through water flotation
- [ ] Surface drying completed (8-12 hours minimum)
- [ ] Immediate refrigeration at $$40°F$$ or below
- [ ] Use-by date established (5-7 days maximum)
The Bottom Line on Growing Sprouts Safely at Home
Look, I won’t sugarcoat it—growing sprouts safely at home requires more precision than most kitchen projects. You’re basically running a mini food safety lab, complete with خطوات التعقيم (sterilization steps) and daily monitoring protocols.
But here’s what makes it worth every minute of effort: once you’ve mastered these sprout safety protocols, they become second nature. The seed disinfection takes 10 minutes. Daily rinses take 2 minutes. The payoff? Fresh, nutrient-dense superfoods with 10-50× the beneficial compounds compared to mature vegetables, all for pennies compared to store prices.
Zero risk doesn’t exist anywhere in the fresh produce world—not in home sprouting, not in commercial operations, not even in that fancy organic spinach. But following these protocols for growing sprouts safely at home drops your contamination risk to the same level as store-bought produce while delivering superior nutrition and freshness.
Final safety principle: When in doubt, throw it out. A $10 bag of seeds isn’t worth a $10,000 hospital bill.
Master these basics, avoid the أخطاء شائعة (common mistakes), and you’ll be growing sprouts safely at home like a pro—creating nutrient powerhouses that make your friends wonder why they’re still buying those sad, expensive containers from the grocery store.
Now go grab that hydrogen peroxide and start your sprouting journey the right way. Your future self (and your taste buds) will thank you.