

5 Balcony Garden Layouts for Bigger Harvests
Smart balcony garden layouts turn a cluttered 6×10 slab into a real harvest machine. I’ve grown food on three different balconies since 2016, and the layout mattered more than the plant list.
Most people buy pots first and figure out placement later. That’s backwards. On my current north-facing balcony in zone 6b, I redesigned my setup twice before the containers actually earned their square footage.
A good layout accounts for sun angles, weight limits, and how you actually move through the space. Get that right, and even a tiny balcony garden can feed a household salad greens and herbs all season. Get it wrong, and you’re stepping over trailing vines to reach your basil.
These five container gardening layouts are ones I’ve built, rebuilt, or watched fail for specific reasons. Pick the one that matches your balcony’s shape and your sun exposure, then adjust from there.
Table of Contents
Assessing Your Balcony Space and Microclimate
Before you buy a single planter, audit what you’re actually working with. Balconies lie constantly — that “full sun” corner might get four hours in October and eight in July.
Two things matter most: how much weight your balcony can safely hold, and where the sun actually falls throughout the day. Skip this step and you’ll either overload the structure or end up with leggy, sun-starved tomatoes in the wrong spot.
Measuring Footprint and Weight Capacity
Quick Answer: Measure your balcony’s exact length and width, then check your lease or building specs for load capacity before adding containers. Most residential balconies hold roughly 40-60 pounds per square foot as a combined live load.
Grab a tape measure and get your real square footage — not the “about 8×4” guess most people work from. Then multiply that by your building’s rated capacity to get a rough total weight ceiling.
Wet potting soil is the silent killer here. A 20-inch container packed with moist mix and mature plants can hit 100 pounds on its own, according to the University of Maryland Extension’s container vegetable guide.
Pro Tip: Cluster your heaviest pots near the balcony’s load-bearing wall rather than the outer railing edge, where structural support is weakest.
Sun Mapping and Wind Exposure
Quick Answer: Track sun hours every two hours for one full day, noting which corners stay shaded. Fruiting crops need 6-8 hours of direct light; leafy greens tolerate 3-4.
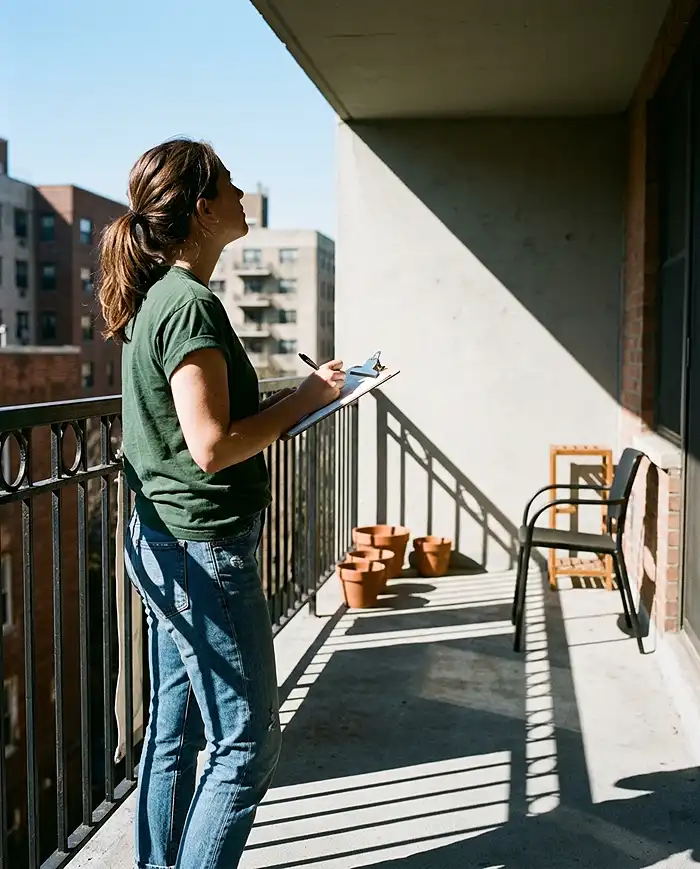
I keep a cheap notebook by the door and jot down sun coverage at 8 a.m., noon, 2 p.m., and 5 p.m. for one clear day each season. Patterns show up fast — my railing gets brutal afternoon sun that scorches lettuce by July but keeps peppers thriving through September.
Wind tunnels form where buildings funnel airflow between structures, usually along railings and open corners. That’s exactly where I lost an entire tray of seedlings my first year — a gust took the whole thing off a plant stand.
Real Example: On my current balcony, the west railing corner acts as a wind funnel every afternoon. I moved my basil and cilantro (both wind-sensitive) toward the building wall and only lost one plant that season, down from four the year before.
Essential Supplies for Container Gardening
You don’t need to drill into a rental balcony to build a serious container gardening setup. A handful of freestanding and railing-mounted pieces does the job.
The core list: lightweight containers, a well-draining soil mix, and some kind of vertical support. Everything else is optional depending on your layout choice.
Choosing the Right Containers and Soil
Quick Answer: Use lightweight fiberglass or resin pots instead of ceramic or terracotta, and fill them with a custom mix of compost, peat, and perlite for better drainage and root growth.
Ceramic looks nice but adds unnecessary dead weight before you’ve even added soil or water. I switched my 14-inch pots from glazed ceramic to resin two seasons ago and cut roughly 30% off my total balcony load.
- Standard potting soil weighs 40-50 lbs per cubic foot dry, and significantly more once saturated
- A mix of 40% compost, 30% peat or coco coir, and 30% perlite drains well without compacting
- Modular raised beds under 24 inches wide fit most standard balcony doorways for easy setup
Pro Tip: Add a one-inch layer of coarse perlite at the pot’s base instead of gravel — it drains just as well and weighs a fraction as much.
Vertical Supports and Trellising Systems
Quick Answer: Freestanding obelisks, tension-rod plant poles, and railing-mounted brackets give you vertical growing space without drilling into rental property.
Tension rods that wedge floor-to-ceiling are the single best rental-friendly tool I’ve used. I run one in each back corner and train cucumbers up jute twine wrapped around them.
Railing brackets work well for saddle-style planters but check your building’s rules first — some HOAs restrict anything hanging over the exterior edge.
Real Example: I tried a cheap plastic obelisk my first year and it snapped under a loaded pea vine by week six. I now only buy powder-coated steel obelisks rated for at least 15 pounds of lateral pull.
5 Productive Container Layouts for Balconies
Below are five distinct balcony garden layouts, each built around a specific shape, sun pattern, or yield goal. Match your layout to your balcony’s actual dimensions rather than forcing a Pinterest photo onto a space it wasn’t designed for.
| Layout | Best Balcony Shape | Best For |
|---|---|---|
| Vertical Culinary Wall | Narrow, deep | Herbs, cut-and-come-again greens |
| Railing-Hugging Salad Bar | Any, especially small | Open floor space, salad crops |
| Corner Pollinator Tower | Sunny corner available | Tomatoes, peppers, pollinators |
| Privacy Screen Vining Garden | Exposed to neighbors | Cucumbers, beans, privacy |
| U-Shaped High-Yield Patch | Wide, square | Maximum continuous harvest |
Layout 1: The Vertical Culinary Wall (Herbs & Greens)
Quick Answer: Mount tiered shelving or hanging pocket planters against your longest wall, filling each tier with shallow-rooted herbs and cut-and-come-again lettuce to keep the floor completely clear.
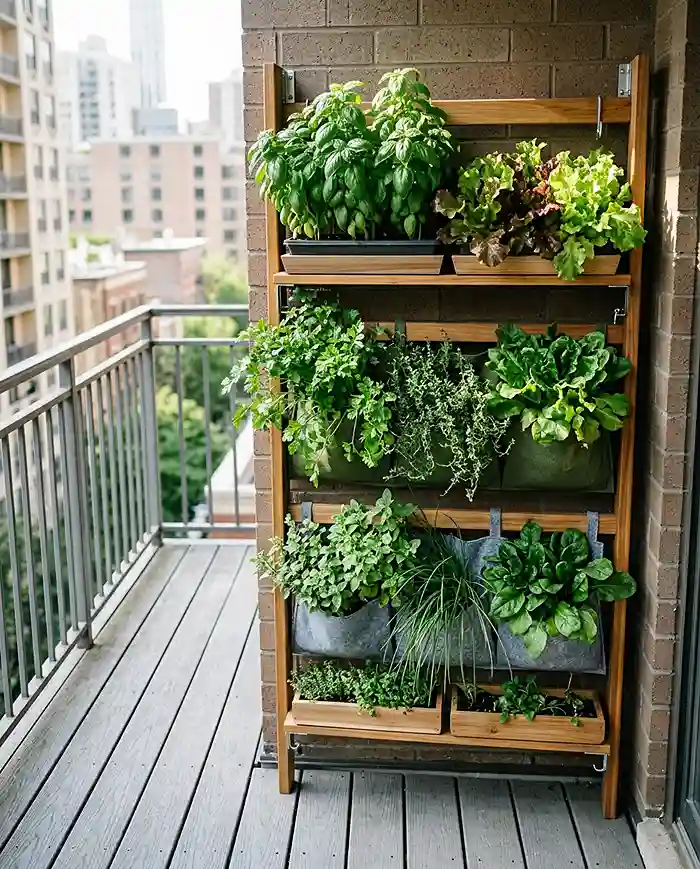
This layout works best on narrow balconies where floor space is precious. I run a three-tier shelf against my building wall holding basil, thyme, parsley, and two trays of mesclun mix.
- Shallow-rooted herbs (6-inch depth) work well in fabric pocket planters
- Cut-and-come-again greens like ‘Salad Bowl’ lettuce regrow within 10-14 days after harvest
- Position the top tier for morning sun, since it’s typically the brightest zone
Pro Tip: Harvest greens by cutting the outer leaves first — the center keeps producing for weeks longer that way.
Layout 2: The Railing-Hugging Salad Bar
Quick Answer: Mount heavy-duty saddle planters over the railing and place narrow troughs along the floor edge, leaving the entire center of the balcony open for seating or standing.
This is my go-to for tiny balconies under 40 square feet. Saddle planters straddle the railing rail itself, so they don’t eat into your walkable footprint at all.
Stick to lightweight annual crops here — lettuce, spinach, radishes, and compact herbs. Saddle planters typically cap out around 15-20 pounds fully loaded, so skip anything requiring a deep root run.
Real Example: I ran six saddle planters of loose-leaf lettuce along my railing last spring and still had room for a small bistro table in the center — something the previous cluttered layout never allowed.
Layout 3: The Corner Pollinator & Fruiting Tower
Quick Answer: Cluster large 20-gallon containers of tomatoes and peppers in your sunniest corner, surrounded by companion-planted marigolds to draw in pollinators.
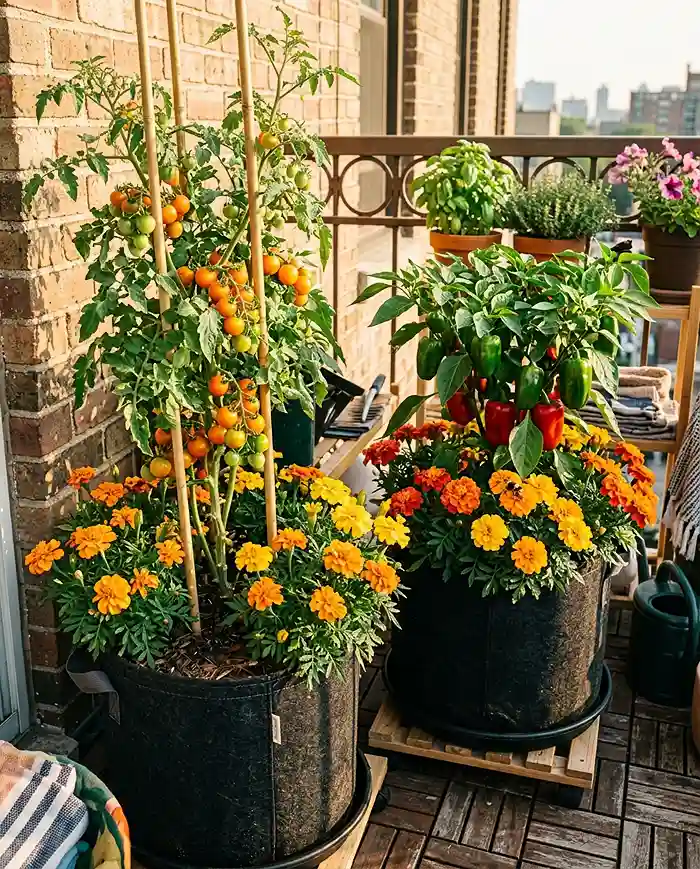
Fruiting crops need the most consistent light on the whole balcony, so this layout dedicates your best corner entirely to them rather than splitting sun across the space.
Marigolds aren’t just decorative — they draw in hoverflies and bees that dramatically improve fruit set on balcony tomatoes, which often struggle with pollination compared to ground-level plants.
Real Example: My first year growing ‘Sun Gold’ cherry tomatoes without any companion flowers, I got maybe a third of the fruit set I expected. Adding marigolds the following season nearly doubled my harvest.
Layout 4: The Privacy Screen Vining Garden
Quick Answer: Place large rectangular planters fitted with tall bamboo trellises along your balcony’s exposed edges to grow climbing cucumbers and beans as a living privacy wall.
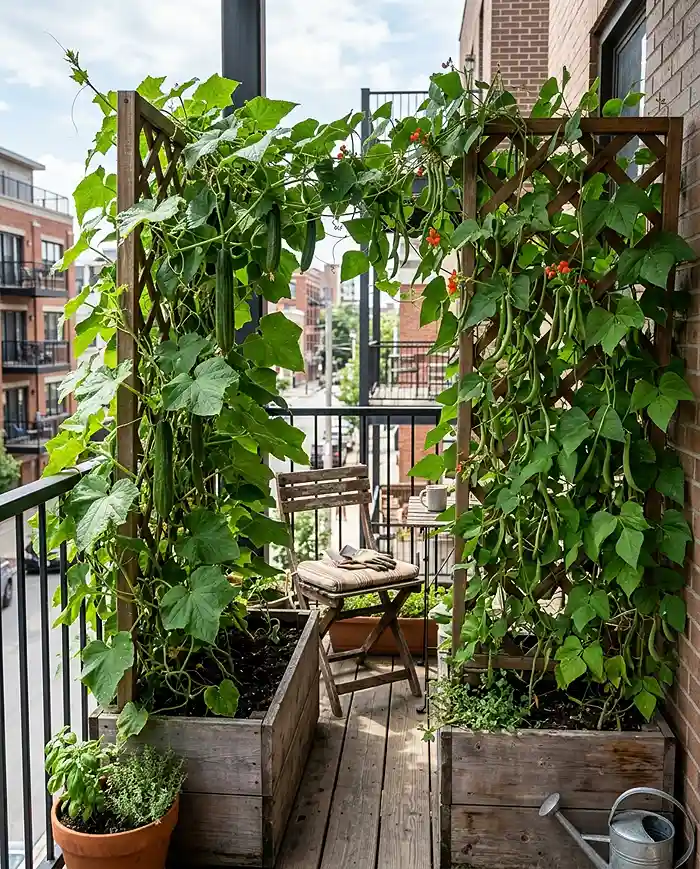
If your balcony faces a neighbor’s window or a busy street, this layout solves two problems at once — screening and yield. Bamboo trellises 5-6 feet tall give vining crops enough vertical run.
Pole beans like ‘Kentucky Wonder’ and slicing cucumbers such as ‘Spacemaster’ both perform well trained vertically, and they fill in dense enough by midsummer to block sightlines almost completely.
Pro Tip: Angle trellises slightly inward at the top so mature vines don’t lean out over the railing edge in wind.
Layout 5: The U-Shaped High-Yield Veggie Patch
Quick Answer: Arrange a continuous U-shaped perimeter of containers, tallest in the back corners and shortest toward the front, to maximize continuous harvest cycles on a wider, square balcony.
This layout needs at least 8×8 feet to work well, since it dedicates almost the entire perimeter to growing space while keeping a walkable path down the middle.
Stagger plant heights so nothing shades out a shorter neighbor — tall trellised crops in the back corners, mid-height peppers along the sides, and low herbs or lettuce up front.
Real Example: A friend with a wide corner-unit balcony used this layout to run a near-continuous succession of lettuce, radishes, and bush beans, replanting each section as soon as one crop finished.
Seasonal Maintenance and Layout Rotation
Your layout shouldn’t stay static all year. Mount your heavier pots on caster-wheel plant caddies so you can chase the lower autumn sun angle without straining your back or the structure.
As of the 2026 growing season, I swap my summer tomatoes and peppers for cool-weather brassicas like ‘Dwarf Blue Curled’ kale by mid-September in zone 6b. That’s roughly six weeks before first frost.
Rotating layouts seasonally also gives soil in each container a break, which cuts down on pest buildup that comes from growing the same crop in the same spot year-round.
Common Problems & Solutions
Tight balcony layouts create two recurring headaches: crowding-related disease and uneven light causing weak growth. Both have simple fixes once you know what to look for.
Overcrowding and Poor Air Circulation
Quick Answer: Packing containers too close invites powdery mildew and spider mites. Keep a minimum two-inch gap between foliage canopies and prune regularly to maintain airflow.
Powdery mildew showed up on my zucchini the one summer I crammed six pots into a space meant for four. Once I thinned the canopy and widened gaps, it cleared up within two weeks.
Pro Tip: Prune from the inside out on bushy plants like tomatoes — it improves airflow without sacrificing much fruiting potential.
Uneven Sun Exposure and Leggy Growth
Quick Answer: Taller pots shading shorter ones causes etiolation, the stretching and weakening of stems reaching for light. Rotate pots weekly to ensure balanced exposure.
Etiolation shows up as pale, stretched stems leaning hard toward one direction. I run a simple weekly rotation — every Sunday, I turn each pot a quarter turn and swap front-row and back-row positions where possible.
For more ideas on maximizing tight urban spaces beyond just balconies, check out our guide to space-saving small garden ideas.
balcony garden layouts FAQs
How close together can I place containers on a balcony?
Leave at least two to three inches of space between the rims of your pots. This allows for adequate airflow, proper water drainage, and easy access for a watering can spout without knocking over neighboring plants.
What is the best balcony layout for a north-facing apartment?
The Vertical Culinary Wall layout works best for north-facing balconies. Focus on shade-tolerant crops like spinach, mint, and cilantro, and position the tallest shelves as close to the outer railing as safely possible to catch ambient light.
How do I arrange pots for optimal watering efficiency?
Group plants by watering needs, a technique called hydro-zoning. Keep thirsty fruiting vegetables like tomatoes near the balcony door for easy access, and place drought-tolerant Mediterranean herbs like rosemary on the far periphery.
Can I use a balcony garden layout in a rental apartment?
Yes. All five layouts in this guide use freestanding obelisks, tension-rod poles, and railing brackets rather than drilling into walls or floors, so they work in most rental properties without violating lease terms.
How much weight can a typical balcony support for container gardening?
Most residential balconies support roughly 40 to 60 pounds per square foot as a combined live load, though this varies by building age and construction. Always confirm exact limits with your building management before adding heavy containers.
Conclusion
The right balcony garden layouts turn wasted square footage into a real source of homegrown food, no matter how small your space is. Start by auditing your sun and weight limits, then pick the layout that fits your balcony’s actual shape.
Whichever design you choose, expect to tweak it after one full season. Every balcony has its own quirks that only show up once you’ve watched a full year of sun and wind patterns play out.
For more foundational tips before you start building, see our guides on apartment balcony garden ideas and apartment gardening for beginners.
Key Takeaways
- Audit your balcony’s weight capacity and sun exposure before choosing any balcony garden layout
- Match your layout to your balcony’s shape: narrow spaces favor vertical walls, wide balconies suit U-shaped patches
- Lightweight fiberglass or resin containers cut structural load significantly versus ceramic or terracotta
- Rotate pots weekly and maintain two-inch gaps between canopies to prevent mildew and leggy growth
- Adjust your layout seasonally, using caster-wheel caddies to chase changing sun angles