

Layered Container Gardening
Layered container gardening stacks root depths and canopy heights in one pot, turning a single container into three harvests. It’s the fastest way to boost yield in small space gardening.
I’ve grown vegetables on a fourth-floor, south-facing balcony in Portland, Oregon (zone 8b) for six seasons. My first year, I planted one tomato per 15-gallon pot and got maybe a dozen fruit. Once I started layering, that same pot gave me tomatoes, a steady basil harvest, and a thyme border I snipped all summer. Same footprint, way more food.
Table of Contents
The Science of Layered Container Gardening
Layered container gardening works because roots don’t all compete for the same underground space. It’s called root stratification: pairing plants with shallow, mid-depth, and deep root systems so each one claims its own zone in the soil.
Think of a 20-gallon pot as a three-story building. Lettuce and herbs occupy the penthouse (top 6 inches). Carrots and beets take the middle floor. Tomatoes and peppers dig into the basement, sending roots 12 to 18 inches down.
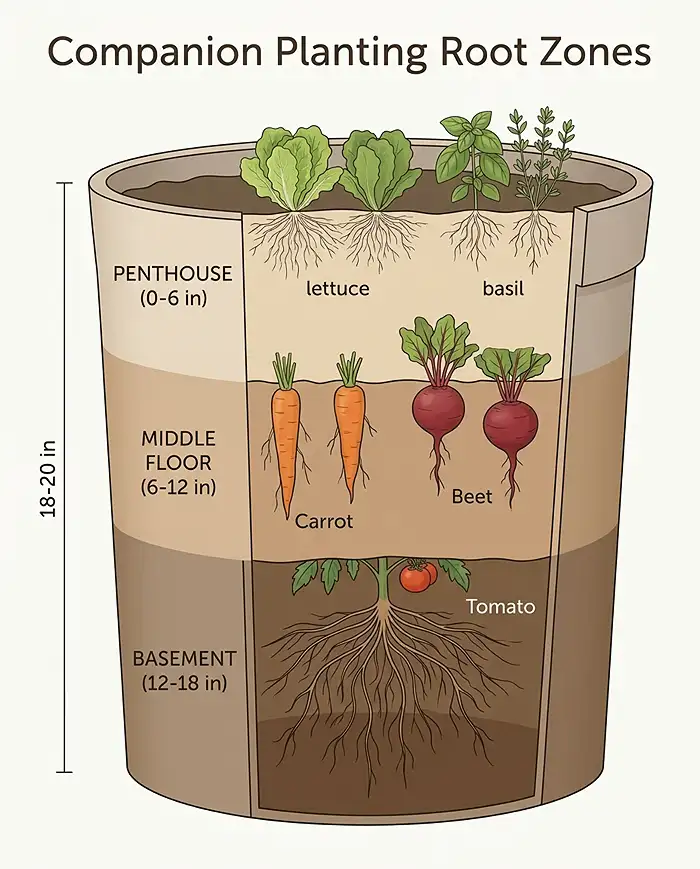
Above ground, you’re also stacking light exposure. Tall plants shade the soil surface, which cuts down on evaporation for the lower-growing companions underneath. This intensive planting approach is the backbone of good urban gardening when square footage is tight.
Planning Your High-Yield Layered Containers
Before you touch soil, match plants by sunlight, water, and nutrient needs. A drought-tolerant herb like rosemary sulks next to a thirsty cucumber — they’ll fight over water all season.
Group plants that want the same conditions: full sun and consistent moisture, or partial shade and drier soil. This single planning step prevents 90% of the problems I see in layered pots, including my own early failures.
Understanding Root Depths and Growth Habits
Map your container’s underground real estate before planting. Deep-rooted crops go in the center; shallow, fast growers fill the gaps around them.
| Root Layer | Depth Needed | Example Crops |
|---|---|---|
| Deep (thriller) | 12–18 inches | Tomatoes, peppers, eggplant |
| Mid (filler) | 8–12 inches | Carrots, beets, Swiss chard, bush beans |
| Shallow (spiller) | 4–6 inches | Lettuce, radishes, thyme, nasturtiums |
The NC State Extension container gardening handbook confirms these depth ranges, and I’ve found them reliable across six seasons of trial and error.
One caution: don’t pair two deep-rooted heavy feeders in the same pot. I tried tomatoes with a second pepper plant one year, and both stayed stunted from root crowding by August.
The “Thriller, Filler, Spiller” Method for Edibles
This ornamental design trick works just as well for food crops. A tall thriller anchors the center, compact fillers pack the mid-zone, and trailing spillers cascade over the rim.
- Thriller: One indeterminate tomato, staked or caged, center of the pot
- Filler: Bushy basil or dwarf peppers ringing the base
- Spiller: Creeping thyme or trailing nasturtiums along the edge
This is one of the simplest tiny garden ideas to replicate, even in a single 20-gallon pot on a fire escape or apartment balcony.
Essential Supplies for Multi-Level Planting
Multiple plants sharing one pot need more infrastructure than a single-plant container. Skimp here and you’ll fight nutrient crashes and toppled cages all summer.
- An extra-large container (minimum 15–20 gallons) with multiple drainage holes
- A sturdy obelisk or heavy-duty tomato cage, installed at planting time
- Nutrient-rich, well-draining potting mix built for heavy feeding
- A weekly liquid organic fertilizer, like fish emulsion or kelp
Choosing the Right Containers and Trellises
Go bigger than feels necessary. A 15–20 gallon container gives roots room to stratify without crowding, and it holds moisture longer than a 5-gallon bucket on a 90-degree afternoon.
Look for containers with at least four drainage holes, not just one center hole. I switched to fabric grow bags for my thriller-filler-spiller pots and drainage problems disappeared overnight.
Install your trellis, obelisk, or tomato cage before you plant, not after. Jamming a cage into established roots snaps them and sets your thriller back weeks.
Formulating a Nutrient-Dense Potting Mix
A layered container is essentially a mini raised bed feeding three or four plants, so standard potting soil runs out of nutrients fast. Build a richer base from the start.
My go-to recipe: 60% high-quality potting soil, 20% finished compost, 10% worm castings, and 10% perlite for drainage and structure. This blend resists compaction all season, even under heavy watering.
Step-by-Step Guide to Planting Your Layered Container
Follow this sequence and you’ll avoid root damage and uneven establishment, which is the most common reason layered pots underperform in their first month.
- Fill the container two-thirds full with your nutrient-dense mix
- Set the thriller (deepest-rooted plant) in the center first
- Install the trellis or cage around it now, before roots spread
- Backfill soil to the correct depth for the thriller’s root ball
- Tuck fillers into the mid-section, spacing them evenly around the thriller
- Plant spillers along the rim, angling them to trail outward as they grow
- Water deeply until it runs from the drainage holes
- Add a 2-inch layer of organic mulch to lock in moisture
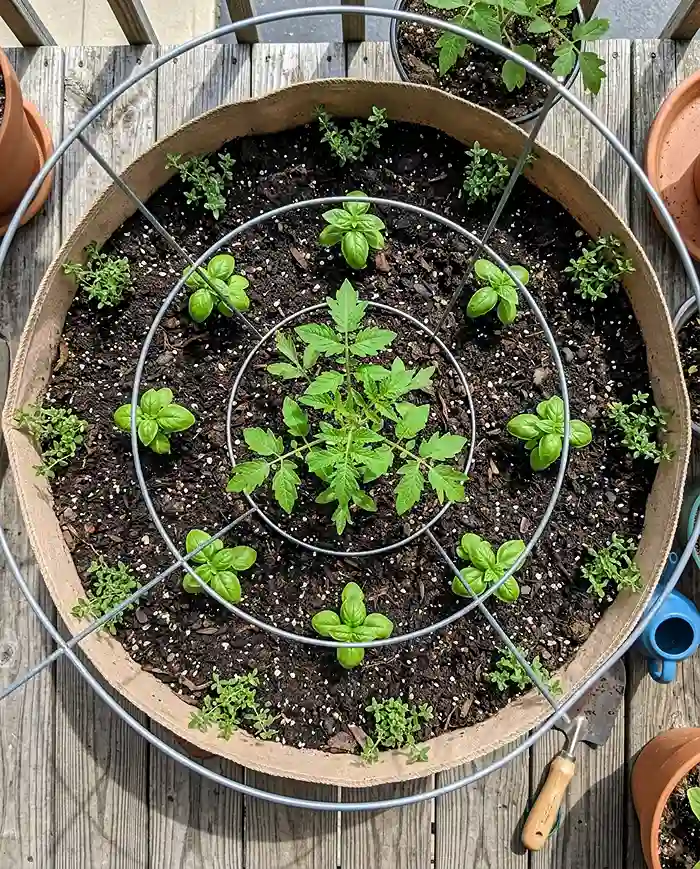
Mulch matters more in layered pots than single-plant containers, since you’ve got less bare soil surface and more competing roots pulling moisture fast.
Winning Plant Combinations for Layered Pots
The best pairings do double duty: they fill different root zones and help each other fend off pests or hold moisture. Here are two combinations I’ve grown for multiple seasons.
The Classic Salsa Pot: Tomatoes, Basil, and Trailing Thyme
Quick Answer: Stake an indeterminate cherry tomato like ‘Sungold’ in the center, ring the base with bushy Genovese basil, and let creeping thyme spill over the sides.
Basil’s strong scent helps confuse aphids and hornworm moths looking for tomato foliage. Thyme spreads low and dense, acting as a living mulch that shades the soil and cuts down watering.
My first attempt crowded the basil too close to the tomato stem, and it got shaded out by July. Now I leave a solid 8 inches between the tomato cage and the basil ring.
The Cool-Season Salad Bowl: Swiss Chard, Radishes, and Nasturtiums
Quick Answer: Center a ‘Bright Lights’ Swiss chard, underplant with fast-maturing ‘Cherry Belle’ radishes, and edge the pot with trailing nasturtiums.
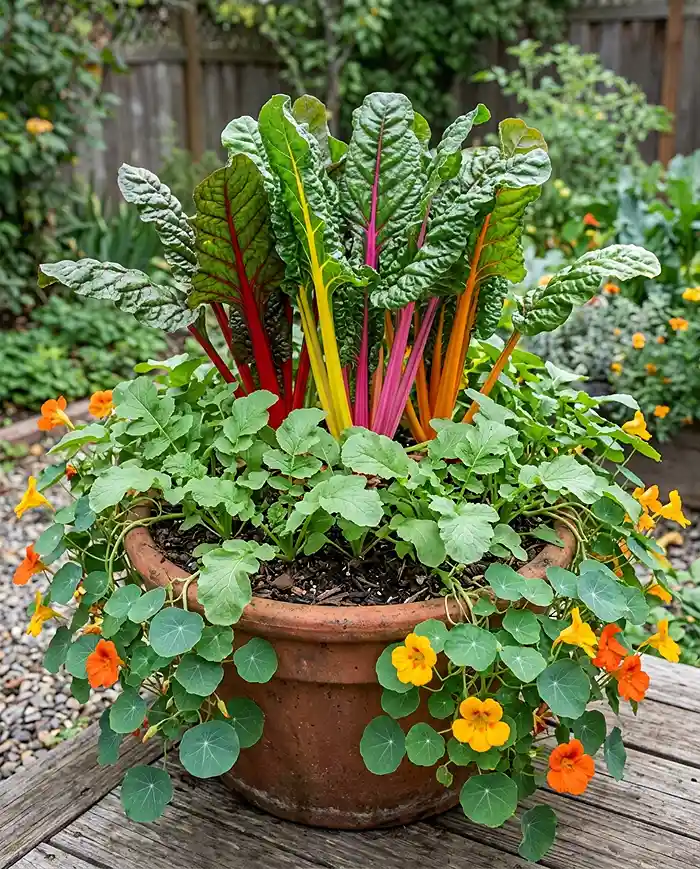
Radishes mature in about 25 days and break up compacted soil before they’re harvested, opening root space for the chard as it matures. Nasturtiums lure aphids away from the chard, acting as a trap crop.
I run this combo every spring in a 5-pot layout on my balcony — you can see the full setup in our container garden layout with 5 pots guide.
Watering and Feeding High-Density Pots
Overcrowded pots dry out faster and burn through nutrients faster than single-plant containers. Adjust your routine accordingly, or you’ll watch growth stall mid-season.
| Task | Frequency | Notes |
|---|---|---|
| Moisture check | Daily | Stick a finger 2 inches deep; water if dry |
| Liquid fertilizer | Every 7–10 days | Diluted fish emulsion or kelp |
| Slow-release granular | Mid-season | Scratch into top 1 inch of soil |
The season I skipped weekly feeding to save time, my salsa pot’s tomato yellowed from the bottom up by August. A strict fertilizing schedule isn’t optional in layered containers — it’s the difference between a decent harvest and a great one.
Common Problems and Solutions
Intensive planting invites a few predictable challenges. Catch them early and your harvest survives; ignore them and the whole pot can collapse within weeks.
Nutrient Depletion and Stunted Growth
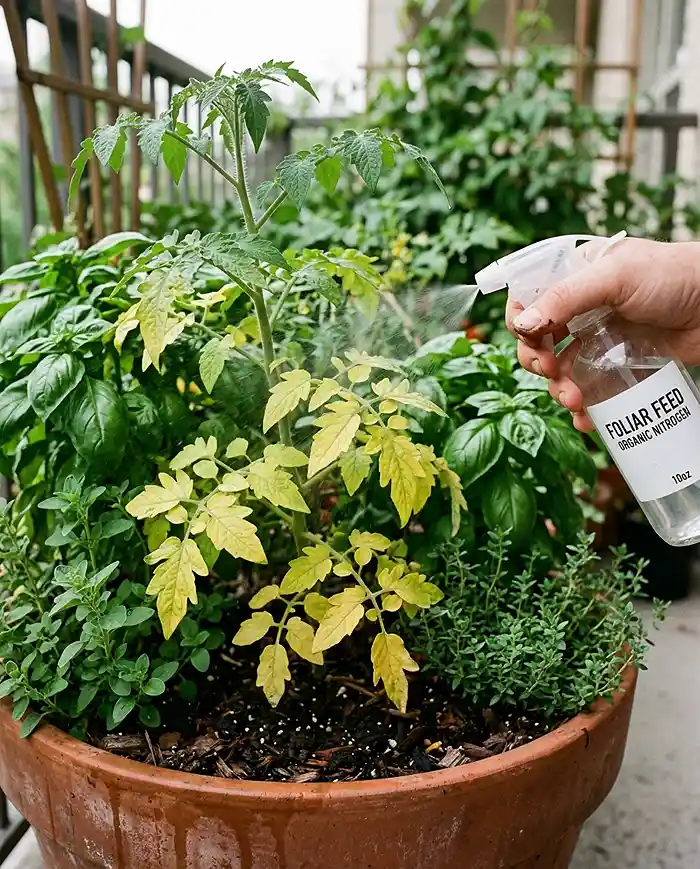
Yellowing lower leaves signal nitrogen deficiency from root competition. Purplish tinges on stems or undersides of leaves point to phosphorus starvation, common when multiple heavy feeders share one pot.
For a fast fix, apply a foliar feed directly to the leaves for quick uptake, then follow with a compost tea drench at the roots. Most plants bounce back within a week if you catch the symptoms early.
Overcrowding and Poor Air Circulation
Dense canopies trap humidity, which invites powdery mildew and fungal disease, especially on basil and Swiss chard leaves pressed close together.
Prune interior foliage that isn’t getting direct light, focusing on leaves that touch neighboring plants. This opens airflow through the canopy without sacrificing your outer, sun-exposed harvest leaves.
For more ways to squeeze extra yield out of tight footprints, check our guide to space-saving small garden ideas.
Frequently Asked Questions
How deep does a container need to be for layered planting?
Shallow bowls work fine for simple lettuce mixes, but true layered planting with fruiting crops needs a minimum depth of 12 to 18 inches. That depth lets deep, mid, and shallow root zones develop without stunting the central plant.
Can I layer root vegetables with heavy-feeding fruiting plants?
Yes. Fast-growing, shallow-rooted crops like radishes or baby carrots pair well with deep-rooted fruiting plants like peppers or eggplants. Harvest the root vegetables early so their space opens up for the fruiting plant’s late-season growth surge.
How often should I fertilize a densely packed container?
Apply a diluted, balanced, water-soluble organic fertilizer every 7 to 10 days. Midway through the season, supplement with a slow-release granular organic fertilizer scratched into the topsoil to sustain the heavier plant biomass.
What’s the minimum container size for layered container gardening?
Use at least a 15 to 20 gallon container for a full thriller-filler-spiller setup with a fruiting plant. Smaller pots work for herb-only or lettuce-only layers, but fruiting crops need the extra root volume and moisture reserve.
Is layered container gardening good for beginners doing small space gardening?
It’s beginner-friendly if you start with one proven combination, like tomato, basil, and thyme. Match plants with similar sun and water needs first, then expand to more complex layered pots once you’re comfortable reading the soil.
Conclusion
Layered container gardening isn’t complicated once you understand root zones and light stacking. Match plants by needs, give them room to stratify, and feed on a strict schedule.
Start with one proven combo, like the salsa pot, before building out a full patio of layered containers. If you’re new to growing in tight quarters, our apartment gardening for beginners guide is a solid next stop.
Key Takeaways
- Layered container gardening pairs deep, mid, and shallow root zones in one pot to triple your yield
- Use the thriller-filler-spiller method: one tall plant, mid-level fillers, and trailing spillers along the rim
- Choose a 15–20 gallon container minimum, with a nutrient-dense mix of potting soil, compost, and worm castings
- Feed weekly with liquid organic fertilizer and check soil moisture daily — dense pots dry out fast
- Prune interior foliage regularly to prevent powdery mildew in tightly packed canopies