

Sprouts vs Microgreens
Sprouts vs Microgreens: Discover which packs 40x more vitamins, grows safer, and saves you $800+ yearly. Complete growing guide inside. Start today!
Ever stood in the grocery store staring at those tiny containers of green stuff, wondering if you’re about to drop $5 on what looks like grass clippings? Yeah, me too. The whole sprouts vs microgreens thing used to confuse the heck out of me until I realized they’re not even the same plant—they’re more like different life stages of the same organism.
If you’ve been curious about growing your own superfood on your kitchen counter (and saving a ton of money while you’re at it), you’re in the right place. I’ve been growing both for years now, and trust me, once you understand the difference between sprouts vs microgreens, you’ll never look at those overpriced store containers the same way again.
Table of Contents
What’s Really Different About Sprouts vs Microgreens?
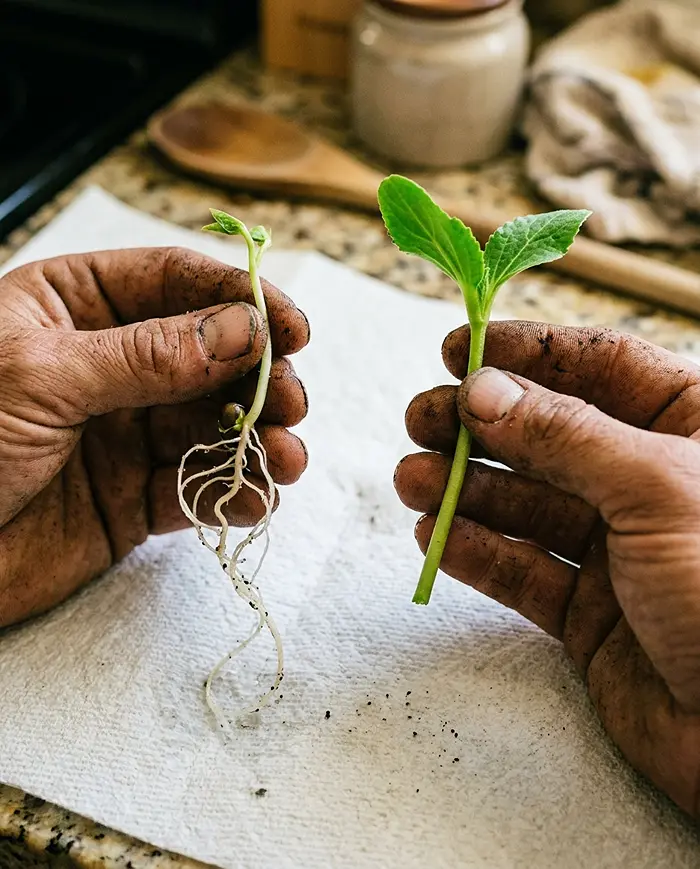
Here’s the thing most people don’t realize: comparing sprouts vs microgreens isn’t like comparing apples to oranges—it’s more like comparing a caterpillar to a butterfly. They’re the same organism at completely different life stages.
Sprouts are basically plant babies that you catch super early in the game. We’re talking 2-7 days after the seed decides to wake up from its nap. During this phase, they’re living off their “trust fund”—all that energy packed inside the seed. Scientists call this heterotrophic growth, but I just think of it as the plant eating its own lunch.
You grow them in just water (no soil needed), keep them in the dark like little vampires, and when harvest time comes, you eat everything—roots, seed coat, the whole shebang.
Microgreens, on the other hand, are the teenagers of the plant world. You harvest them at 7-21 days once they’ve developed their first “real” leaves (not just those baby cotyledons). By this point, they’ve graduated to making their own food through photosynthesis—what scientists call autotrophic growth. They need soil or growing medium, they crave light, and you harvest them by giving them a haircut above the soil line.
| The Sprouts vs Microgreens Breakdown | Sprouts | Microgreens |
|---|---|---|
| Harvest Time | 2-7 days (the babies) | 7-21 days (the teenagers) |
| Growing Setup | Just water in a jar | Soil/growing medium + light |
| Light Requirements | None (they prefer darkness) | 12-16 hours daily |
| What You Actually Eat | Everything including roots | Just stems and leaves |
| How They Get Energy | Stored seed energy | Photosynthesis |
| Leaf Development | Only cotyledons (baby leaves) | True leaves fully developed |
Fun fact that’ll make you feel smart at parties: “microgreens” didn’t even exist as a term until the 1980s. Fancy restaurants wanted something that sounded more upscale than “sprouts” (which were getting a bad rap for food safety issues). So they basically rebranded young greens as “microgreens” and started charging premium prices. Marketing genius, right?
The Nutrition Battle: Sprouts vs Microgreens Showdown
When it comes to microgreens vs sprouts nutrition, it’s not about declaring a winner—it’s about understanding what each one brings to your plate. Think of it like this: they’re both nutritional powerhouses, just with different superpowers.
Why Microgreens Are Vitamin Bombs
Microgreens are like nature’s multivitamin that decided to show off. Research shows they can pack 4-40 times more vitamins C, K, and E than their full-grown counterparts. That’s not a typo—we’re talking forty times more nutrition in a tiny package.
The antioxidant levels are absolutely insane too. All that chlorophyll, carotenoids, and polyphenols develop when the plant starts photosynthesizing. But here’s where it gets really wild: broccoli microgreens contain 20-50 times more sulforaphane than regular broccoli heads. According to Johns Hopkins research on sulforaphane, this compound is one that scientists get genuinely excited about for its potential health-protective properties.
Plus, microgreens have more fiber than sprouts since they’re actually developed plant structures rather than just germinated seeds.
Where Sprouts Shine: The Enzyme Advantage
Before you write off sprouts in this sprouts vs microgreens nutrition debate, hear me out. Sprouts have something microgreens simply can’t match: peak enzyme activity.
During those first 2-7 days of germination, enzymes are going absolutely crazy. These enzymes basically pre-digest the nutrients for you, breaking down complex proteins into amino acids and making minerals way easier for your body to absorb. It’s like having a personal nutritionist working inside each seed.
The sprouting process also knocks down antinutrients (like phytic acid) that normally block your body from absorbing minerals. So that iron and zinc in your lentil sprouts? Your body can actually use it, unlike in the dry lentils sitting in your pantry.
Let’s Talk Safety: The Real Deal About Sprouts vs Microgreens
Okay, time for some real talk that might make you uncomfortable, but you absolutely need to know this before choosing between sprouts vs microgreens.
Sprouts carry higher food safety risks. Between 1996 and 2016, the CDC documented over 40 outbreaks linked to sprouts that made more than 2,400 people sick. We’re talking E. coli, Salmonella—the scary stuff that makes headlines.
Why? Because the exact conditions that make sprouts grow beautifully—warm, moist, dark environments—are also perfect breeding grounds for bacteria. If there’s even a tiny bit of contamination hiding in those seed crevices (which there often is), it multiplies like crazy during those few sprouting days.
Microgreens have significant safety advantages in the sprouts vs microgreens safety comparison:
- They grow in light with good airflow, which bacteria hate
- You harvest them above the soil line, avoiding root-zone bacteria
- The growing environment naturally inhibits pathogen growth
If you’re pregnant, elderly, have a compromised immune system, or feeding young kids, honestly? The CDC recommends avoiding raw sprouts entirely. Microgreens are a much safer bet when grown with proper protocols.
How to Grow Sprouts vs Microgreens: The Real-World Guide
Let’s get practical about how to grow sprouts at home versus how to grow microgreens at home. Both are way easier than you think, but they require different approaches.
The Lazy Gardener’s Guide to Growing Sprouts
If you can make coffee, you can grow sprouts. It’s honestly the easiest entry point into what I like to call “countertop farming.”
What You’ll Need:
- Wide-mouth mason jars (quart size works great)
- Sprouting lids or mesh screens (cheesecloth and rubber bands work too)
- Sprouting seeds (alfalfa, mung beans, lentils are foolproof)
The Dead-Simple Process:
- Measure seeds: 1-2 tablespoons per quart jar
- Soak overnight: 8-12 hours in cool water
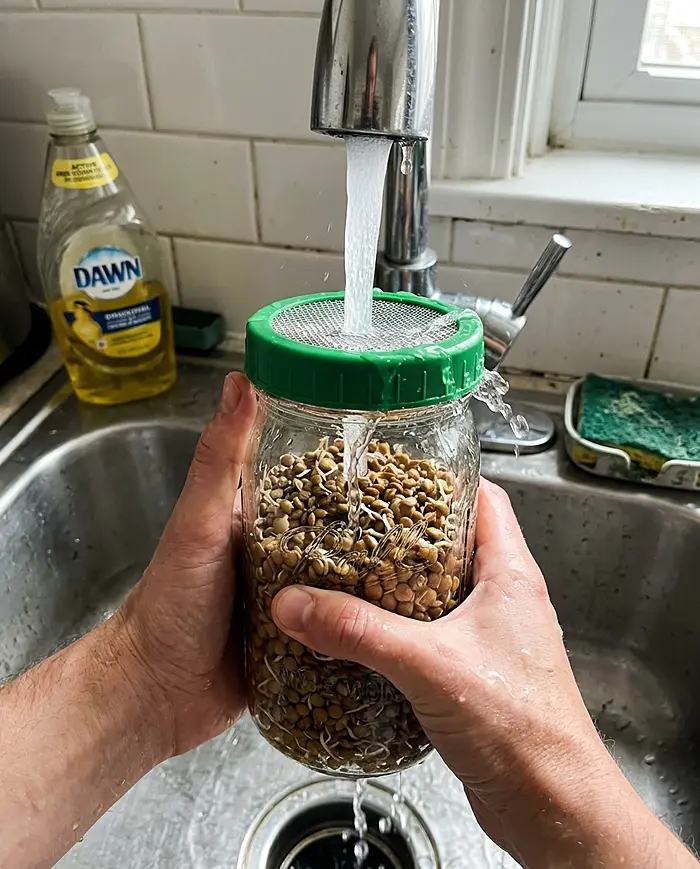
- Drain completely: Use your mesh lid to pour off all water
- Rinse and drain: 2-3 times daily (this is crucial for safety)
- Keep tilted: 45-degree angle so water doesn’t pool
- Harvest: When sprouts are 2-4 inches long (usually day 3-5)
The beauty? You can stack multiple jars vertically, making this perfect for tiny spaces. Three jars in rotation take up less room than a coffee maker.
Growing Microgreens: The Tray Method
How to grow microgreens at home feels more like real gardening, just miniaturized. It’s incredibly satisfying watching your own little forest emerge.
Equipment You’ll Need:
- Shallow trays with drainage holes
- Growing medium (potting soil, coconut coir, or hydroponic mats)
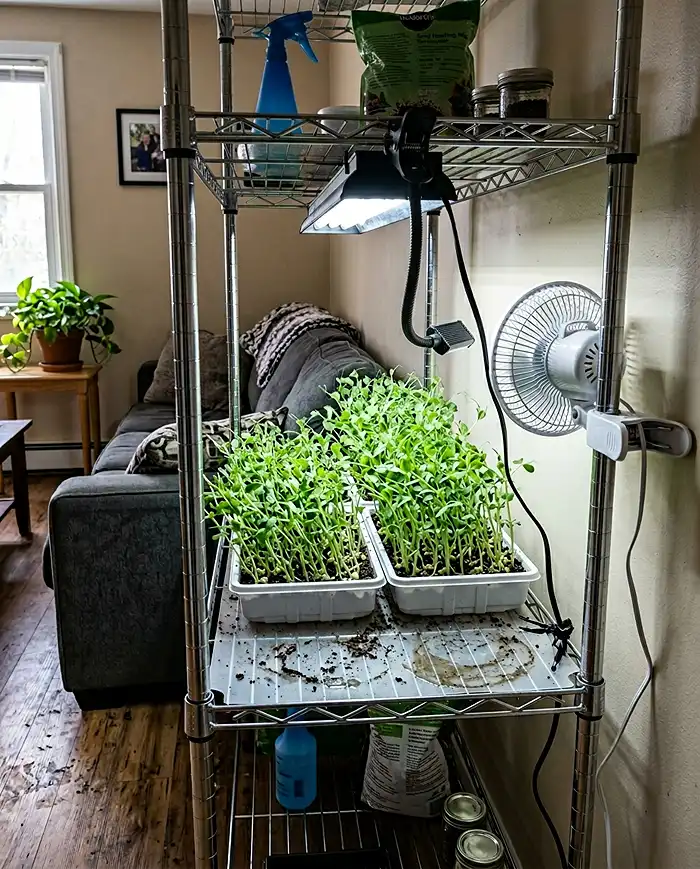
- Light source (sunny window or LED shop light)
Step-by-Step Growing Process:
- Prep your tray: Fill with 1 inch of pre-moistened growing medium
- Apply the “popcorn rule”: Sprinkle seeds densely but not overlapping
- Blackout period: Cover for 2-3 days to encourage strong germination
- Add light: 12-16 hours daily once sprouted (cheap LED shop lights work great)
- Bottom watering: Water the tray underneath—never from above or you’ll get mold
- Harvest: Cut 1 inch above medium when true leaves appear
Pro tip I learned the hard way: position lights 6-12 inches above trays. Too close and you’ll cook them; too far and they get weak and leggy.
If you’re working with limited space, this guide on indoor gardening for small spaces has tons of creative solutions for maximizing tiny apartments and making the most of vertical growing systems.
Space and Budget: The Economics of Sprouts vs Microgreens
Let’s talk money because the sprouts vs microgreens cost comparison is honestly mind-blowing.
Store-bought microgreens are highway robbery at $3-6 per ounce ($48-96 per pound!). Meanwhile, growing your own costs about $0.50-1.00 per tray, equivalent to roughly $8-16 per pound. If you’re buying microgreens weekly, you’re saving $832-1,664 annually by growing your own.
Store-bought sprouts are cheaper but still expensive at $2-4 for a tiny 4-ounce package. Home-grown sprouts cost maybe $0.15-0.30 per batch. Weekly consumption saves you $416-832 per year.
Here’s where it gets interesting: let’s calculate your “hourly wage” for this work. You spend maybe 2-5 minutes daily on maintenance. Over a year, that’s 12-30 hours total. Divide your annual savings by those hours, and you’re effectively making $28-139 per hour. Show me another side hustle that pays that well!
Space Requirements for Sprouts vs Microgreens:
- Tiny studio apartment? Sprouts win hands down—vertical jar stacking uses minimal counter space
- Small apartment with windows? Microgreens work beautifully on windowsills
- Got some shelf space? Run both systems with staggered harvests
Troubleshooting Your Sprouts vs Microgreens Adventure
You’re going to have some weird batches. I definitely did. Here’s how to fix the most common issues:
Mold problems? First, make sure it’s actually mold and not root hairs (they look fuzzy but disappear when rinsed). Real mold needs better airflow—add a small fan, reduce watering, or check your seed quality.
Seeds not sprouting? They might be too old, you didn’t soak long enough, or your space is too cold. Aim for around 70°F and extend soaking time by 2-4 hours.
Funky smells? That’s contamination. Toss the entire batch immediately, sterilize your equipment with diluted bleach, and start fresh.
Tall, floppy microgreens? They’re stretching for light. Move your light closer or increase daily light hours.
Yellow leaves? Either insufficient light for photosynthesis or overwatering causing root problems.
The Final Verdict: Which Should You Choose in Sprouts vs Microgreens?
So who wins the sprouts vs microgreens championship? Here’s my honest decision matrix:
Choose Sprouts If:
- You’re on a tight budget ($5-20 startup)
- Your place has zero natural light
- You want food fast (2-7 days)
- You prefer soil-free growing
- You have minimal counter space
- You’re interested in enzyme benefits and easy digestion
Choose Microgreens If:
- You want maximum vitamin density
- Food safety is a top concern
- You enjoy flavor variety and colors
- You have window space or can invest in basic lighting
- You want longer shelf life (7-10 days vs 3-5 days)
- You like the actual gardening experience
Grow Both If:
- You want complete nutritional coverage
- You enjoy dietary variety
- You can manage staggered harvest cycles
- You have space for both systems
My recommendation? Start with jar sprouting to build confidence. Once you taste your first batch of crunchy alfalfa sprouts on a sandwich, you’ll catch the growing bug. Then add microgreens for variety and that vitamin boost.
Your Sprouts vs Microgreens Questions Answered
Are microgreens actually healthier than sprouts?
In the sprouts vs microgreens nutrition debate, it’s not about one being universally “better.” Microgreens win on vitamin density and antioxidants, while sprouts excel in enzyme activity and digestibility. Honestly, eat both for the complete package.
Are sprouts safe to eat raw?
They carry higher risks due to their growing conditions. If you’re healthy and follow strict safety protocols, probably fine. But if you’re in a high-risk group, stick with microgreens or cook your sprouts.
Can you grow microgreens without soil?
Absolutely! Use coconut coir, hydroponic mats, or peat-based growing mediums. They work great and keep things cleaner for kitchen growing.
How long do they last once harvested?
Microgreens last 7-10 days refrigerated when kept unwashed in breathable containers. Sprouts have a shorter shelf life of 3-5 days, so plan your consumption accordingly.
Which is actually cheaper to grow?
Both save you 80-90% compared to store prices. Sprouts have lower startup costs, but microgreens provide more value per harvest once you’re established.
What’s the easiest option for beginners?
For the sprouts vs microgreens beginner question: radish microgreens are nearly foolproof with fast growth and forgiving nature. For sprouts, alfalfa offers reliable germination and mild flavor that’s perfect for first-timers.
The bottom line in this sprouts vs microgreens comparison? Both are incredible ways to grow nutrient-dense food year-round in whatever space you’ve got. Your wallet, your health, and your sense of accomplishment will all thank you for making the leap into countertop farming.