

Low-Cost Microgreens System at Home
Ditch the $5 store packs for good. Learn exactly how to set up a low-cost microgreens system at home using recycled containers, cheap LED lights & bulk seeds — and start harvesting in 7 days. Your wallet will thank you. → Read the Full Frugal Guide
⚡ Quick Answer: What’s the Cheapest Way to Build a Low-Cost Microgreens System at Home?
A low-cost microgreens system at home runs under $50 to start and roughly $60 per year to maintain — compared to $200+ buying them at the store. You need recycled shallow containers, a basic LED shop light (5,000–6,500K), bulk potting soil, and wholesale seeds. Most varieties harvest in 7–14 days with just 2 minutes of daily care, saving enough to earn you $11.67/hour in grocery savings. Not bad for tending baby plants in your closet.
Why Your Grocery Bill Is Begging You to Build a Low-Cost Microgreens System at Home
Let’s be honest — have you ever picked up a tiny clamshell of microgreens at the store, clocked the $4–5 price tag, and quietly put it back? Yeah. We’ve all done it.
Here’s the thing: building a low-cost microgreens system at home is one of the smartest frugal gardening decisions you can make right now. Microgreens are young vegetable seedlings harvested just 7–21 days after germination, right when the first true leaves emerge past the initial cotyledons. Despite being tiny, they pack up to 40 times the vitamins, minerals, and antioxidants of their fully grown counterparts. That’s not a rounding error — that’s forty times.
The numbers make store-bought greens look embarrassing. Retail microgreens run $3–5 per ounce, while a home-grown tray costs around $0.50 and yields 3–4 ounces. Over a full year, that’s $140+ back in your pocket just by running your own low-cost microgreens system at home instead of hitting the produce aisle.
But here’s the part that really lands: factor in the time, and the ROI is wild. With just 2 minutes of daily maintenance — about 12 hours total per year — your savings break down to:
Weekly Retail Value = 16 oz × $3.50/oz = $56.00 per week
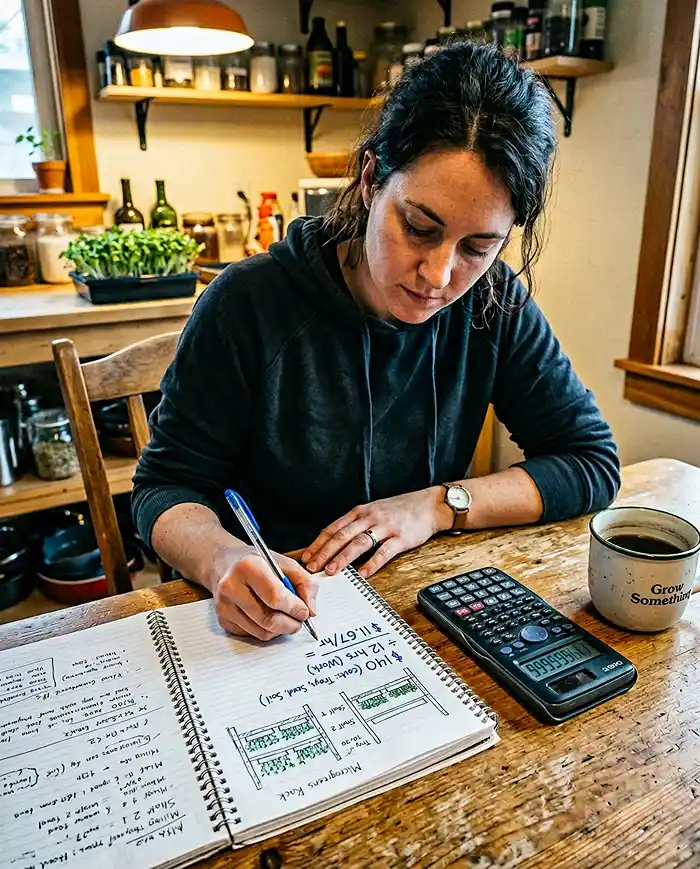
That’s more than minimum wage. For watering tiny plants. In your pajamas.
And if space is your concern? A complete low-cost microgreens system at home fits in just 3 square feet, needs zero outdoor access, no natural sunlight, and runs year-round regardless of season or climate. It’s the ideal indoor gardening project for apartments, small homes, or anywhere with an electrical outlet.
Making the Most of a Tiny Space With Your Low-Cost Microgreens System at Home
You Really Don’t Need Much Room
The biggest myth about growing microgreens at home is that you need dedicated garden space. You don’t. A closet shelf, a basement corner, or a large kitchen cabinet is genuinely all you need to run a fully functional low-cost microgreens system at home.
Each standard 10×20-inch tray produces 3–4 ounces of fresh greens — that’s $12–16 of retail value per tray, sitting in the footprint of a laptop. Stack several on a wire shelf, and you’ve got a productive indoor garden humming away in what used to be dead space.
For location, prioritize stability. You want a consistent 65–75°F temperature, access to an outlet, and distance from heating vents or drafty windows. Temperature swings stress seedlings during germination — and that’s a problem you can completely avoid just by picking the right spot. Basements and interior closets are underrated here: steady, dark, and completely out of the way.
If you’re working with a really tight footprint, this guide on Microgreens Complete Growing System for Small Apartments breaks down vertical setups built specifically for apartment living. Practical, space-smart, and worth bookmarking before you start building your own low-cost microgreens system at home.
Shelving: Where Your Low-Cost Microgreens System at Home Gets Serious
A standard wire shelving unit (36×18 inches) holds four 10×20-inch trays per level. A four-tier version gives you 16-tray capacity — enough for a continuous weekly harvest cycle that keeps fresh greens on your table without interruption. Always choose metal racks rated for 200+ pounds — soil, water, and lighting add up faster than you’d expect.
Organize your shelves by growth stage to keep your low-cost microgreens system at home running efficiently:
- Bottom shelf → Blackout-period trays needing zero light and minimal clearance
- Middle shelves → Actively growing crops under lights, needing 8–10 inches of vertical clearance
- Top shelf → Harvesting tools, spare seeds, and supplies within easy reach
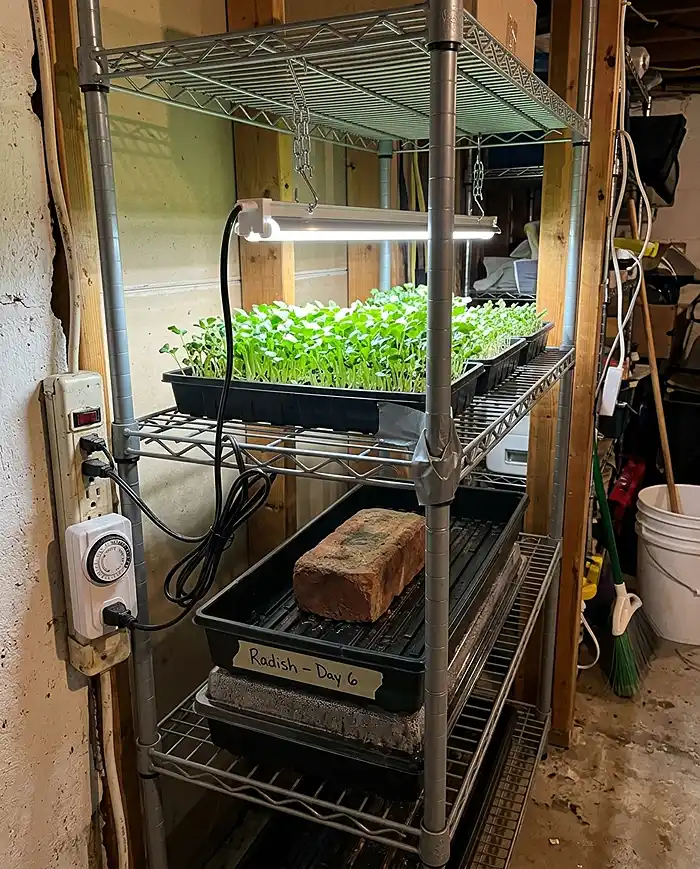
Don’t skip the weight check. Each saturated tray weighs 3–4 pounds. Multiply by 16 trays, add lights and water trays — you’re looking at 50–70 pounds total. Verify your shelf rating before loading everything up. More than a few enthusiastic beginners have learned this lesson the messy way.
Affordable LED Lighting That Gets the Job Done
Here’s a dirty little secret: those expensive specialty “grow lights” marketed to indoor gardeners? Completely unnecessary for a low-cost microgreens system at home. A standard 4-foot LED shop light from any hardware store, priced at $20–30, performs just as well — sometimes better.
Target a 5,000–6,500 Kelvin color temperature (look for “daylight” on the label) and at least 2,000 lumens per fixture. This spectrum keeps your greens compact and strong, rather than tall and leggy from reaching toward inadequate light.
Mount lights 4–6 inches above the canopy using adjustable chains or S-hooks — one fixture covers two standard trays. Grab a mechanical timer for $5–10 and program a 12–16 hour daily photoperiod. That one small step turns your low-cost microgreens system at home into a near-automated setup that genuinely runs on 2 minutes a day.
The 4 Pillars of a Low-Cost Microgreens System at Home That Actually Works
1. Growing Containers: Your Recycling Bin Is a Goldmine
Before spending a single dollar, check what you already have. Shallow containers measuring 1.5–2 inches deep are all you need, and the best candidates might already be sitting in your kitchen. Restaurant takeout trays, berry clamshells, aluminum baking pans, tofu containers — all of these work as growing vessels in your low-cost microgreens system at home.
Using plastic? Check the recycling code on the bottom. Stick to #2 (HDPE), #4 (LDPE), or #5 (PP) — these are confirmed food-safe and won’t leach chemicals into your greens. Poke 6–8 quarter-inch drainage holes per tray with a heated nail or soldering iron, then nest each draining tray inside a solid bottom tray for the bottom-watering setup that keeps mold and root rot out of your system.
2. Growing Medium: Keep It Simple and Cheap
Bulk potting soil costs roughly $0.65 per tray in 2-cubic-foot bags from home improvement stores — which is genuinely hard to beat for what it delivers. Go for peat-based or coconut coir blends without added fertilizers.
Since microgreens are harvested so early, extra nutrients are completely irrelevant to the plant, and you’re just paying for something you don’t need. Fine-textured mixes give better seed-to-soil contact, which means more even germination across your whole low-cost microgreens system at home.
Prefer a reusable option? Silicone mesh mats or hemp grow pads cost $1–2 per use and cut disposal time to zero. They excel with mucilaginous seeds like basil or chia that tend to clump awkwardly in soil. The trade-off is a higher upfront cost per tray and a steeper learning curve with moisture management — but they’re a solid long-term upgrade.
3. Seeds: Buying Wholesale Changes Everything
This is the single biggest cost lever in your entire low-cost microgreens system at home. Retail seed packets at the garden center hold 1–2 grams for around $4. Agricultural wholesalers sell the same seeds in 1-pound quantities for $15–20. One pound of broccoli seeds yields 40+ tray sowings, dropping your per-tray seed cost from $3.00 down to roughly $0.20 per tray. That math alone justifies the bulk purchase immediately.
Always source seeds labeled “sprouting grade” or “microgreens grade.” These guarantee 85–95% germination rates and are confirmed free of fungicide coatings — which matters a great deal when you’re eating whatever grows. Avoid standard garden packets designed for outdoor planting; they frequently carry lower germination rates and chemical treatments that have no business in your salad.
Research from the USDA Agricultural Research Service consistently shows that untreated, high-germination seeds produce microgreens with superior nutritional profiles and safer edible yields — making seed quality one of the most critical variables in any low-cost microgreens system at home.
4. The Supporting Equipment (All Under $40 Combined)
The rest of what you need to complete your low-cost microgreens system at home is refreshingly simple:
- Small spray bottle for misting — $2
- Sharp chef’s knife for clean harvesting cuts — $10
- Basic mechanical timer for light automation — $8
- 6-inch USB fan for air circulation and stem strengthening — $15
Total: under $40. Every single item earns its place in every harvest cycle.
From Tiny Seeds to Your Salad Bowl: The Full Growing Protocol
Phase 1: Sowing and the Blackout Period (Days 1–4)
Seed prep is where your low-cost microgreens system at home either starts strong or stumbles early. Large seeds — sunflower and pea especially — need 8–12 hours of pre-soaking in room-temperature water to soften their hulls and germinate evenly. Small seeds like broccoli and radish go straight into the tray dry — soaking makes them mushy and nearly impossible to spread cleanly.
Fill trays with 1–1.5 inches of pre-moistened growing medium and distribute seeds evenly in a single layer. For medium seeds like broccoli, 2 tablespoons per 10×20-inch tray hits the right density. Too much overlap means competition, uneven growth, and increased mold risk — three things that undermine an otherwise solid low-cost microgreens system at home.
Mist heavily until the soil is saturated but not waterlogged. Use the squeeze test: grab a handful, squeeze firmly — it should clump and release only 1–2 drops of water. If it pours, it’s too wet.
Stack a second tray on top, weight it down with a brick or paver, and move the whole setup to a dark spot at 65–75°F. Check moisture once daily by lifting the cover. Most varieties germinate within 48 hours, showing pale yellow shoots pushing upward in the dark.
Phase 2: Light Exposure and Bottom Watering (Days 4–10)
When shoots hit 1–1.5 inches tall and start pressing against the top tray, move them under the LEDs immediately. Delayed light exposure causes irreversible stem elongation and pale coloration — a mistake you can’t undo, and one that undermines the entire output of your low-cost microgreens system at home.
Switch to nested tray bottom-watering from this point forward. Place the draining tray inside the solid tray, add 1 cup of water to the bottom tray, and let roots wick moisture upward through capillary action.
Increase to 2 cups as plants grow and uptake accelerates. This method keeps the soil surface dry, which is your best natural defense against mold and the devastating “damping off” disease that can wipe out a tray overnight.
Bottom-water every 2–3 days, always emptying standing water after 15–20 minutes. Keep the USB fan running on low nearby — it strengthens stems through gentle mechanical stress and disrupts the humid microclimate under the dense canopy where fungal pests thrive. Good airflow is a non-negotiable part of a healthy low-cost microgreens system at home.
Phase 3: Harvest Day (Days 7–14)
Harvest when cotyledons are fully open and the first true leaves are just beginning to emerge between them. This window delivers the best balance of flavor, tenderness, and nutritional density — and it’s when your greens look their most impressive on a plate, which is a legitimate consideration.
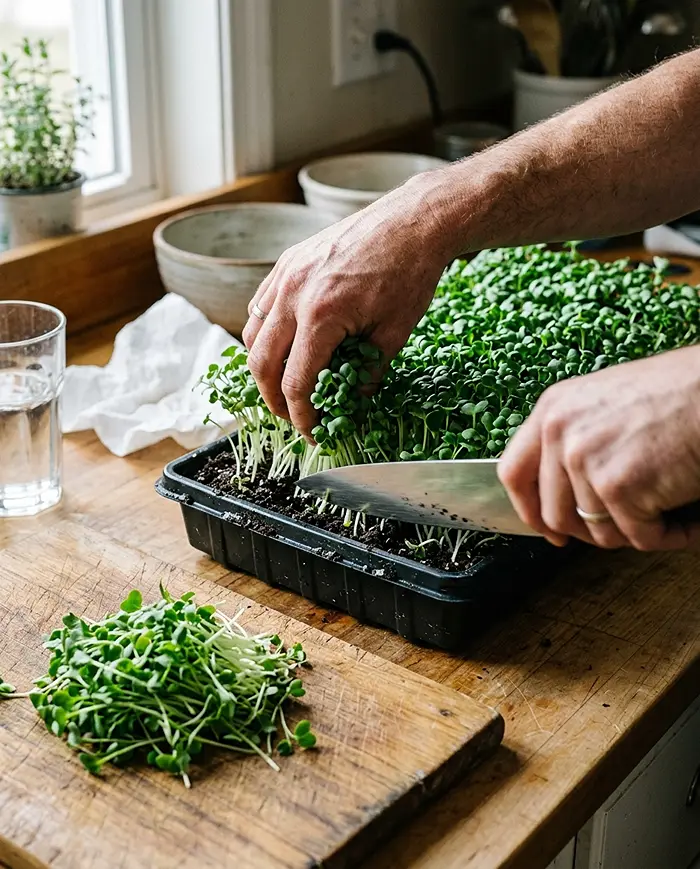
Use your sharp chef’s knife, not scissors. Cut ½ inch above the soil line in one clean motion — scissors crush stem cells, opening bacterial entry points that accelerate spoilage and shorten refrigerator shelf life significantly. Gather greens with your free hand as you cut to keep things organized and damage-free.
Rinse gently under cool water in a colander, then spin completely dry. Excess moisture is the leading cause of fast deterioration in stored microgreens — a salad spinner is one of the best small investments you can make for your low-cost microgreens system at home.
The 5 Best Microgreens to Start With
Choosing the right first varieties dramatically improves early success with your low-cost microgreens system at home. These five balance ease of growth, flavor, and ROI better than anything else:
- Broccoli (Brassica oleracea) — The definitive beginner variety. Mild flavor, 8–10 day harvest, forgiving of watering inconsistencies, and loaded with sulforaphane at up to 40x mature broccoli levels. Seed cost: roughly $0.40 per tray. Start here, no question.
- Radish (Raphanus sativus) — Harvests in 5–7 days flat with bold, peppery flavor and vibrant pink stems. The most resilient variety in any low-cost microgreens system at home — nearly impossible to kill even as a complete beginner.
- Pea Shoots (Pisum sativum) — Sweet, crunchy, and generous in yield. The standout advantage: regrows after harvest when cut above the lowest leaf node, delivering a 60–70% second harvest from the same tray. Pre-soak 8–12 hours before sowing.
- Sunflower (Helianthus annuus) — Nutty and substantial enough to anchor a salad. Use black oil sunflower seeds only — striped bird feed varieties germinate poorly. Heavy weighting during blackout is essential for hull shedding. Ready at 10–12 days.
- Amaranth (Amaranthus tricolor) — The visual showstopper of any low-cost microgreens system at home. Vivid magenta coloring, mild earthy flavor, and 14% protein by weight. Commands $6+ per ounce at farmers markets. Surface sow without burial and harvest at 12–14 days at peak color intensity.
Storage, Succession Planting, and Scaling Your Low-Cost Microgreens System at Home
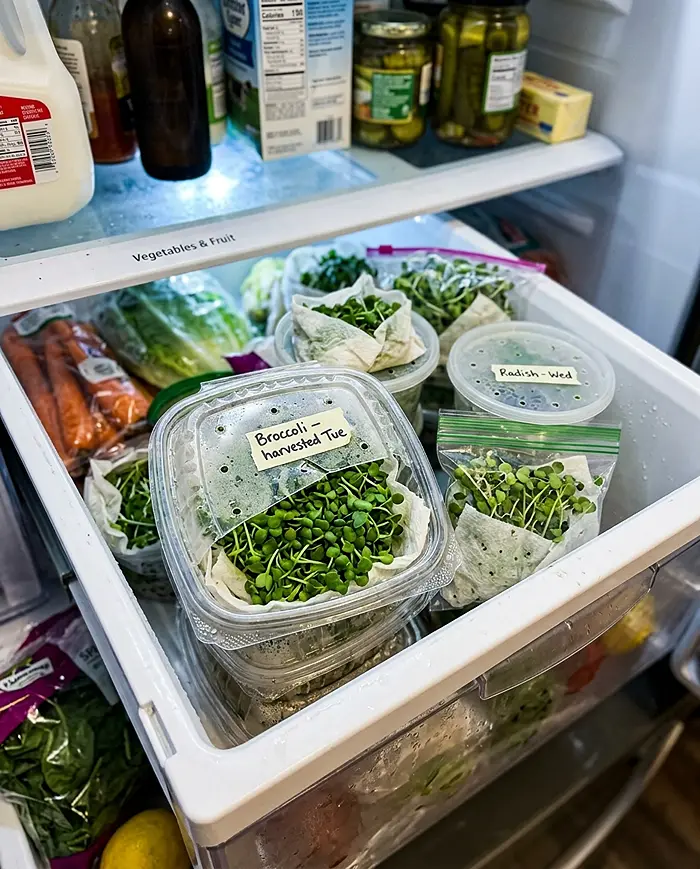
Storage Protocol: Wrap unwashed microgreens loosely in a slightly damp paper towel, place in a perforated container, and refrigerate at 35–40°F. This keeps them crisp and fresh for 7–10 days. The rule is simple: wash only what you’re about to eat, never the full batch.
Succession Planting: Start a fresh tray every 3–4 days to stagger your harvests and maintain a continuous supply. A fully loaded 16-tray shelf produces 12–16 ounces per week, which translates to:
Hourly Rate = $140 ÷ 12 hours = $11.67 per hour
That’s over $2,900 in annual retail value running through a $50 setup. Let that number sit for a moment.
Closed-Loop Composting: Spent root mats after harvest are packed with organic matter worth composting. Shake soil blocks into a dedicated compost bin, balance with shredded cardboard, and after 2–3 months, that compost feeds back into your growing medium — reducing soil costs by 30–40% and closing the loop on your low-cost microgreens system at home in a genuinely sustainable way.
Scaling Up: Most households need just 2–3 trays in rotation to cover 4–6 ounces of weekly consumption. Once you’ve dialed in your system, surplus production opens doors to farmers market sales at $4–6 per ounce or restaurant partnerships where chefs pay premium prices for same-day harvested freshness.
Troubleshooting Your Low-Cost Microgreens System at Home
Can I use grocery store seeds in my low-cost microgreens system at home?
Whole, untreated seeds from bulk bins work fine — dried lentils, whole coriander, and mung beans are all valid options. Avoid irradiated spices (won’t germinate) and anything with a colored coating indicating fungicide treatment.
Dedicated microgreen seeds guarantee 85–95% germination rates and are the smarter investment once your system is running consistently.
How do I tell root hairs from mold?
Root hairs grow straight outward from stem bases in uniform fuzzy patterns and vanish when misted. Mold spreads as web-like strands across the soil surface, persists when wet, and smells musty. Consistent bottom-watering and steady airflow prevent almost every mold issue before it starts — both are core habits in a well-run low-cost microgreens system at home.
What’s the hydrogen peroxide fix for mold?
Mix 8mL of 3% hydrogen peroxide per liter of water — about 1.5 teaspoons per quart — and lightly spray affected areas during the blackout period. This precise concentration eliminates mold spores while oxygenating roots with zero plant tissue damage:
$$\text{H}_2\text{O}_2 \text{ Solution} = \frac{8\text{mL}}{1000\text{mL}} = 0.8% \text{ active concentration}$$
Will microgreens regrow after cutting?
Most varieties — broccoli, radish, sunflower — put everything into that first growth cycle and won’t regrow meaningfully. The exceptions in any low-cost microgreens system at home are pea shoots and wheatgrass, which genuinely regrow from their nodes when cut above the lowest leaves, delivering a reliable second harvest at 60–70% of original yield.
The bottom line is simple: a low-cost microgreens system at home doesn’t require a green thumb, a big budget, or spare square footage you don’t have.
Under $50, three square feet of space, and two weeks is all it takes to go from zero to harvesting your first tray of fresh, nutrient-dense greens at home. Start with broccoli, grab a shop light, order seeds in bulk — and two weeks from now, you’ll be wondering why you ever paid $5 for a plastic clamshell.