
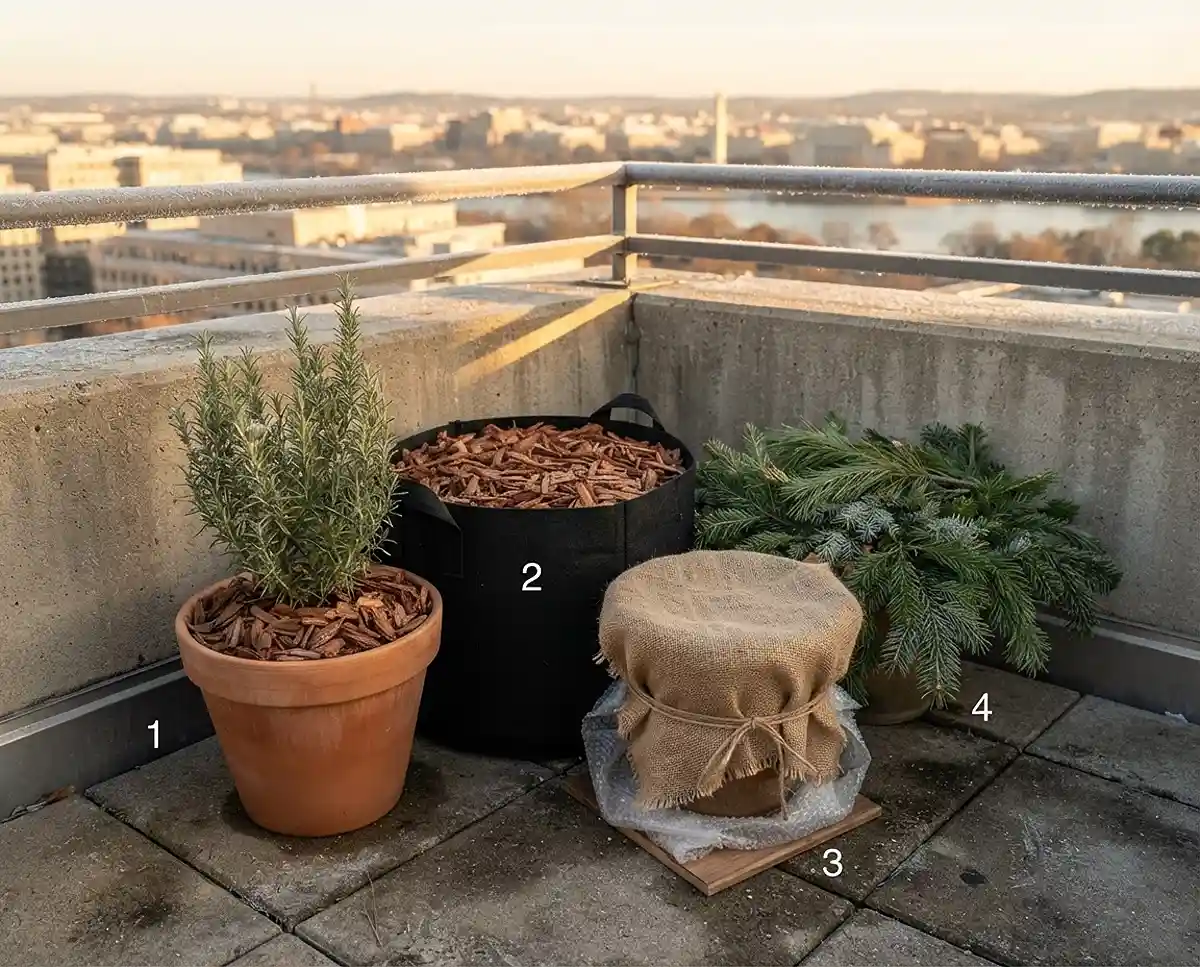
Mulching Potted Plants for Winter
Your pots look fine in October, then January’s thaw heaves the soil. Mulching potted plants for winter is a fall garden task that saves your plant roots. I’ve done it for 12 years on my zone 7a rooftop.
My terrace gets about eight hours of summer sun and takes the full force of winter wind. I grow in terracotta, fabric pots, and 15-gallon tubs. Here’s what works up there, and what flopped.
Table of Contents
The Lifesaving Importance of Mulching Potted Plants for Winter
Short Answer: In-ground roots sit inside the earth’s stored warmth. Container roots hang in freezing air on every side. A thick layer of winter mulch is the one barrier between your pot and a fatal root freeze. Skip it, and one cold snap can kill perennials that would survive in a garden bed.
Garden beds borrow warmth from deep soil. A pot has no such cushion, and cold hits it from every side. Container plants are often treated as one to two zones less hardy than the same plant in the ground.
Not sure of your zone? The USDA Plant Hardiness Zone Map lets you search by ZIP code. The 2023 update shifted many zones warmer, so recheck yours.
Understanding How Winter Mulch Protects Containers
Short Answer: Winter mulch doesn’t warm the soil. Its job is to keep soil consistently cold and stable, so roots stay dormant instead of freezing, thawing, and freezing again. Think of it as a lid on a cooler: it slows temperature swings rather than adding heat.
The science is simple. Soil that stays frozen stays asleep. Soil that bounces between 20°F and 45°F keeps waking roots up and hurting them.
Preventing Frost Heave and Root Tearing
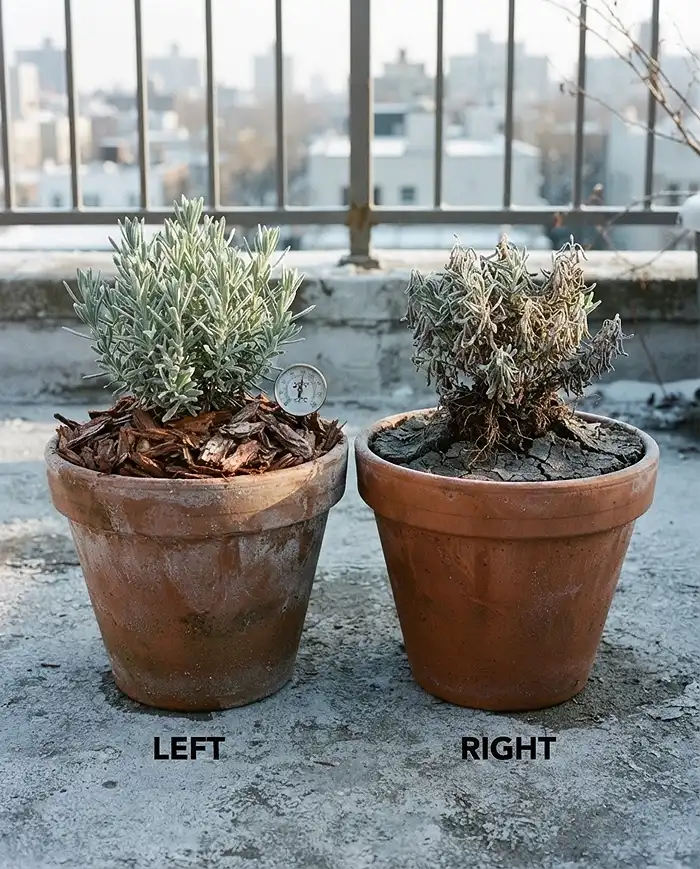
Short Answer: Frost heave happens when soil freezes, expands, thaws, and settles over and over during winter warm spells. Each cycle can shove roots upward and snap fine root hairs. Mulch evens out the temperature swings, so the soil stays frozen until winter actually ends.
Frost heave works like a slow-motion shove. Each freeze expands the wet soil upward, and each thaw lets it sink back unevenly. Fine root hairs [the tiny threads that absorb water] snap as the soil moves.
I learned this the hard way. One February, I left a ‘Munstead’ lavender in a 12-inch terracotta pot with no mulch. Three thaws in two weeks later, the crown sat 2 inches above the soil line. By April, the plant was gone.
Now every pot gets a thick mulch layer right after the first hard frost. I haven’t lost a lavender to heave in four winters. Mulch doesn’t stop the cold. It stops the whiplash.
Guarding Against Winter Desiccation (Wind Burn)
Short Answer: Cold wind pulls moisture out of topsoil and evergreen leaves while dormant roots can’t take up replacements. Plants then dry out and brown, even though it’s freezing. A heavy mulch layer locks in moisture below the surface and shields the soil from wind.
Rooftops make this worse, since wind speeds climb with height. Evergreens like rosemary, sage, and boxwood lose water through their leaves all winter. Meanwhile, frozen roots can’t replace it.
Try this:
- Push pots together against a wall to cut wind exposure.
- Water deeply right before the soil freezes.
- Cover the soil with 2 to 3 inches of mulch.
Choosing the Best Mulch Materials for Winter Containers
Short Answer: Choose chunky, slow-decomposing materials for winter: shredded bark, pine needles, straw, or evergreen boughs. They trap air and stay put in wind. Fine summer mulches like cocoa hulls or grass clippings pack down and blow away. They can’t protect roots in a hard freeze.
| Material | Insulation | Wind Hold | Best For |
|---|---|---|---|
| Shredded cedar bark | High | Good | Perennials, herbs, shrubs |
| Coarse pine needles | Medium-high | Very good | Blueberries, acid lovers |
| Thick wood chips | High | Good | Large tubs and planters |
| Clean straw | High | Very good | Garlic, hardy vegetables |
| Evergreen boughs | Medium | Excellent | Extra cap over other mulch |
Heavy Organic Insulators: Bark Chips and Pine Needles
Short Answer: Shredded cedar bark, coarse pine needles, and thick wood chips decompose slowly and create pockets of trapped air. Those pockets work like insulation in a house wall. Use chunks of about one to two inches so they stay put and let moisture drain.
In November, I topped a 7-gallon pot of ‘Arp’ rosemary with 3 inches of shredded cedar. A cheap probe thermometer showed the soil held between 28 and 34°F through January. An unmulched pot of ‘Arp’ beside it swung from 14 to 41°F.
The mulched rosemary pushed new growth by mid-March. The bare pot’s plant dropped about half its needles.
Straw and Evergreen Boughs for Extra Protection
Short Answer: Clean straw and cut evergreen boughs, such as old Christmas tree branches, work well on your most vulnerable pots. The pieces interlock, so gales can’t easily strip them off. Use seed-free straw, not hay, to avoid sprouting weeds. Old trees are nearly free after the holidays.
Straw is hollow, so it traps air like a bundle of tiny drinking straws. It packs down, so start with about 4 inches. It settles to the 2 to 3 inches you want.
Lay boughs on top of the mulch for a windproof cap. Weight them with a couple of bricks if your terrace gets gusty.
Step-by-Step Guide: How to Mulch Potted Plants for Winter
Short Answer: Winter mulching takes three steps. Clean and deeply water the pot. Add a 2-to-3-inch layer with a bare gap at the stem. Then insulate the outside walls. Do them in order after the first hard frost. Skipping a step invites rot or disease.
Step 1: Pre-Winter Cleaning and Deep Watering
Short Answer: Weed the pot and clear every dead, mushy leaf, since decaying foliage shelters overwintering fungal spores. Then water deeply once, before the soil freezes solid. Moist soil holds heat better than dry soil, and roots need that water stored for the long dormant stretch.
Add this to your fall garden tasks list:
- Pull weeds and fallen leaves.
- Snip dead summer foliage, but leave healthy evergreen growth.
- Water until it drains from the bottom holes.
- Empty saucers so water can’t freeze in them.
Step 2: Applying the 2-to-3-Inch Insulation Layer
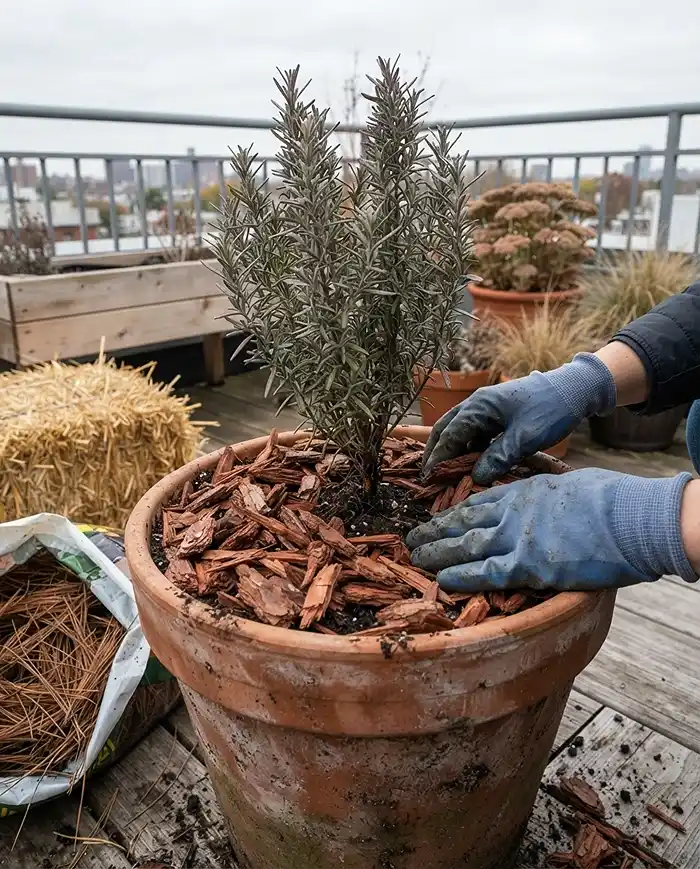
Short Answer: Spread a uniform layer of mulch, 2 to 3 inches deep, across the soil surface. Keep a one-inch bare gap around the main stem. That gap lets the base breathe, which prevents basal rot, and it keeps rodents from nesting against the plant.
In a 12-inch pot, a 3-inch layer leaves about an inch below the rim, so you can still water. Pull the mulch back from the stem like you’re parting a curtain.
Want more material ideas? See our guide to mulching potted plants.
Step 3: Insulating the Exterior of the Container
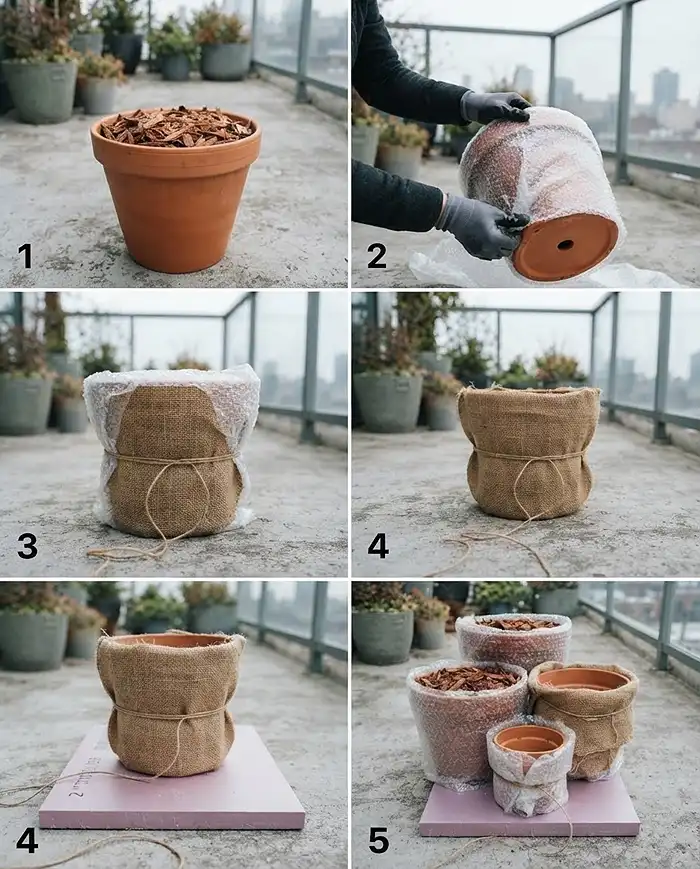
Short Answer: Mulching the top is only half the job for above-ground pots. Cold also creeps through the side walls and freezes the outer roots first. Wrap the pot in heavy-duty bubble wrap or burlap, and set it on a board or foam to block cold from below.
Staple or tie the wrap around the pot, and leave the drainage holes uncovered. Wrapped pots clustered together hold warmth best.
Growing herbs in small pots? My tips on caring for potted herbs cover the best spots to group them.
Winter Maintenance for Mulched Containers
Short Answer: Mulched soil dries far slower than bare soil, so winter watering shrinks to a rare, careful check. Good winter container care means testing moisture under the mulch. Water only when the soil is truly dry. Overwatering and underwatering both kill dormant roots.
Think of mulch as a lid on the pot. It slows evaporation, so the soil stays damp much longer than bare dirt would.
Watering Dormant Plants Under Mulch
Short Answer: Push a finger past the mulch and 2 inches into the soil. If it’s completely dry, water sparingly on a mild day above 40°F, in the morning. If it’s cool and damp, leave it alone. Never water a frozen pot.
For the final waterings before the freeze, see my guide to watering potted herbs in fall. After that, switch to the finger test.
Common Problems & Solutions
Short Answer: Most mulch problems come from two mistakes: piling it against the stem and giving rodents a cozy nest. Both are easy to fix in minutes. Pull the mulch back, add a barrier, and your plant will usually recover. Here’s how to spot each.
Crown Rot from “Volcano Mulching”
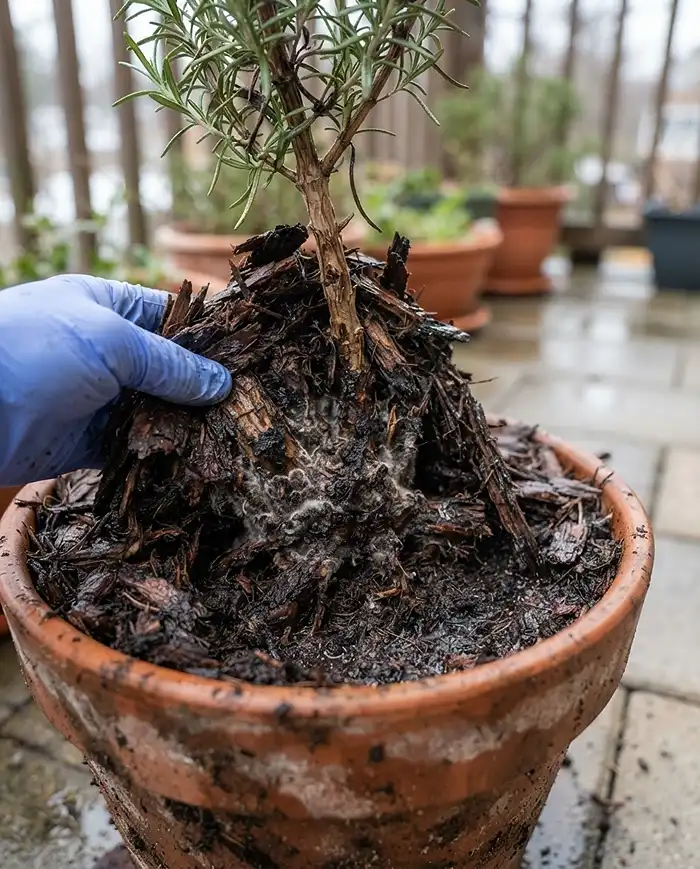
Short Answer: Volcano mulching means piling wet mulch up against the stem. It traps freezing moisture against the crown [the spot where stem meets roots], causing rot. The fix is immediate: pull the mulch back to expose the crown and leave a one-inch gap.
Warning signs: a dark, mushy stem base, yellowing leaves, or fuzzy mold at the soil line. Let the exposed crown air out for a day before you add mulch back.
Rodents Nesting in Winter Mulch
Short Answer: A thick, warm straw layer attracts overwintering mice and voles. Block them with hardware cloth [sturdy galvanized wire mesh] laid over the soil before you mulch. A light dusting of cayenne pepper helps too. Mesh works better, since cayenne washes off in rain.
Voles once moved into the straw on my 15-gallon tub of ‘Music’ hardneck garlic. Winter pests are part of container vegetable gardening, apparently. By January, six of 24 cloves were chewed.
Now I lay hardware cloth under the straw. Last winter, 23 of 24 cloves sprouted.
Frequently Asked Questions
When exactly should I apply winter mulch to my pots?
Wait until after the first hard, killing frost has put the plant into full dormancy and slightly frozen the topsoil. In my zone 7a, as of fall 2026, that’s typically late October to mid-November, but check your local frost dates. Mulching too early, while the soil is warm, encourages new growth that the next freeze will kill.
Should I remove the winter mulch in the spring?
Yes. Gently pull it back in early spring as temperatures rise. The sun can then warm the potting soil and wake up the roots. Once hard freezes are behind you, replace it with a lighter summer mulch if you like.
Can I use fallen autumn leaves to mulch my balcony pots?
Whole leaves mat down into a dense, wet layer that suffocates container roots and breeds fungus. If you use them, shred them finely with a lawnmower first. Shredded leaves are free, but bark or straw insulates better.
How much mulch do I need for a container?
Plan on a 2-to-3-inch layer across the soil. A 12-inch pot takes roughly 4 to 6 quarts of shredded bark. Leave a one-inch gap at the stem and about an inch below the rim for watering.
Will winter mulch keep my pots from freezing solid?
No, and that’s fine. Mulch isn’t meant to keep the soil warm. It keeps temperatures steady so roots don’t thaw and refreeze, which does the real damage.
Can I mulch vegetables in containers, like garlic or kale?
Yes. Hardy crops such as garlic and kale do well with straw or shredded bark over the soil. Winter container vegetable gardening works best with hardy crops, and mulch keeps their roots steady.
Quick Recap
- Begin mulching potted plants for winter only after the first hard frost puts plants to sleep.
- Clean the pot, then water deeply once before the soil freezes.
- Add 2 to 3 inches of bark, pine needles, or straw, with a one-inch gap at the stem.
- Wrap the outside of the pot in bubble wrap or burlap.
- Check moisture under the mulch, water sparingly above 40°F, and use hardware cloth against rodents.