

Container Drainage Solutions for Small Balconies
Waterlogged pots kill more balcony plants than cold snaps or pests combined. The right container drainage solutions protect your plants, your floor, and your downstairs neighbor’s patience.
I’ve killed two rosemary plants and one fig to root rot on my own 6th-floor, zone 7a balcony in Chicago before I figured this out. Here’s everything I wish I’d known sooner.
Table of Contents
The Hidden Danger of Poor Drainage in Balcony Containers
Overwatering, not underwatering, is the number one killer of container plants. When water can’t escape, roots sit in soggy soil and suffocate from lack of oxygen.
On a ground-level garden bed, excess water can spread out and soak into surrounding earth. In a container, it has nowhere to go except out the bottom, which is exactly why drainage matters so much more for small space gardening than it does in a yard.
Balconies raise the stakes further. You’re managing water in a sealed box, on a shared structure, above someone else’s living space. Get it wrong and you’re not just losing a plant, you’re dealing with a soggy deck or an angry neighbor.
Assessing Your Current Drainage Problems
Before you drill anything or buy new pots, spend a week watching how your current containers actually behave. Water each one, then check back at 10 minutes, 1 hour, and 24 hours.
If water is still pooling on the surface after an hour, or the soil feels swampy a full day later, you’ve got a drainage problem worth fixing. Note which pots are the worst offenders before you start troubleshooting your urban gardening setup.
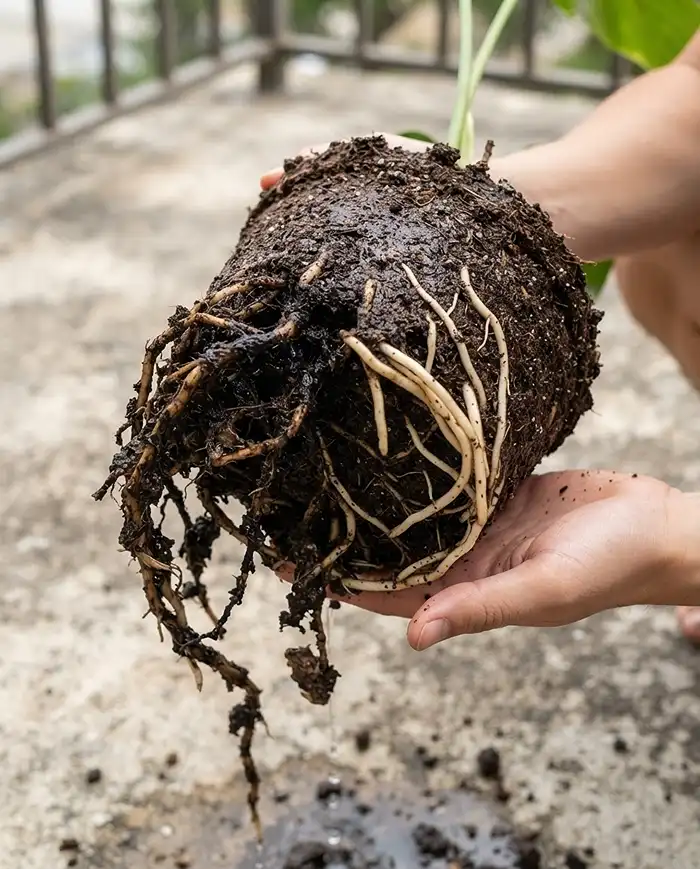
Signs Your Potted Plants Are Drowning (Root Rot Symptoms)
Quick Answer: Root rot shows up as yellowing lower leaves, a sulfur-like swampy smell, fungus gnats swarming the soil surface, and soil that stays heavy and wet days after watering.
- Yellow, mushy lower leaves that drop with a light touch
- A sour, rotten-egg smell when you dig a finger into the soil
- Fungus gnats hovering near the pot, especially at dusk
- Soil that’s still soaked 3+ days after watering, with no dry top layer
Real Example: My first fig tree, a Chicago Hardy in a 14-inch plastic pot, showed yellow lower leaves for weeks. I thought it needed more water. It needed the opposite, and by the time I pulled the root ball, half the roots were black mush.
The “Downstairs Neighbor” Dilemma: Managing Runoff
Quick Answer: Good container drainage means water exits the pot freely, but on a shared balcony you also need a plan to catch that runoff before it drips onto the balcony or unit below yours.
This is the part most drainage advice skips. Fixing the pot solves the plant’s problem but creates a building problem if you don’t also manage where the water lands afterward.
The fix isn’t to restrict drainage, that just brings back root rot. Instead, drain freely inside the pot and catch everything with a proper saucer setup, which I’ll cover below.
Essential Materials to Fix Container Drainage
Quick Answer: You need coarse potting amendments (perlite or pumice), a drill with the right bit for your pot material, sterilized pruning shears, and deep plastic saucers, not just for one plant but for your whole tiny garden ideas setup.
| Material | Best For | Watch Out For |
|---|---|---|
| Perlite or pumice | Aerating heavy potting mix | Perlite dust when dry; wet it first |
| Diamond masonry bit | Drilling glazed ceramic | Cracks pot if drilled too fast |
| Deep plastic saucers | Catching runoff cleanly | Must be sized to the exact pot |
| Rubber pot feet | Elevating pots off decking | Won’t help without a saucer too |
Choosing the Right Potting Soil and Amendments (Perlite/Pumice)
Quick Answer: Blend 30% to 40% coarse perlite, pumice, or pine bark fines into standard potting mix to create fast-draining, well-aerated soil that roots can actually breathe in.
Bagged “potting soil” straight from the store is usually too dense for containers. It’s formulated with peat that compacts over a season, squeezing out air pockets roots need.
I mix 3 parts bagged potting soil to 1 part coarse perlite for anything in a pot under 12 inches, and closer to 40% perlite for anything smaller than 8 inches, since small pots dry out and drain unevenly faster.
Pro Tip: Wet your perlite in a bucket before mixing, it kicks up a lot less dust and blends in more evenly.
The Myth of “Gravel at the Bottom” (Perched Water Table Explained)
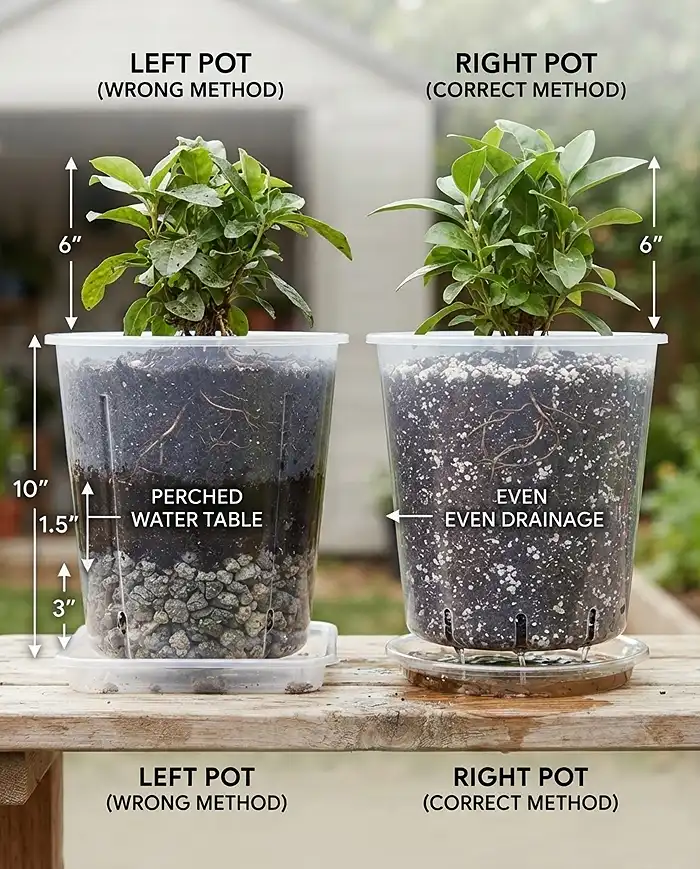
Quick Answer: Adding rocks or gravel to the bottom of a pot does not improve drainage. It actually raises the “perched water table,” the saturated layer of soil that sits above the drainage point, pushing sogginess closer to the roots.
Water doesn’t move from fine soil into coarse gravel until the soil above is fully saturated, thanks to capillary action. So that gravel layer just shrinks the usable root zone and traps more water higher up in the pot.
Oregon State University’s horticulture research explains this soil physics in detail in their container soils guide, if you want the deep-dive version.
Pro Tip: Skip the gravel entirely. Use straight, well-amended potting mix all the way to the bottom of the pot instead.
Step-by-Step Drainage Fixes for Existing Pots
If you’re staring at containers that are already sealed or holding water, here’s how to fix them without buying a single new pot.
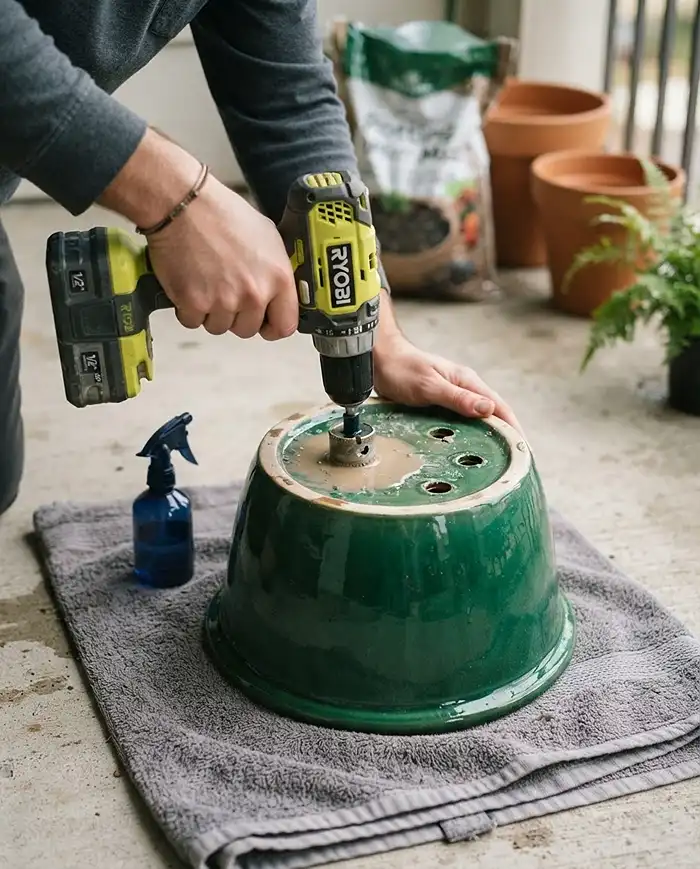
Drilling Proper Holes in Plastic and Ceramic Planters
Quick Answer: Drill drainage holes at least half an inch in diameter, using a standard bit for plastic and a diamond-tipped masonry bit for glazed ceramic to prevent cracking.
- Empty the pot completely and set it on a stable, protected surface
- Mark 3 to 5 spots roughly an inch apart across the base
- Start plastic drills at low speed to prevent melting or cracking the rim
- For ceramic, keep the bit wet and let it do the work, don’t force it
Real Example: I cracked a glazed ceramic planter my first try by using a regular metal bit at full speed. A $12 diamond hole saw fixed that mistake on every pot since.
Repotting Waterlogged Plants to Save the Roots
Quick Answer: Gently remove the wet root ball, trim away black or mushy roots with sterilized shears, and repot into fresh, well-aerated dry mix in a container with real drainage holes.
Work quickly once the root ball is exposed so roots don’t dry out or sit in air too long. Healthy roots are firm and pale; anything dark, slimy, or hollow-feeling gets cut.
Sterilize your shears with rubbing alcohol between cuts if the rot looks severe, so you’re not spreading fungal pathogens to healthy tissue.
Smart Balcony Runoff Management Solutions
Quick Answer: Combine rubber pot feet with deep, exact-fit plastic saucers to elevate pots off the floor while safely catching every drop of runoff before it reaches your neighbor.
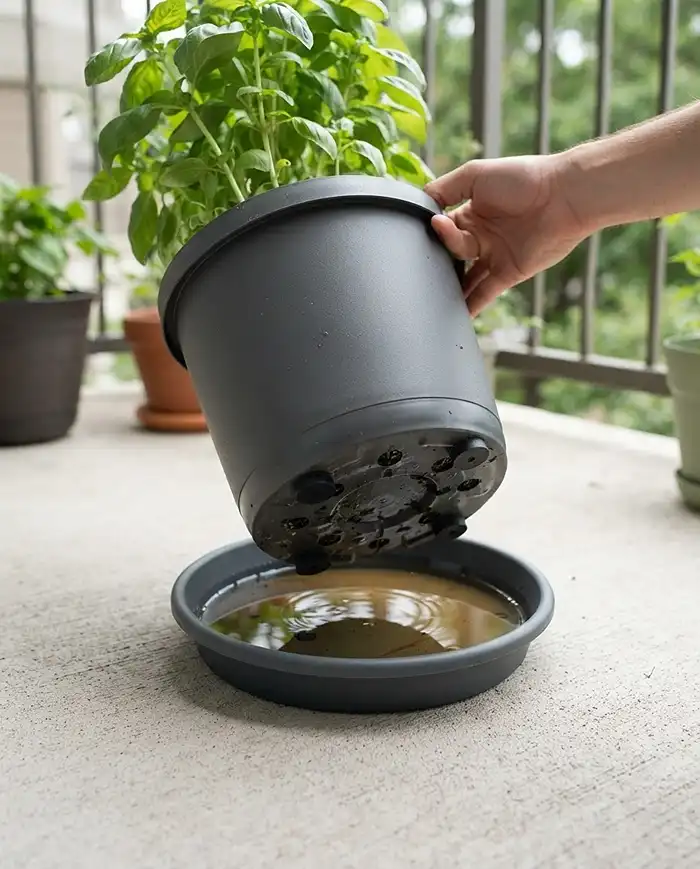
Utilizing Deep Saucers and Pot Feet for Clean Floors
Pot feet lift containers off the surface so water drains freely instead of pooling under the pot and staining wood decking. Without them, you get moisture rings and eventually rot.
But feet alone let runoff spill sideways onto the floor. You need a saucer sized to catch all of it, deep enough to hold a full watering’s worth of overflow without spilling over the edge.
For my small balcony garden, I use saucers a full inch wider than the pot’s base, on 1-inch rubber risers underneath. Airflow stays open, and nothing drips through the railing gaps.
Self-Watering Planters as a Controlled Alternative
Quick Answer: Self-watering planters use an enclosed bottom reservoir that wicks water up to roots as needed, which eliminates external dripping entirely while keeping soil moisture consistent.
These closed systems are worth it for anyone in urban gardening spaces where any drip at all is a problem, like a balcony with no gap between you and the unit below.
Common Problems & Solutions
Two mechanical issues cause most container drainage solutions to fail even after you’ve done everything right. Here’s how to catch and fix both fast.
Clogged Drainage Holes
Quick Answer: Compacted soil and roots plug drainage holes over time. Clear the blockage from the outside with a chopstick, and prevent future clogs with a curved piece of broken terracotta over the hole before planting.
Check clogged-looking pots first if water suddenly starts pooling on a container that used to drain fine, it’s often this simple.
Pro Tip: Lay the terracotta shard curved-side up like a little roof, this blocks soil without sealing the hole flat.
Soil Washing Out the Bottom of the Pot
Quick Answer: Prevent potting mix from eroding out of large drainage holes by laying a square of fiberglass window screening, or a plain coffee filter, flat against the bottom of the pot before adding soil.
This stops the muddy floor problem without blocking water flow the way a solid liner or excessive gravel would.
Frequently Asked Questions
Can I grow plants in pots without drainage holes?
Not safely long-term. Decorative cachepots without holes trap water and cause root rot. Use the double-potting method instead: keep the plant in a thin plastic nursery pot with drainage holes, then lift it out of the decorative pot to water it over a sink.
How do I drain heavy pots that I can’t lift?
Use a turkey baster or a small wet/dry shop vacuum to siphon standing water out of the saucer underneath large, immovable planters. Do this within a day or two of watering to prevent mosquitoes from breeding in the standing water.
What is the best saucer for a wooden balcony deck?
Avoid unglazed terracotta saucers, they sweat moisture and can rot wooden decking over time. Use thick, waterproof glazed ceramic or heavy-duty plastic saucers, elevated slightly on rubber risers to keep airflow moving underneath.
How often should I check my balcony pots for drainage problems?
Check every 2 to 3 weeks during the growing season, or any time you notice slow drainage after watering. A quick finger test in the soil tells you if water is moving through properly or pooling near the roots.
Conclusion
Fixing container drainage solutions on a balcony comes down to three things: aerated soil, real drainage holes, and a runoff plan that keeps water off the floor below you.
Skip the gravel myth, amend your mix with perlite, and pair every pot with a proper saucer. Your plants, your deck, and your neighbor will all thank you.
For more on picking the right pots from the start, see our guide to choosing containers for small space gardening.
Want the fundamentals first? Check out our beginner drainage rules guide and tips on light and space planning for your balcony.
Key Takeaways
- Skip the gravel layer, it raises the perched water table and traps water near roots instead of draining it away
- Blend 30-40% perlite or pumice into potting mix for real container drainage solutions that work
- Pair pot feet with deep, exact-fit saucers to keep runoff off shared balcony floors
- Drill half-inch holes with a diamond bit on ceramic, standard bit on plastic, to fix sealed pots
- Check drainage every 2-3 weeks, catching root rot early saves the plant