
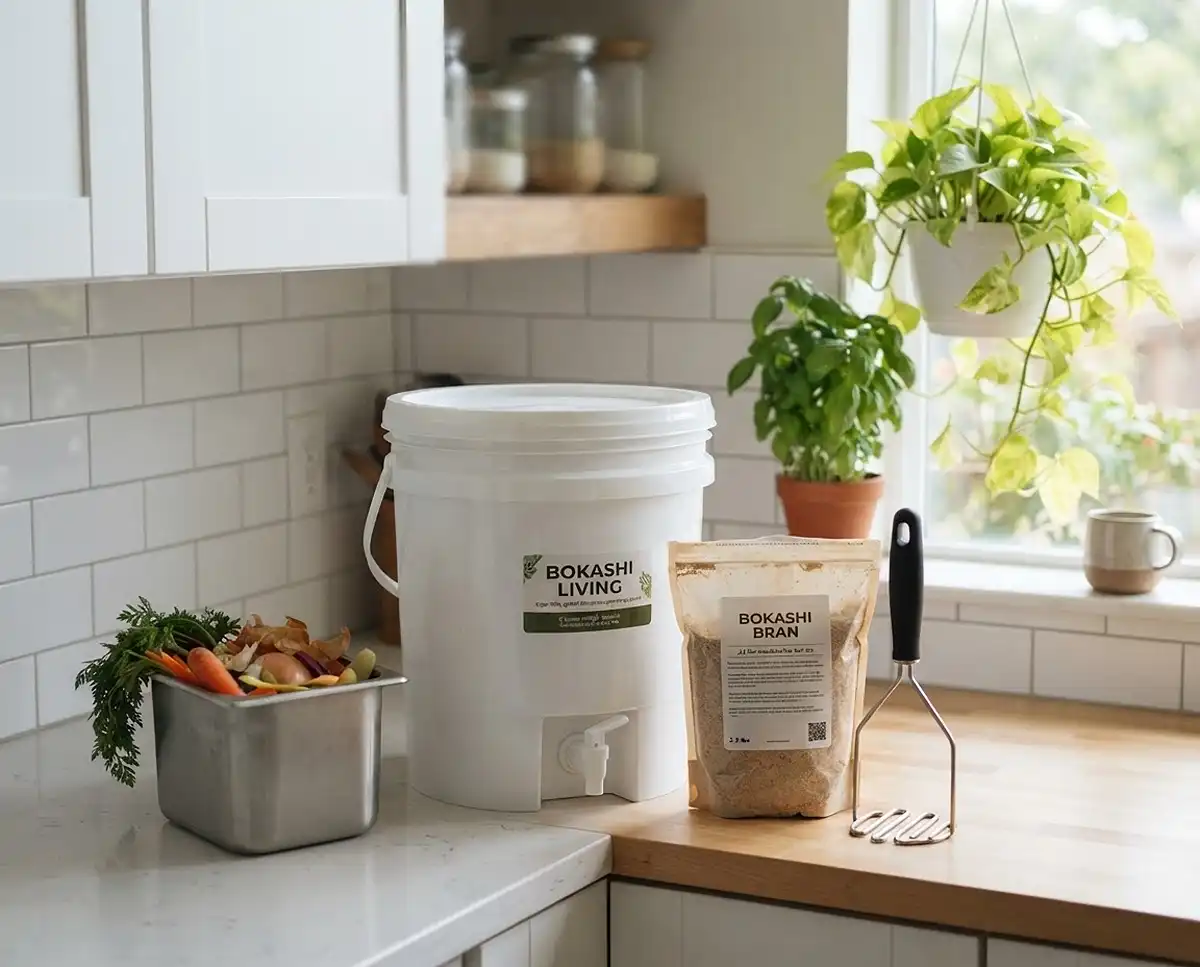
Bokashi Composting for Beginners
Bokashi composting for beginners takes 10 minutes to set up and smells like pickles, not garbage. Here’s apartment composting that actually works indoors.
I grow tomatoes, peppers, and herbs in containers on a north-facing balcony in USDA zone 6b. A few years ago, one batch of orange peels wiped out my worm bin. Bokashi was the fix, and it’s lived under my sink ever since.
Table of Contents
The Magic of Bokashi Composting for Beginners: Odor-Free and Indoors
Bokashi is a Japanese method that ferments food scraps in a sealed bucket instead of letting them rot. It’s a natural fit for small space gardening, since it needs no yard, attracts no pests, and fits under a sink.
You add scraps, sprinkle bran, press down, and close the lid. Two weeks later, you’ve got pickled pre-compost that feeds your containers. New to growing at home? Start with this apartment gardening for beginners guide.
Understanding How Anaerobic Fermentation Works
Bokashi ferments waste without oxygen, the same basic process that turns cabbage into sauerkraut. Microbes produce lactic acid, which drops the pH to roughly 3.5 to 4 and preserves the scraps.
Nothing really breaks down in the bucket. It gets pickled, and your soil finishes the job later.
Bokashi Bran vs. Traditional Compost Microbes
Traditional piles depend on aerobic bacteria, which need oxygen, heat, and regular turning. Bokashi bran carries effective microorganisms (EM) instead: lactic acid bacteria, yeasts, and photosynthetic bacteria living on wheat bran or sawdust.
EM work in a sealed bucket at room temperature. For how outdoor piles work, see the EPA’s composting at home basics. Here’s how the two systems compare.
| Feature | Bokashi (EM bran) | Traditional pile |
|---|---|---|
| Oxygen | None (anaerobic) | Required (aerobic) |
| Temperature | Room temperature | 130 to 160°F (54 to 71°C) |
| Time to usable | 2 weeks fermenting, then 2 to 4 weeks in soil | 2 to 12 months |
| Meat and dairy | Accepted | Usually avoided |
Why Bokashi Doesn’t Smell Like Rotting Garbage
Quick Answer: A healthy bokashi bin smells like mild yeast, vinegar, or pickles. Acidic fermentation preserves scraps instead of rotting them, so the putrid smell of a landfill never develops.
My bin sits in a kitchen corner, and guests have never noticed it. The sour scent only shows up for a second when I lift the lid.
Pro Tip: Keep the lid open for under a minute, so oxygen never gets a chance to disturb the fermentation.
Essential Gear for Your First Bokashi System
You don’t need much to start. Here’s the full shopping list for fermenting kitchen scraps indoors:
- An airtight bokashi bucket with a spigot (5 gallons, or 19 L, suits one or two people)
- Inoculated bokashi bran, roughly a 2 lb (900 g) bag to begin
- A potato masher or flat trowel for pressing scraps
- A small countertop caddy for collecting scraps during the day
- A lidded plastic tote and old potting soil for finishing the compost
Choosing the Right Airtight Bokashi Bucket
A good bucket has three features: a gasket-sealed lid, a perforated inner plate that lifts scraps off the liquid, and a spigot near the base. The spigot lets you drain liquid without opening the bucket.
Skip buckets with loose snap-on lids. Air leaks are the most common reason beginner bins fail.
Pro Tip: Buy two buckets. One ferments while the other fills, so you never have to pause.
Selecting High-Quality Inoculated Bokashi Bran
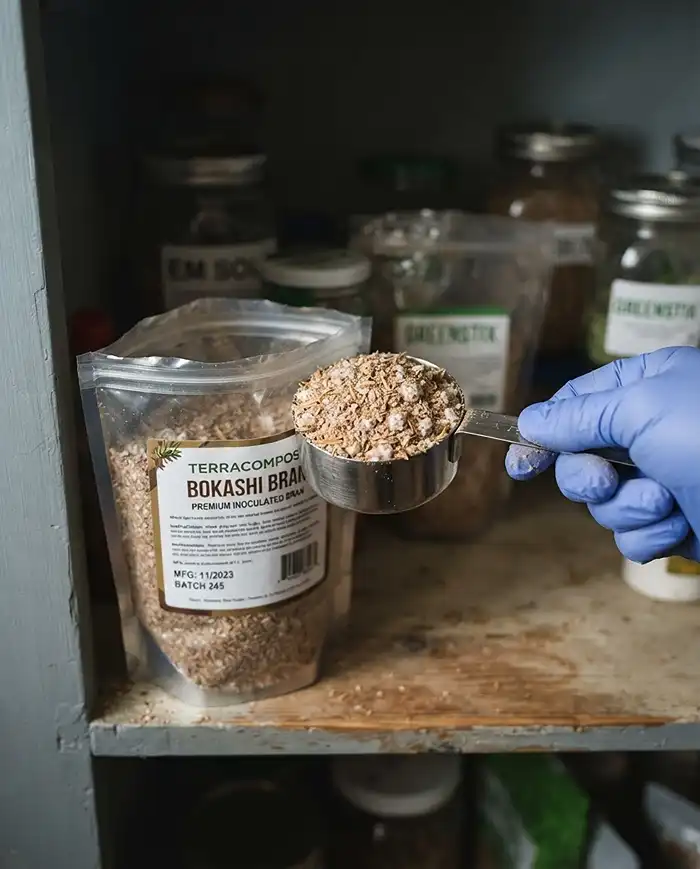
Fresh bran is dry, tan, and smells faintly sweet and sour. Check the manufacture date, since the microbes are dormant but not immortal. Many brands stay viable for about a year when stored properly.
Keep the bag sealed in a cool, dry cupboard. Moisture and heat wake the microbes early. Toss any bran with black mold or a rotten smell.
Step-by-Step Guide to Starting Your Bokashi Bin
Here’s how to compost at home with bokashi, from kitchen counter to sealed bucket. Each addition takes about two minutes. Repeat steps one through three until the bucket is full, then move to step four.
Step 1: Prepping and Chopping Your Kitchen Scraps
Chop big pieces into roughly 1-inch (2.5 cm) chunks. Smaller pieces give the microbes more surface area, so fermentation speeds up and finishes evenly.
I keep a caddy by the cutting board and empty it into the bucket once a day. That way the lid only opens once. Cut melon rinds into strips and halve avocado skins.
Step 2: The Layering Technique (Scraps and Bran)
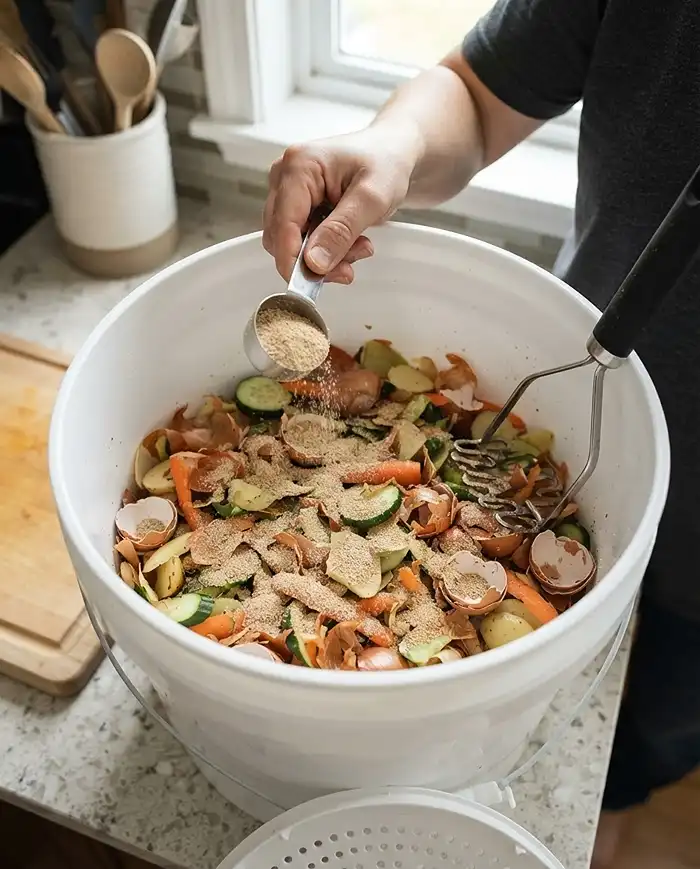
Start with a thin sprinkle of bran on the bottom. Then add 1 to 2 inches (2.5 to 5 cm) of scraps and cover them with an even coat of bran, about 2 to 3 tablespoons per inch of waste.
Keep going in layers. Add extra bran over meat, dairy, and other protein-heavy scraps.
Step 3: Compressing the Waste to Remove Oxygen
Press the scraps down hard with a masher until they’re compact and flat. Air pockets let oxygen in, and oxygen lets the wrong microbes take over.
Real Example: On my first bin, I only patted the scraps down. Four days later, I had green fuzzy patches and a rotten smell. I’d trapped air, so the bin went aerobic. I tossed the batch and started over.
Pro Tip: Lay a flattened plastic bag over the top layer before closing the lid. It blocks the last bit of trapped air.
Step 4: Sealing the Bin and Fermentation Time
Keep the lid tightly sealed between additions. When the bucket is full, add a final layer of bran, press down, and seal it.
Then leave it alone for two weeks at room temperature, ideally 65 to 80°F (18 to 27°C). Keep draining liquid from the spigot, but don’t open the lid. Start your second bucket while the first one ferments.
What Can (and Cannot) Go Into a Bokashi Bin
This is where bokashi beats worm bins and backyard piles. It accepts foods those systems reject. Use this table as a quick reference.
| Food | Verdict | Note |
|---|---|---|
| Raw or cooked meat and fish | Yes | Add extra bran |
| Cheese, yogurt, and other dairy | Yes | Add extra bran |
| Cooked, oily leftovers | Yes | Moderate amounts only |
| Coffee grounds, tea bags, citrus, onion | Yes | Chop larger pieces |
| Moldy or rotten food | No | Competes with your EM |
| Soup, milk, and other liquids | No | Strain or let drip dry first |
The Green Light: Meat, Dairy, and Cooked Foods
Meat, bones, dairy, and oily foods are all fair game. The strongly acidic environment suppresses pathogens, and the sealed bucket gives rodents and flies no way in.
Just add an extra spoonful of bran over high-protein scraps. Large bones ferment but won’t soften, so expect to pick them out when you bury everything.
The Red Light: Excessive Liquids and Rotten Food
Don’t add food that’s already rotting or has blue, green, or black mold. Those microbes compete with your EM. Skip excessive liquids too, like soup, milk, or a full glass of juice.
A little moisture is fine. A soaked bin loses its balance and starts to smell, so strain liquids or let scraps drip dry first.
Managing and Harvesting Your Bokashi Compost
After two weeks, open the bucket. The scraps will look mostly intact, maybe a bit darker, with a sour pickle smell. That’s normal. You now have two products: liquid tea and fermented pre-compost.
Draining and Using the “Bokashi Tea” Liquid Fertilizer
Drain the spigot every 2 to 3 days. Dilute the liquid at 1:100, about 2 teaspoons per quart (1 liter) of water, before feeding houseplants or balcony containers.
Use it within a day, since it doesn’t store well. Never pour it on plants undiluted, because it’s highly acidic and can burn roots. My pothos and basil get a dose every other week.
Burying the Fermented Pre-Compost in Soil or Pots
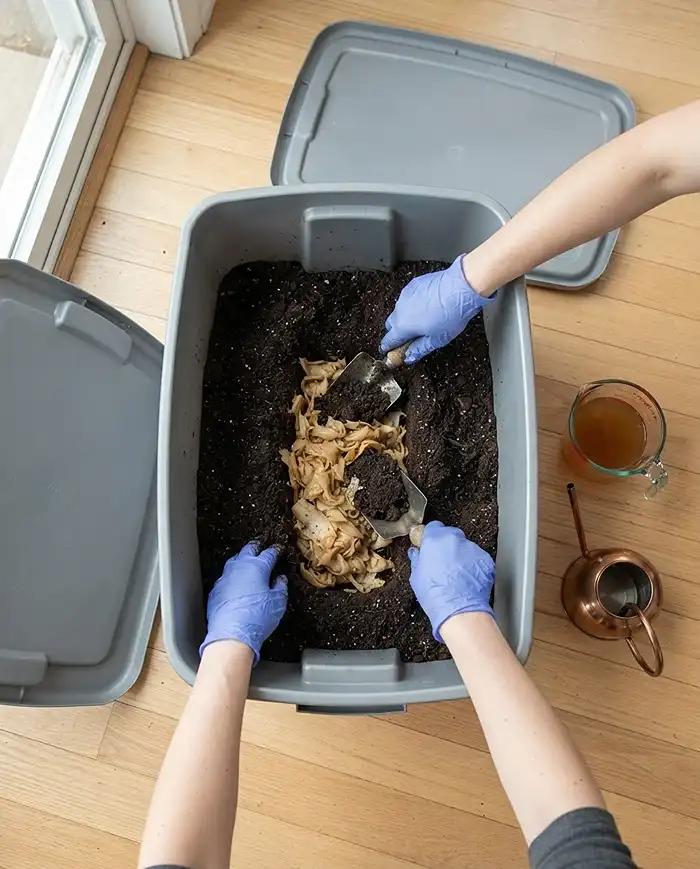
Fermented scraps still need soil microbes to finish the job. Fill a lidded 18-gallon tote about one-third full with old potting soil. Dig a hole, bury the pre-compost, and cover it with at least 2 inches (5 cm) of soil.
Wait 2 to 4 weeks, until the scraps vanish into dark, crumbly earth. Don’t plant seedlings straight into fresh pre-compost, because the acidity can burn roots.
Real Example: Last October I buried two buckets in a tote and left it indoors all winter. By April, only eggshells and avocado pits remained. I mixed that soil into my Sungold tomato pots.
Fall is a good time to start. As of October 2026, your containers are winding down, and a buried tote can rest indoors until spring. For more ideas, try these apartment gardening tips for beginners.
Common Problems & Solutions
Small slips are normal, and most are fixable. Like these apartment gardening mistakes for beginners, bokashi issues usually come down to too much air or too much liquid.
White Mold vs. Green/Black Mold on the Surface
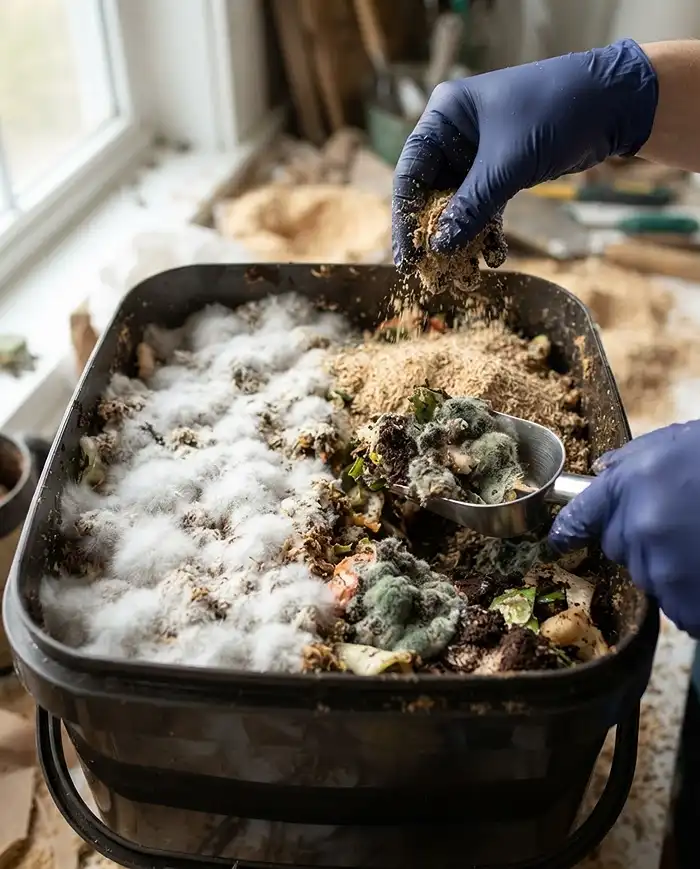
Fluffy white mold on top is a good sign. It’s healthy EM fungi, and it means fermentation is on track. Don’t scrape it off.
Green, black, pink, or orange growth is a problem. It means too much oxygen or contaminated scraps. Scoop out small patches, add extra bran, and press down again. If mold covers most of the surface, treat the batch as failed.
Foul, Putrid Smells Instead of a Pickled Odor
A rotting smell means the bin went aerobic. Try these fixes in order:
- Drain any liquid from the spigot
- Add 2 extra tablespoons of bran over the top layer
- Press everything down and check the lid gasket for gaps
If it still smells putrid after 2 to 3 days, bury the batch in a garden bed or community plot, or use your municipal organics collection. Then clean the bucket and start fresh.
Frequently Asked Questions
Do I need a yard to finish bokashi compost?
No. Fill a lidded plastic tote one-third full with old potting soil, bury the fermented scraps under 2 inches (5 cm) of soil, and close the lid. After 2 to 4 weeks, the scraps break down into dark, crumbly earth you can use in pots.
How much bokashi bran should I use per layer?
Use about 2 to 3 tablespoons per inch of scraps. Add more whenever you’re adding meat, dairy, or other high-protein scraps, since those are the ones most likely to turn.
Can I leave my bokashi bin alone while I go on vacation?
Yes. Bokashi thrives on neglect. Drain the liquid, add a final layer of bran, press down, and seal the lid. A sealed bin can sit for several weeks, or even months, without trouble.
How long does bokashi composting take from start to finish?
Fermentation takes about 2 weeks once the bucket is full. The scraps then spend 2 to 4 weeks in soil, so the full cycle runs roughly 4 to 6 weeks.
Will a bokashi bin attract fruit flies?
Rarely. Flies show up when the lid stays open or scraps sit uncovered. Cover each layer with bran, keep the lid sealed, and wipe the gasket clean.
Key Takeaways
- Bokashi composting for beginners comes down to four habits: chop, layer with bran, press hard, and seal.
- A healthy bin smells like pickles, and a rotten smell means air got in.
- Meat, dairy, and cooked food are welcome, but rotten food and pools of liquid aren’t.
- Drain the tea every 2 to 3 days and dilute it 1:100 before using it.
- Finish fermented scraps in soil for 2 to 4 weeks, even in a plastic tote on a balcony.