
Apartment Composting
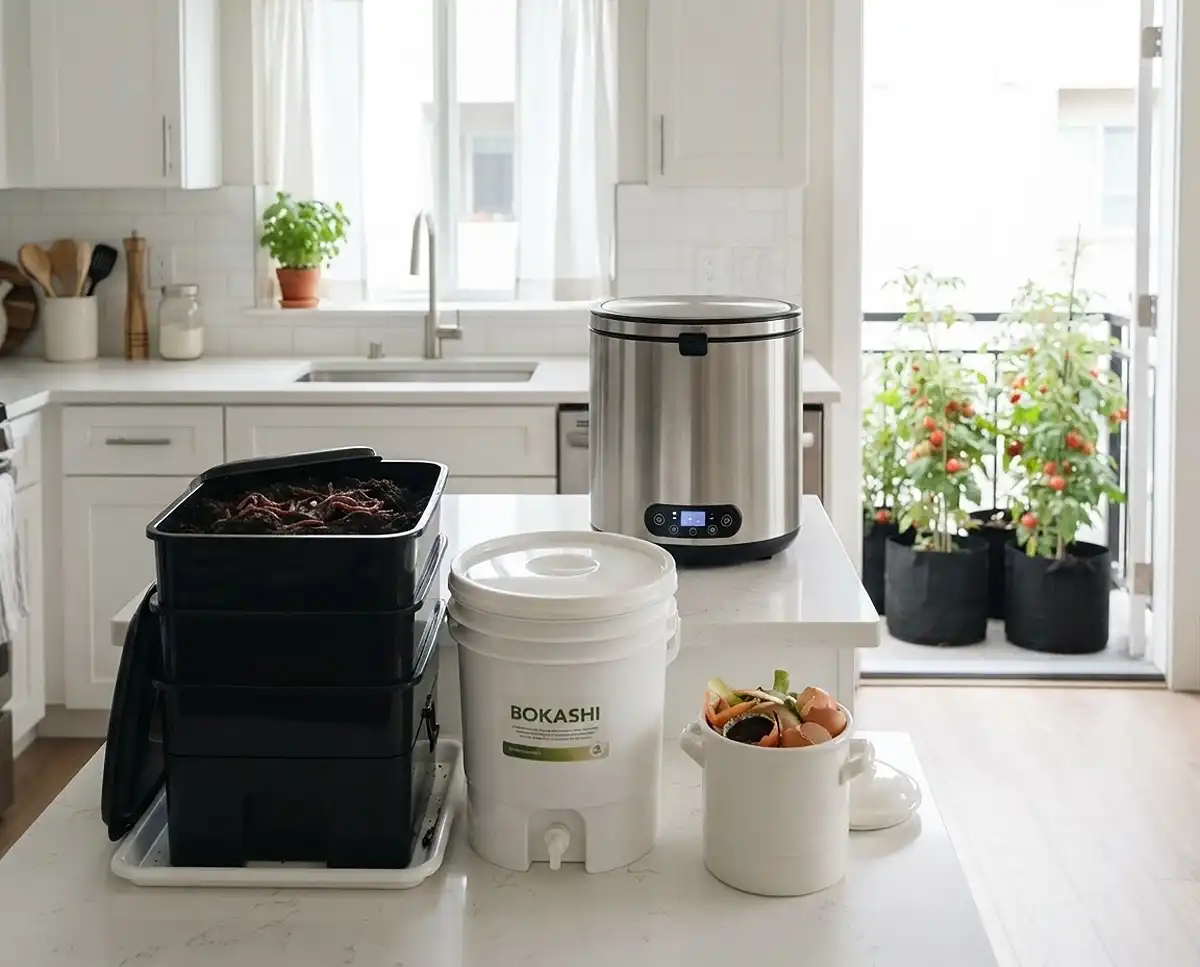
Apartment composting doesn’t need a yard. Learn how to compost at home with a worm bin, Bokashi, or an electric unit, all without the smell or the mess.
I’ve composted on a north-facing balcony in zone 6b for eight years, and in a 600-square-foot rental before that. Here’s what actually works in a small space, as of 2026.
Table of Contents
The Green Revolution: Composting Without a Yard
You don’t need a sprawling backyard to turn food scraps into rich soil. A storage tote under your sink does the job.
Indoor and balcony composting keeps scraps out of landfills, where they rot without oxygen and release methane. It also gives you free fertilizer for houseplants and patio pots.
It’s the quiet backbone of small space gardening, too. My tomatoes in 5-gallon buckets stopped needing bagged feed once I had castings on hand. That’s organic vegetable gardening at its most closed-loop.
The EPA‘s home composting guide covers the basic science if you want background.
Evaluating Your Small Space for Composting
Your microclimate decides which method survives, so spend ten minutes checking temperature swings, airflow, and floor space before buying anything. New to tiny-garden planning? Start with this beginner small space gardening guide.
Indoor Kitchen Spaces vs. Covered Balconies
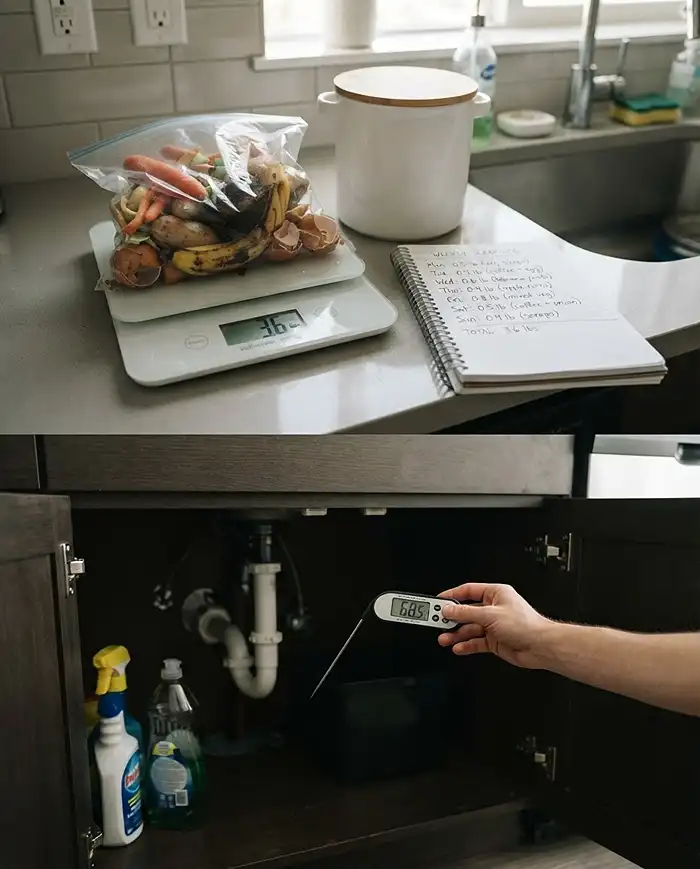
Quick Answer: Keep indoor bins in a cool, stable spot like under the sink. Balcony bins need shelter from freezing winters and scorching summer sun, because the microbes and worms inside die at temperature extremes.
- Under the sink or pantry: Steady 60-75°F (15-24°C). Keep it away from dishwashers and heating pipes.
- Covered balcony: Fine from spring through fall. Worms stall below 50°F (10°C) and die above roughly 85°F (29°C).
- Winter rule: Move balcony bins inside before the first hard frost.
My first January, I left a worm bin outside. A cold snap to 12°F (-11°C) killed most of the colony. I rescued a few dozen survivors and never made that mistake again.
Assessing Your Food Waste Habits
Save your scraps in a container for one week and weigh them. Heavy fruit and vegetable eaters suit worm bins. If you toss a lot of meat, dairy, and cooked carbs, you need an anaerobic [oxygen-free] fermentation system.
My two-person kitchen makes about 2.5 pounds of scraps weekly. If you grow microgreens, spent roots and mats from a low-cost microgreens system make great bin food.
The Top 3 Apartment Composting Methods
Only three systems stay reliably odor-free inside a residential building. Here’s how they compare before we look at each one.
| Method | Best For | Watch Out For |
|---|---|---|
| Worm bin | Fruit, veggie scraps, coffee grounds | No meat, dairy, citrus, or onions; 2-3 months to first castings |
| Bokashi | All food waste, including meat and dairy | Output needs 2 weeks of burying; bran is a recurring cost |
| Electric countertop | Busy households wanting fast, sterile results | Costs several hundred dollars and uses electricity |
Vermicomposting: The Power of Worm Bins
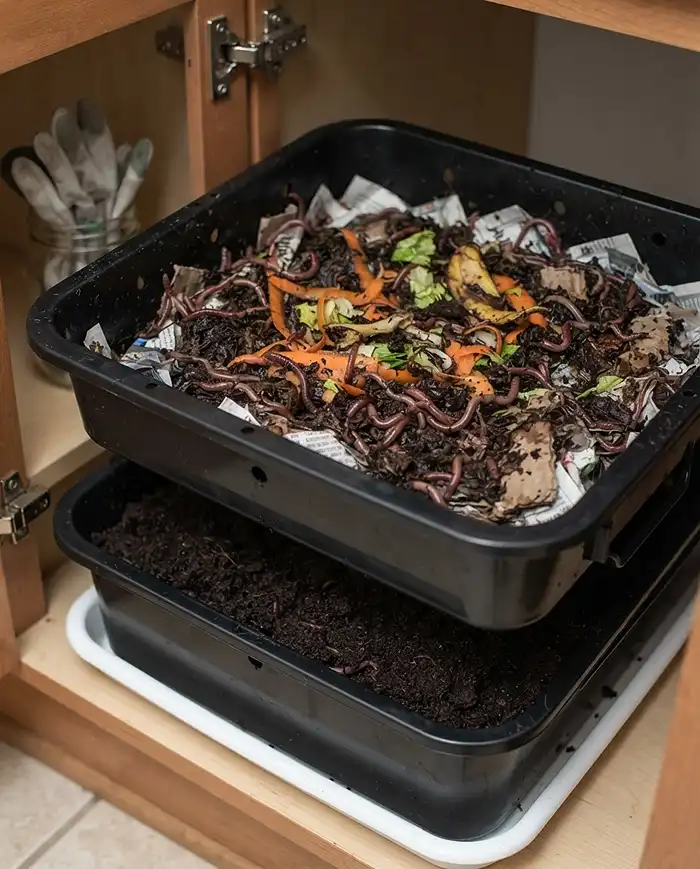
Quick Answer: Vermicomposting uses red wiggler worms in a compact tiered bin to eat vegetable scraps. They produce worm castings [worm poop], a top-tier fertilizer for potted plants.
Red wigglers (Eisenia fetida) are surface feeders built for bins. One pound eats up to half a pound of scraps daily once established. Stackable tiered bins let worms migrate upward, which makes harvesting easier.
Pro Tip: Never use garden earthworms. They’re deep burrowers and sulk and die in shallow bins.
Bokashi Composting: The Anaerobic Fermentor
Quick Answer: Bokashi ferments food waste, including meat and dairy, in a sealed bucket using inoculated bran [wheat bran loaded with beneficial microbes]. The airtight seal prevents rotting smells, and the bucket fits under a counter.
This Japanese method is simple. Add scraps in layers, sprinkle about 1 tablespoon of bran per inch, and press out air. Drain the liquid every two to three days.
After about two weeks, the contents look pickled and smell sweet-sour. That’s still pre-compost, so bury it in a large planter for two more weeks before planting.
Pro Tip: Dilute drained Bokashi liquid 1:100 with water before feeding plants. Undiluted, it’s acidic enough to burn roots.
Electric Countertop Composters: The High-Tech Option
Electric units like the Lomi or the Vitamix FoodCycler don’t biologically ferment anything. They dehydrate and grind scraps into a dry, sterile material in a few hours.
That makes them the fastest, tidiest option for busy professionals without time for traditional methods. The trade-off is cost and power use.
The output is soil amendment, not finished compost. Mix it into potting soil at about 10 percent and let it settle for a couple of weeks before planting.
Step-by-Step Guide to Starting a Worm Bin
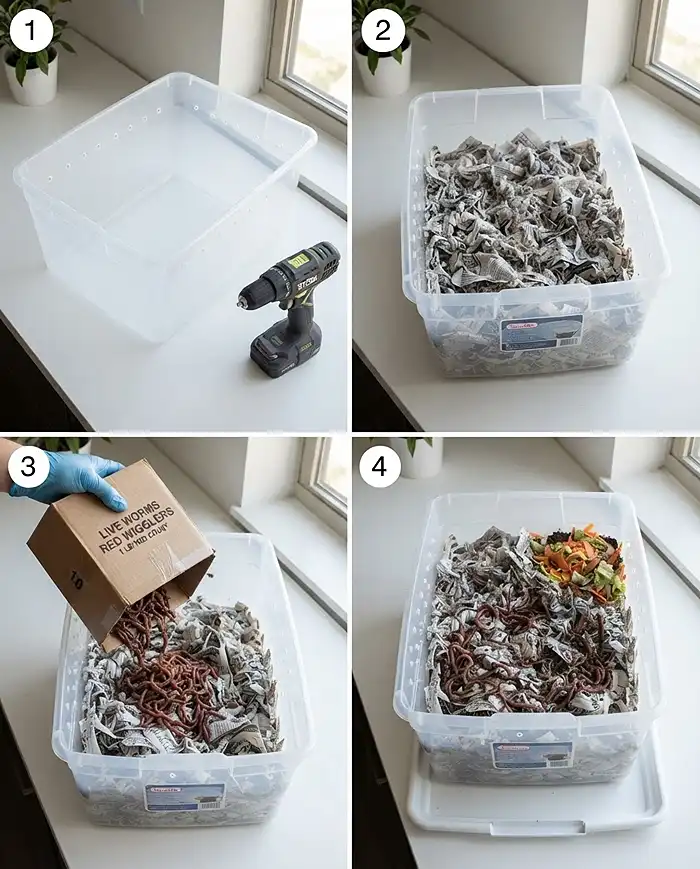
This setup takes about 30 minutes and works for most apartments. Use an opaque 10-gallon plastic tote, since worms avoid light.
- Drill ventilation holes: Make 1/8-inch holes every 2 inches along the upper sides and lid.
- Add bedding: Fill the tote halfway with damp, shredded newspaper (no glossy pages), wrung out like a sponge.
- Add worms: Tip in 1 pound of red wigglers and let them settle for a day.
- Bury the first scraps: Bury about 1 cup of chopped scraps in one corner. Wait a week before adding more.
- Cover it up: Top with 2 inches of dry bedding, snap on the lid, and set the bin on a drip tray.
Managing and Maintaining a Healthy Indoor Bin
A small bin has no buffer for mistakes. Adjust what you add each day, and you’ll keep the breakdown healthy and odor-free.
The Critical Carbon to Nitrogen Ratio
Quick Answer: Keep roughly two to three parts “browns” (carbon) to one part “greens” (nitrogen) by volume. Too much nitrogen causes foul-smelling rot, and too much carbon stalls decomposition.
- Browns: shredded newspaper, torn cardboard, dry leaves, paper egg cartons
- Greens: vegetable peelings, fruit scraps, coffee grounds, tea leaves
If the bin smells sour, add browns. If scraps sit untouched for weeks, add a few more greens.
Moisture Control and Aeration Tactics
Aim for the consistency of a wrung-out sponge. A squeezed handful should release maybe one drop of water. If the bin gets soggy, tuck in dry cardboard.
Once a week, gently turn the top few inches with a hand trowel to bring in oxygen. Go slowly so you don’t slice worms. Skip the bottom layers, where they congregate.
Harvesting and Using Your Apartment Compost
Fresh compost behaves differently in a pot than in garden soil. Container roots are fragile and confined, so a heavy dose can burn them. Keep castings to about 20 percent of the potting mix, or top-dress with a half-inch layer.
Sifting and Extracting Finished Castings
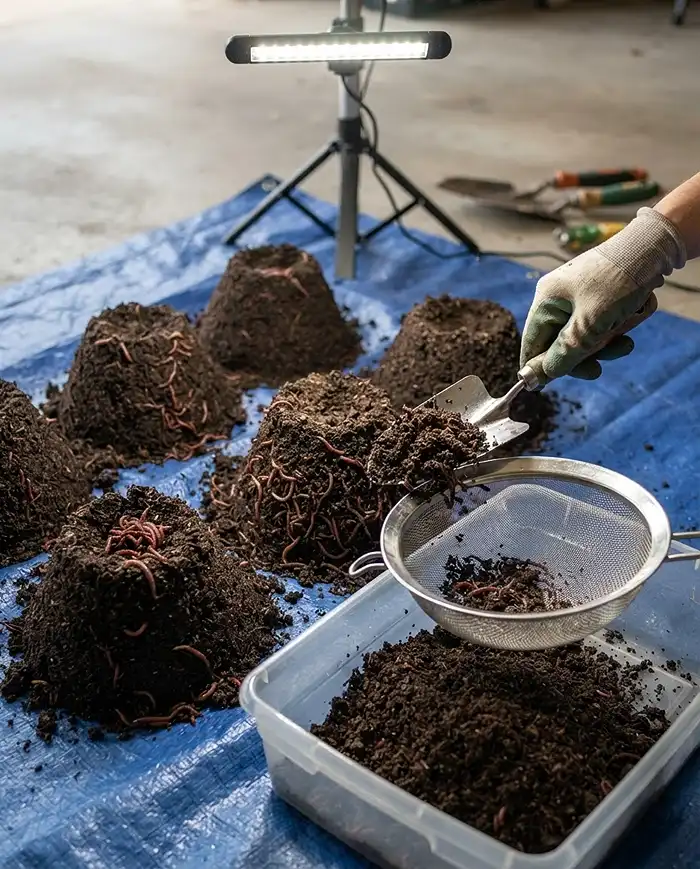
Use the light migration trick. Dump the bin onto a tarp under a bright lamp and form small cones. Worms burrow down to escape the light, so scrape off the top of each cone every few minutes.
Then run the castings through a 1/4-inch mesh sifter. Return unfinished bits to the bin. Wash your hands afterward, using the same food-safety mindset you’d apply to growing sprouts safely at home.
Brewing Compost Tea for Houseplants
Steep a handful of finished castings (about 1 cup) in a gallon of dechlorinated water for 24 hours. Run an aquarium air pump the whole time to keep it aerated.
The result is a rapid-absorption liquid feed that skips slow soil breakdown. Use it within four hours. Spray it on ornamental houseplants, but use it only as a soil drench on edibles.
Common Problems & Solutions
Most bin disasters come from a handful of predictable biological failures. Catch them early and each one is reversible.
Foul Odors and Anaerobic Sludge
A rotten-egg or ammonia smell means anaerobic decomposition, where the bin has turned into wet sludge. Mix in massive amounts of shredded dry cardboard, and stop all wet food additions for two weeks.
I once dumped a week of banana peels and coffee grounds in at once. Within three days the bin reeked. Cardboard and a two-week fast fixed it, and the worms survived.
Fruit Flies and Fungus Gnats Invading the Bin
Exposed scraps are a breeding magnet. Set a trap outside the bin: a small cup of apple cider vinegar with two drops of dish soap.
Then bury every new batch of greens under a thick two-inch layer of dry bedding. Pro Tip: Freeze scraps for 48 hours before feeding to kill any eggs.
Frequently Asked Questions
Will an indoor compost bin attract cockroaches or rodents?
No, not a properly managed one. A sealed, securely lidded plastic bin with the right green-to-brown ratio won’t attract rodents or roaches. The carbon layer neutralizes odors, and the container walls physically block pests.
Can I compost citrus peels or onions in a worm bin?
It’s best to avoid them. Citrus peels, onions, and garlic irritate worms’ sensitive skin and disrupt the pH balance of a small, enclosed bin. Use them in a Bokashi bucket instead.
What do I do with the compost if I don’t have enough potted plants?
Donate it to a local community garden, gift it to houseplant-loving friends, or sprinkle it around the base of municipal street trees to help the urban canopy.
How long does apartment composting take?
A worm bin produces usable castings in about two to three months. Bokashi ferments in two weeks, plus two weeks of burying. Electric composters finish a cycle in hours.
Does apartment composting smell?
A healthy bin smells earthy or like pickles (Bokashi). Rotten-egg or ammonia odors signal too much wet food and too little dry bedding. Add shredded cardboard and pause feeding for two weeks.
Key Takeaways
- Apartment composting works in any small space when you match the method to your scraps: worm bins for produce, Bokashi for meat and dairy.
- Keep bins between 55-77°F (13-25°C), and never leave a worm bin outside in a freeze.
- Stick to roughly 2-3 parts browns to 1 part greens, and keep bedding as damp as a wrung-out sponge.
- Use castings sparingly in pots, about 20 percent of the mix, and never apply fresh Bokashi pre-compost directly to roots.
- If it smells or attracts flies, add dry cardboard, bury scraps under 2 inches of bedding, and pause wet feeding for two weeks.