

DIY Vertical Strawberry Planter for Small Spaces
A DIY vertical strawberry planter turns 2 square feet of balcony into a 20-plant berry patch. I built my first one on a 6th-floor balcony in zone 6b, and it’s still my best space-saving garden hack.
Table of Contents
The Benefits of a DIY Vertical Strawberry Planter
Growing up instead of out changes the math completely. A single 5-foot PVC tower holds as many plants as a 4×4 raised bed, but it takes up a footprint smaller than a bar stool. That’s the whole appeal of vertical gardening for anyone working with a patio, fire escape, or apartment balcony.
There’s a horticultural bonus too. Strawberries grown at ground level sit right in slug territory and pick up soil-borne fungal spores every time it rains. Lift them a few feet into the air, and both problems mostly disappear. My first ground-level strawberry bed lost half its crop to slugs one wet June in Portland. I haven’t had that problem since switching to a tower.
Planning Your Vertical Planter Design
Before you buy a single pipe fitting, walk your space with a tape measure. Note how much floor or railing weight you can support, how tall you can go without blocking a doorway, and what you’re comfortable spending. A wobbly, overbuilt planter is worse than no planter at all.
PVC Pipe vs. Wood Tower vs. Upcycled Pallets
Each material suits a different space and skill level. Here’s how the three most common DIY builds stack up:
| Design | Best For | Watch Out For |
|---|---|---|
| PVC pipe tower | Tiny balconies, renters | Can look industrial; needs a heat gun to shape pockets |
| Cedar wood pyramid | Patios with floor space | Heavier build; needs weatherproofing every few years |
| Upcycled pallet | Leaning against a sunny wall | Check for chemical treatment stamps before use |
I’ve built two of the three. My cedar pyramid looks better, but the PVC tower is what I’d recommend for a first-timer with an 8-foot balcony or smaller.
Sunlight Requirements and Placement
Quick Answer: Strawberries need 6 to 8 hours of direct sun daily to produce sweet, red fruit. Pick your permanent spot before you build, since a soil-filled tower is heavy and awkward to move.
Walk your space at 9 a.m., noon, and 4 p.m. to track real sun exposure, not guessed exposure. South-facing railings usually win. My east-facing tower gets only 5 hours of light and produces noticeably smaller berries than my south-facing one, even with identical feeding.
Pro Tip: A pale-colored container or pipe reflects heat instead of absorbing it, which keeps shallow strawberry roots from cooking on a 90-degree afternoon.
Materials and Tools You Will Need
Split your shopping into two trips: hardware store for construction, garden center for the living parts. Budget around 40 to 60 dollars for a standard 5-foot PVC tower, not counting plants.
Hardware and Construction Tools
For a standard PVC tower build, you’ll need:
- One 5-foot length of 4-inch diameter food-grade PVC pipe
- One 4-inch PVC end cap
- A power drill with a 2-inch hole saw bit
- A heat gun for molding the planting pockets
- A measuring tape and permanent marker for layout
- PVC cement (only if you’re joining multiple pipe sections)
Selecting the Best Soil Mix and Strawberry Varieties
Quick Answer: Use a lightweight, moisture-retentive potting mix enriched with compost, never garden soil. Choose day-neutral or everbearing varieties like ‘Seascape’ or ‘Albion’ for continuous summer harvests.
Garden soil compacts and suffocates roots inside a narrow pipe. A peat-free potting mix with perlite drains fast but still holds enough moisture between waterings.
I grow ‘Seascape’ on my balcony because it keeps fruiting from May through October in zone 6b, unlike June-bearing types that dump one crop and quit.
Step-by-Step DIY Construction Guide
Wear safety glasses and gloves any time you’re cutting PVC or handling a heat gun; melted plastic burns fast and sticks to skin. Work outdoors or in a ventilated garage, since heated PVC releases fumes you don’t want to breathe. Once you’re set up, the build itself takes about 2 hours.
Step 1: Cutting and Shaping the Planting Pockets
Quick Answer: Drill staggered 2-inch holes every 8 inches around the pipe, then heat each edge and pry it into a lip with a glass bottle to cradle the plant.
Mark your holes in a spiral pattern so no two pockets sit directly above one another; this gives each plant its own light and airflow. Drill with the 2-inch hole saw bit, then run the heat gun over each hole’s edge for 15 to 20 seconds until the plastic softens.
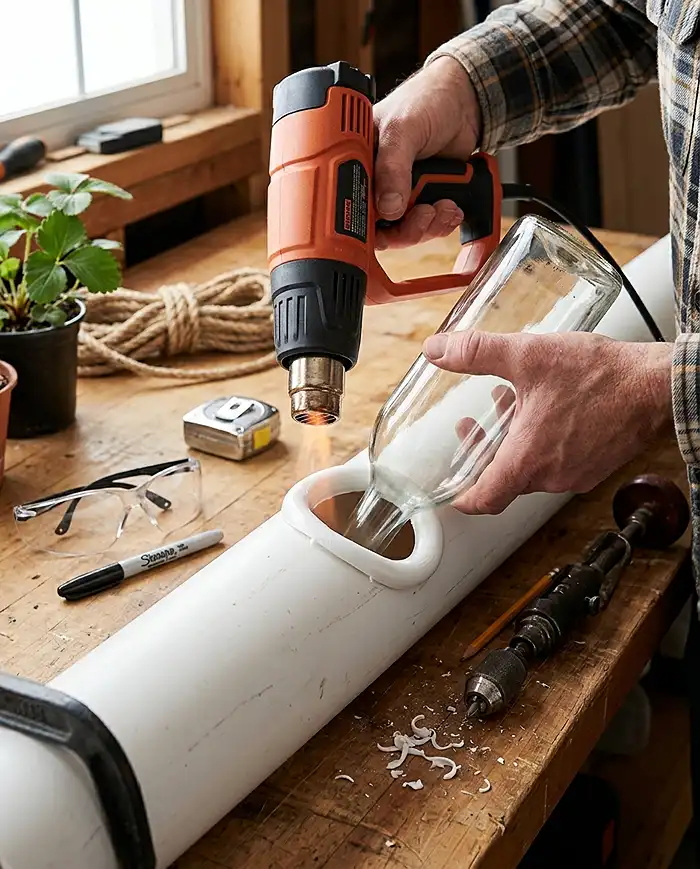
Press a glass bottle into the softened opening to curl the bottom lip outward. That lip is what keeps soil and crowns from sliding straight out the hole once the tower is planted.
Step 2: Creating the Internal Watering Tube
Quick Answer: Build a central watering tube from a narrower, perforated PVC pipe wrapped in landscape fabric so water reaches the bottom roots, not just the top layer of soil.
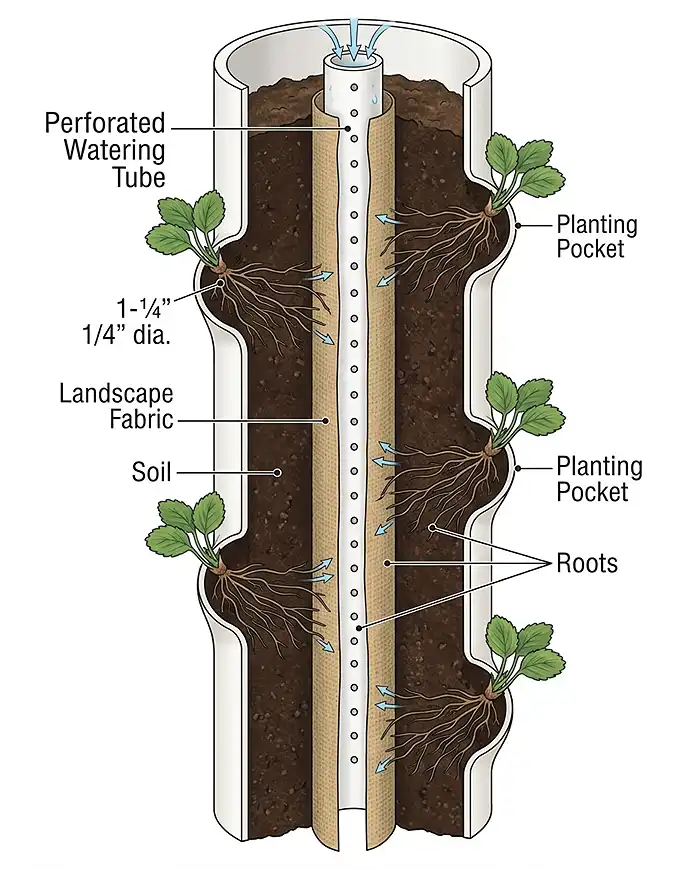
Take a 1.5-inch PVC pipe the same length as your tower and drill small holes every 4 inches along its full length. Wrap it in landscape fabric secured with zip ties, which stops soil from clogging the holes while still letting water pass through.
Stand this tube in the exact center of the tower before you add soil. Without it, gravity pulls all your water to the bottom and the top pockets dry out within a day.
Step 3: Assembly and Securing the Base
Quick Answer: Glue on the bottom cap, add a few inches of coarse gravel for drainage and weight, then anchor the tower to a railing or wooden base so wind can’t tip it.
Cement the end cap onto the bottom of the main pipe and let it cure per the product label, usually 15 to 30 minutes. Pour in 3 to 4 inches of coarse gravel before any soil goes in.
A soil-filled 5-foot tower is top-heavy. Zip-tie or bracket it to a railing, or set it into a weighted wooden frame, before you plant a single crown.
Planting Your Strawberry Tower
Quick Answer: Pour soil mix in a few inches at a time while feeding bare-root or plugged crowns through the exterior holes, keeping each crown sitting above the soil line.
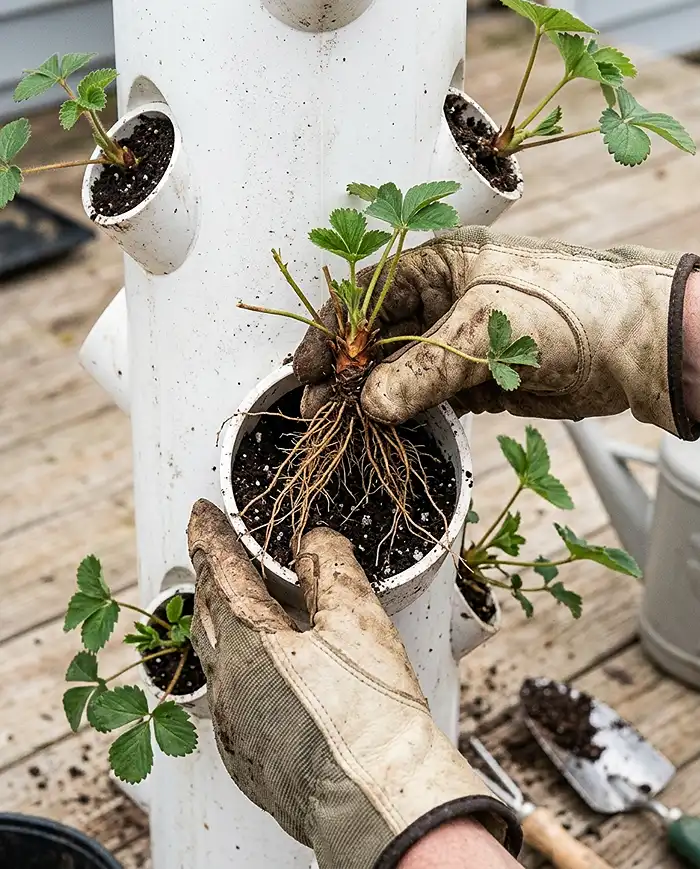
Work from the bottom up. Add soil to just below the first row of holes, tuck a crown’s roots through the pocket from the inside, spread the roots into the soil, then continue layering upward.
The crown, which is the thick woody base where leaves meet roots, must stay above the soil surface. Bury it and the plant rots; leave it too exposed and roots dry out. I lost three plants my first season by burying crowns too deep, chasing what I thought was “extra support.”
Seasonal Care and Maintenance
A vertical tower drains faster and dries out quicker than any ground bed, so your maintenance routine has to keep pace with that. Expect to check on the tower daily during peak summer heat.
Watering and Fertilizing in a Vertical Setup
Quick Answer: Check soil moisture daily since vertical towers drain fast, and feed with a high-potassium liquid organic fertilizer every two weeks to fuel fruit production.
Stick a finger into the top pocket’s soil each morning. If it’s dry past the first knuckle, water slowly through the central tube until it runs out the bottom drainage holes.
Switch to a bloom-boosting, high-potassium liquid fertilizer once flowering starts, applied every 2 weeks through the main growing season. Skipping feedings is the number one reason vertical strawberry yields disappoint.
Overwintering Your Vertical Planter
Quick Answer: Protect exposed vertical roots from freezing by moving the tower into an unheated garage, wrapping it in horticultural fleece, or laying it flat under thick straw mulch.
Because a vertical tower exposes roots on all sides instead of just the top, plants freeze faster than they would in a ground bed. In zone 6b and colder, I move mine into an unheated garage once nights hit consistent freezing.
No garage? Lay the tower on its side against a wall and bury it in 6 inches of straw mulch for the winter.
Common Problems & Solutions
Two issues account for most vertical strawberry complaints: uneven watering and pests. Both have simple fixes once you know what to look for.
Soil Compaction and Uneven Watering
Quick Answer: If top plants look drowned while bottom plants look parched, your central watering tube is likely clogged. Flush it with a hose or add a drip irrigation emitter to equalize moisture.
Compacted soil around the watering tube blocks water from reaching lower pockets, forcing all of it to pool at the top. Run a hose at moderate pressure down the central tube once a month to clear buildup.
If flushing doesn’t fix it, insert a simple drip emitter line down through the tube. This distributes water evenly without you standing there with a watering can for 20 minutes.
Pests: Slugs, Birds, and Spider Mites
Drape bird netting over the top of the tower once berries start blushing red, since birds spot ripening fruit before you do. Wrap a strip of copper tape around the base to repel slugs, which get an electric-feeling shock when they cross it.
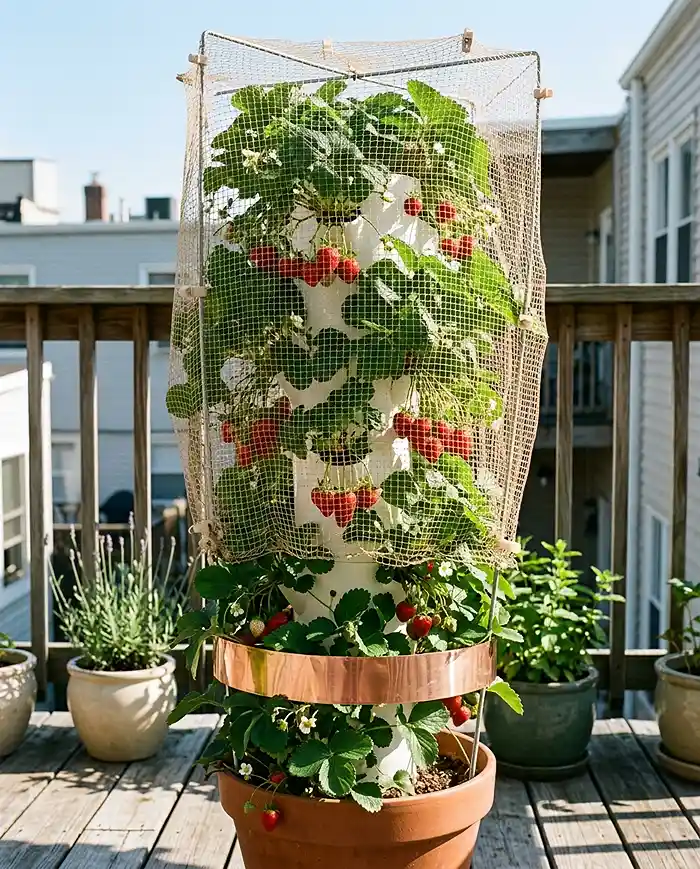
Check the undersides of leaves weekly for fine webbing, a sign of spider mites. At the first hint of webbing, spray neem oil in the early evening to avoid harming pollinators that visit during the day.
diy vertical strawberry planter FAQs
How many strawberry plants can fit in a vertical planter?
A standard 5-foot PVC tower comfortably holds 15 to 20 plants when holes are staggered around the pipe. Staggering matters because it gives each crown room for canopy spread and direct sunlight access.
Everbearing vs. June-bearing: which is better for vertical planters?
Everbearing and day-neutral varieties are better suited to vertical planters than June-bearing types. June-bearers produce one large crop and stop, while everbearing varieties give a steady, manageable supply of fruit ideal for patio grazing all season.
How often do I need to replace the soil and plants?
The physical DIY planter will last for years with basic care, but strawberry plants lose vigor after 3 to 4 years. Replace both the plants and the depleted potting soil together to maintain maximum yields.
Can I build a vertical strawberry planter without power tools?
A drill is essential for clean 2-inch holes, but you can skip the heat gun by using a utility knife to trim rough hole edges instead of shaping a curled lip. It won’t hold soil quite as well, so expect to top off pockets more often.
Will a vertical strawberry tower survive strong wind?
Yes, as long as it’s anchored to a railing, wall bracket, or weighted base before planting. An unanchored soil-filled tower is top-heavy and can tip in gusts above 25 mph.
Conclusion
A DIY vertical strawberry planter is one of the highest-yield space saving garden ideas you can build in a weekend. It solves the two biggest small-space problems at once: limited floor area and ground-level pest pressure.
Start with the PVC design if this is your first build, get the sun placement right before you plant, and stay on top of watering once summer heat arrives. For more ways to stack growing space onto a small balcony, browse our hanging herb garden ideas.
For deeper container-growing specifics like spacing and overwintering by zone, the Iowa State University Extension container strawberry guide is a solid reference.
Key Takeaways
- A DIY vertical strawberry planter fits 15 to 20 plants into a footprint under 2 square feet
- Pick a spot with 6 to 8 hours of direct sun before you build, since the finished tower is heavy to move
- Day-neutral varieties like ‘Seascape’ and ‘Albion’ outproduce June-bearers in container towers
- A central perforated watering tube is what prevents dry top pockets and drowned bottom pockets
- Replace plants and soil every 3 to 4 years to keep yields high