

Easy Patio container gardening for beginners
Container gardening for beginners doesn’t have to be complicated — and if you’ve got a patio, you’re already set up for success. This guide covers everything from small patio garden planning to your first harvest, so you stop overthinking and start growing.
Why Patio Container Gardens Are Beginner-Friendly
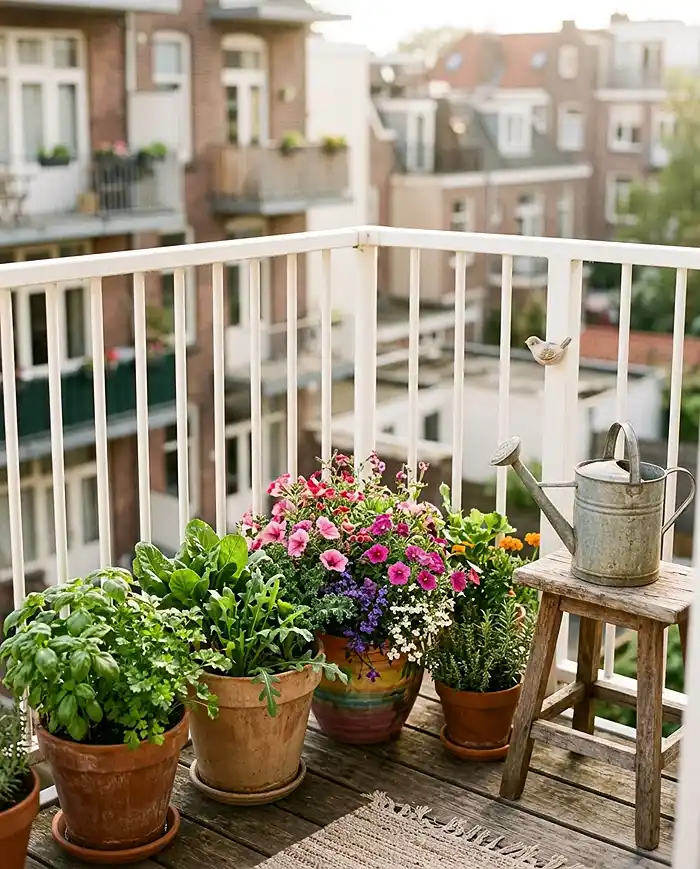
Container gardening fits renters, first-timers, and anyone working with a small patio or balcony. You control the soil, the placement, and the plants. There’s no digging, no weeds from the ground, and if something isn’t working, you just move the pot.
It’s also low-commitment. Start with two or three containers, see what grows, and scale up when you’re ready. Small space gardening like this teaches you the basics fast — without the overwhelm of a full yard.
For more layout inspiration before you buy a single pot, check out these balcony garden ideas that work for all skill levels.
What You Can Grow on a Patio
Quick Answer: Most herbs, leafy greens, compact vegetables, and annual flowers do great in containers. You don’t need a big space — you need the right plants for the right pot.
Here’s what works well for beginners in small space gardening:
- Herbs: Basil, mint, parsley, chives, and rosemary — fast to grow, useful in the kitchen
- Leafy greens: Lettuce, spinach, arugula — ready to harvest in 30–45 days
- Compact vegetables: Cherry tomatoes, peppers, bush beans, radishes
- Annual flowers: Marigolds, petunias, nasturtiums, dwarf zinnias
- Dwarf shrubs: Lavender, dwarf boxwood for structure and low maintenance
Pro Tip: Mint spreads aggressively — always grow it in its own container, not mixed with other herbs.
Plan Your Patio Setup Before Buying Plants
Most beginner mistakes happen at the garden center, not in the garden. Before you spend a dollar, spend 20 minutes assessing your patio. The right container garden for beginners starts with honest observation, not wishful thinking.
Walk your patio at different times of day. Note where the sun hits, where wind comes from, and how close your outdoor tap or hose is. That 10-minute assessment shapes every decision after it.
Check Sun, Wind, Weight, and Water Access
Quick Answer: Track sun hours, test wind strength, check weight limits if you’re on a balcony, and position containers where watering is easy. These four checks prevent the most common container gardening failures.
| Factor | What to Check | Why It Matters |
|---|---|---|
| Sun hours | Count hours of direct light per day | Vegetables need 6+ hours; herbs and greens tolerate 4 |
| Wind exposure | Note corners with constant breeze | Wind dries pots fast and snaps tall plants |
| Weight limit | Check building specs for balconies | Wet soil is heavy — large pots can exceed limits |
| Water access | Measure distance to tap or hose | If watering is inconvenient, it won’t get done |
Real Example: I once planted a full tomato container on a windy corner balcony. By July, the plant was snapping stems and drying out daily. Moved it three feet into a sheltered corner and it thrived. Location matters more than any fertilizer.
Pro Tip: Balcony weight limits apply to the whole surface — spread heavy containers to distribute load, and keep the heaviest pots near load-bearing walls.
Choose a Garden Style
Quick Answer: Pick one focus before you start. A mixed approach leads to buying random plants that don’t work together. Commit to a style, then build from there.
- Edible garden: Herbs, vegetables, salad greens — practical and rewarding for beginners
- Pollinator display: Marigolds, zinnias, lavender — low maintenance and colorful all season
- Foliage setup: Ferns, hostas, ornamental grasses — great for shady urban gardening spots
- Mixed decorative: Combine seasonal flowers and one or two edibles for variety
Pro Tip: If you’re unsure, start edible. Harvesting your own basil or lettuce gives you fast, tangible results that keep you motivated through the learning curve.
Materials and Tools Needed
You don’t need much to start a container garden on your patio. A basic starter kit covers containers, soil, and a few hand tools. Skip the gadgets and focus on quality potting mix and good drainage — those two things matter more than everything else combined.
Here’s a beginner shopping checklist for container gardening:
- Containers with drainage holes (various sizes)
- Saucers to protect patio surfaces
- High-quality potting mix (not garden soil)
- Compost or slow-release granular fertilizer
- Liquid fertilizer for ongoing feeding
- Watering can with a rose head or adjustable hose nozzle
- Gardening gloves and hand pruners
- Plant labels and a waterproof marker
- Fine bark mulch or coir for moisture retention
- Bamboo stakes or small cages for tall plants
Containers and Saucers
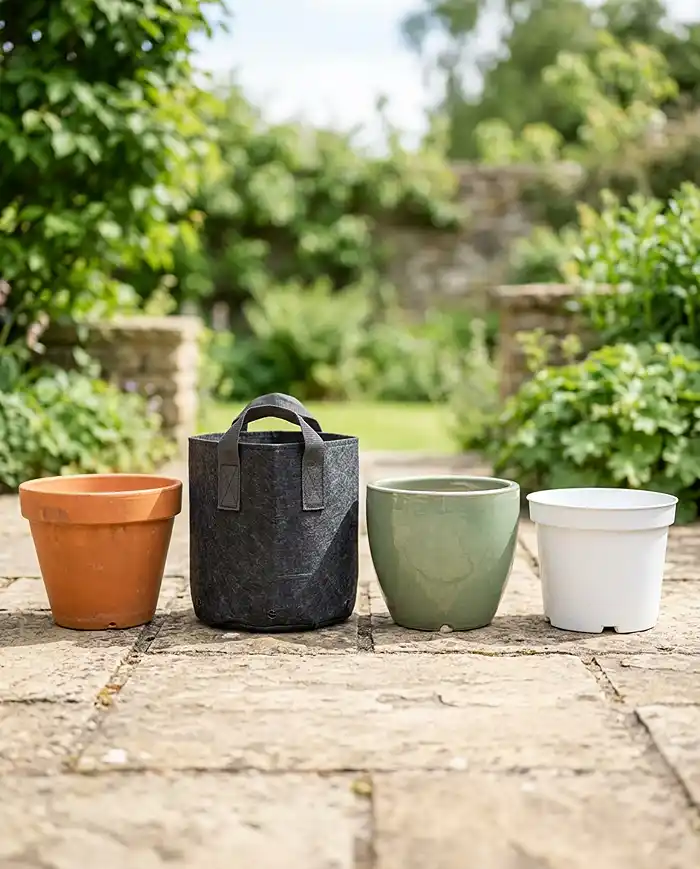
Quick Answer: Every container needs a drainage hole. No exceptions. Without drainage, roots drown and plants die within weeks — no matter how good your other care is.
| Container Type | Best For | Watch Out For |
|---|---|---|
| Terracotta | Herbs, Mediterranean plants | Dries out fast; heavy when large |
| Plastic | Vegetables, beginners on a budget | Can overheat in dark colors |
| Fabric grow bags | Tomatoes, root vegetables | Dries out quickly; needs daily checks in heat |
| Glazed ceramic | Decorative displays, flowers | Heavy; confirm drainage hole before buying |
| Lightweight resin | Balconies with weight limits | Less stable in wind; check quality |
Match pot size to the plant’s root system. Herbs do fine in 6–8 inch pots. Tomatoes and peppers need at least 12–15 inches deep and 12 inches wide. Shallow pots for deep roots equal stressed plants.
Use saucers under every pot indoors or on finished patios, but don’t let saucers sit full of water for more than a day — that waterlogged base leads to root rot just as fast as a pot without drainage.
Pro Tip: Elevate containers slightly on pot feet or small wooden blocks. This improves airflow under the pot and prevents waterlogging at the base.
Potting Mix, Compost, and Fertilizer
Quick Answer: Never use garden soil in containers. It compacts, drains poorly, and suffocates roots in a pot. Always use a high-quality potting mix — it’s lighter, drains better, and gives roots room to breathe.
Here’s how to build your container soil correctly:
- Start with a quality peat- or coir-based potting mix as your base
- Mix in 20–30% compost by volume for nutrients and moisture retention
- Add slow-release granular fertilizer at planting time (follow pack rates)
- Start liquid feeding 4–6 weeks after planting, once slow-release is depleted
- Use a balanced liquid fertilizer (10-10-10 or similar) for general use
- Switch to a high-potassium feed for flowering and fruiting plants
Real Example: Last spring I filled a pot with leftover garden soil for a quick basil planting. Two weeks in, it was waterlogged after every rain and the basil was yellowing. Repotted into proper potting mix and it bounced back within a week.
Pro Tip: The University of Maryland Extension potting media guide is a solid free resource if you want to understand what makes a good container mix.
Best Beginner Plants for a Patio Container Garden
The best container gardening for beginners starts with forgiving plants. You want things that tell you when they’re thirsty, bounce back from missed waterings, and give you something to show for your effort fast.
Avoid fussy plants your first season — no melons, no artichokes, no plants that need perfect conditions. Stick to the proven performers.
Easy Herbs, Vegetables, and Flowers
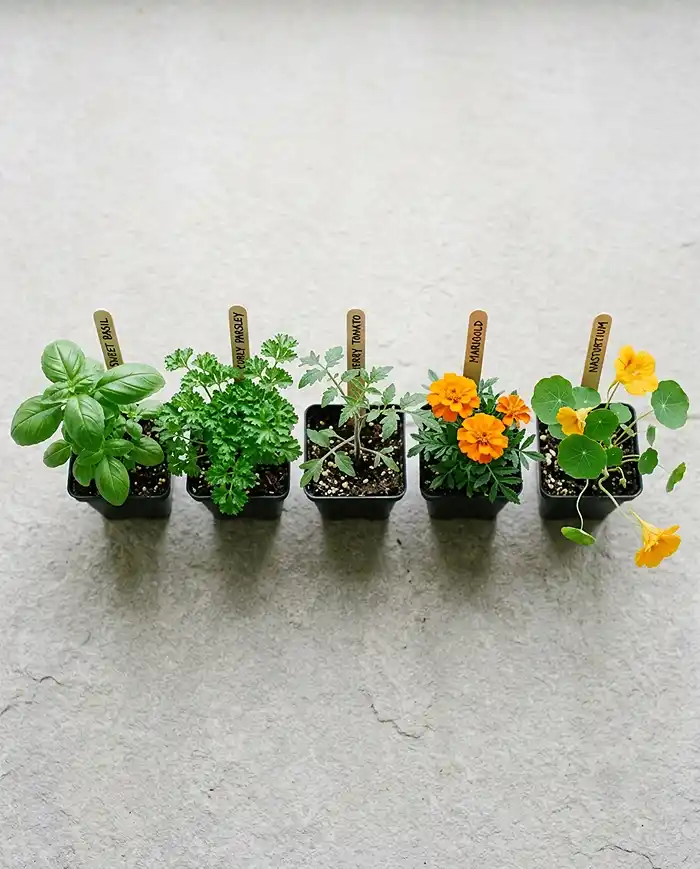
Quick Answer: Basil, cherry tomatoes, lettuce, and marigolds are the holy trinity of beginner container gardening. They’re reliable, fast-growing, and hard to kill if you water correctly.
- Basil: Full sun, 6-inch pot minimum, harvest leaves regularly to prevent flowering
- Mint: Part shade okay, own pot always, nearly impossible to kill
- Parsley: Full sun to part shade, deep pot for taproot, slow to start but steady
- Lettuce: Part shade in summer, 8-inch pot, harvest outer leaves for continuous crop
- Cherry tomatoes (Tumbling Tom, Tiny Tim): Full sun, 12–15 inch pot, stake early
- Peppers (mini bell or chili): Full sun, 10-inch pot, great for hot patios
- Marigolds: Full sun, any 6-inch+ pot, repel some pests, bloom all season
- Petunias: Full sun, trailing types great for spillers, deadhead for more blooms
- Nasturtiums: Full sun to part shade, edible flowers and leaves, almost no care needed
- Dwarf zinnias: Full sun, drought-tolerant once established, attract pollinators
Pro Tip: Buy transplants, not seeds, for your first season. You skip the most challenging stage and see results in weeks rather than months.
Simple Container Combinations
Quick Answer: Plant combinations work best when every plant in the pot shares the same sun and water needs. Mixing drought-tolerant with moisture-loving plants in one pot means one of them always suffers.
- Tomato + basil: Classic companion pairing, same sun and water needs, large pot required
- Lettuce + pansies: Cool-season combo, part shade friendly, harvest lettuce while flowers pop
- Mint (solo pot): Always alone — it crowds out everything else within a season
- Thriller-filler-spiller: Tall centerpiece (pepper), mid-height filler (marigold), trailing edge (nasturtium)
- Herb cluster: Parsley, chives, and thyme together — all Mediterranean, same care needs
For more on renter-friendly vertical layouts that pair well with container setups, see these vertical garden ideas for renters.
Step-by-Step Patio Container Garden Setup
Here’s the exact process for setting up your first containers. Don’t skip steps — the order matters more than it seems, especially placing heavy pots before filling them.
Prepare Pots for Drainage and Placement
Quick Answer: Clean containers, confirm drainage, position before filling. A 20-gallon pot full of wet soil weighs 60+ pounds — move it when it’s empty.
- Wash used containers with a 1:10 bleach-water solution to kill pathogens
- Confirm every pot has at least one drainage hole (drill if needed)
- Place containers in final position before adding soil or plants
- Elevate pots on feet or bricks for drainage clearance
- Place a layer of mesh or a coffee filter over drainage holes to retain soil without blocking water
Pro Tip: Protect composite decking or wood surfaces with rubber pot feet — constant moisture contact causes rot and staining over time.
Fill Containers and Plant Correctly
Quick Answer: Moisten potting mix before filling, plant at the right depth, and firm soil gently without compacting. Loose, airy soil is what roots need.
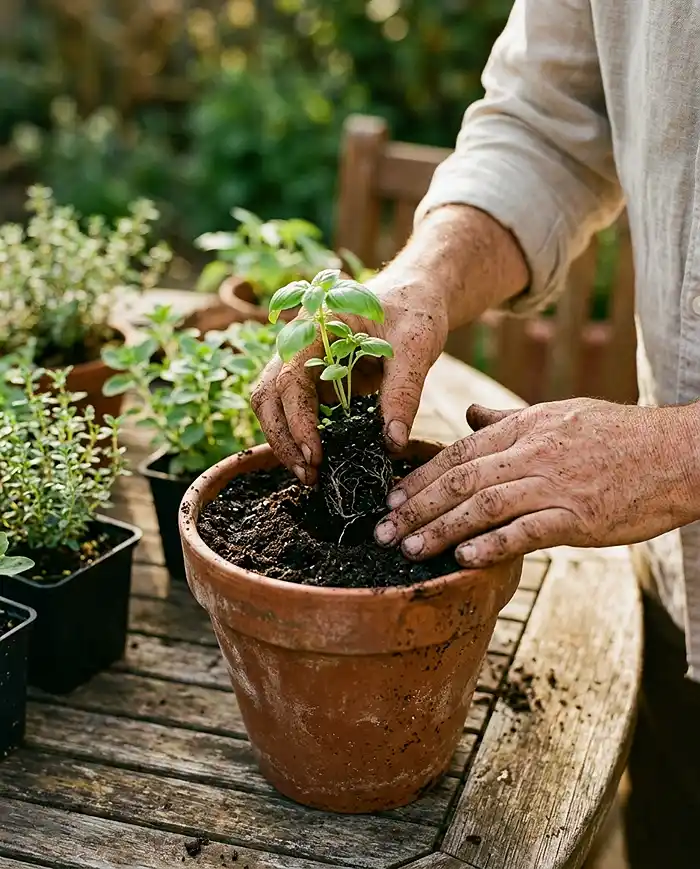
Follow this planting sequence:
- Moisten potting mix until it holds its shape but doesn’t drip — dry mix repels water initially
- Fill the container to about 2 inches below the rim — this creates a watering reservoir
- Remove transplants from nursery pots and gently loosen circling roots
- Place plants at the same depth they were in their nursery pot (most plants, not tomatoes)
- Space plants according to label spacing — resist the urge to overcrowd
- Fill gaps with potting mix and firm gently with your fingers
- Leave a 1.5–2 inch gap between soil surface and pot rim for watering
Real Example: My first container of cherry tomatoes had five plants in a 12-inch pot. They looked great at planting. By midsummer they were a tangled mess competing for nutrients and the yield was terrible. Two plants per pot is the right number.
Pro Tip: Tomatoes are the exception to “plant at nursery pot depth” — bury them 2–3 inches deeper than they came, up to the lowest leaves. Roots grow from buried stem nodes and the plant gets stronger faster.
Water In, Mulch, and Label
Quick Answer: Water thoroughly right after planting until it drains from the bottom. This settles soil around roots and eliminates air pockets that stress new transplants.
- Water slowly and deeply until water runs freely from the drainage hole
- Add a 1-inch layer of fine bark mulch or coir on the soil surface
- Mulch keeps soil cooler, retains moisture, and reduces watering frequency
- Label each container with plant variety and planting date — memory is unreliable
- Use permanent marker on plastic labels, pencil on wooden stakes, or weatherproof tape
Pro Tip: Write the watering frequency and fertilizer schedule on the back of the label when you plant. Future-you will thank present-you during a busy week.
Weekly Maintenance Routine
Container gardening for beginners works best with a simple weekly rhythm. Plants in pots can’t access groundwater or soil nutrients the way in-ground plants can — they depend entirely on you. A 15-minute weekly check is all most patios need.
Watering Schedule
Quick Answer: Check soil moisture with your finger, not a schedule. Stick your finger 1–2 inches into the soil. If it’s dry, water deeply. If it’s still moist, wait.
- Water until it drains from the bottom — shallow watering trains roots to stay near the surface
- In summer heat (above 85°F / 29°C), most containers need water daily or every other day
- In cool spring or fall, every 2–4 days is typical for most pots
- Small pots dry faster than large ones — check smaller containers more often
- Water early morning when possible to reduce evaporation and fungal risk
Pro Tip: Lift your pots after watering versus when dry — you’ll quickly learn to judge moisture level by weight alone, no finger test needed.
Fertilizing Schedule
Quick Answer: Start liquid feeding 4–6 weeks after planting. Before that, your slow-release fertilizer handles it. Overfeeding herbs produces lush leaves with weak flavor — less is more.
- Vegetables and flowers: liquid feed every 7–14 days with balanced or bloom formula
- Herbs: feed lightly every 3–4 weeks — over-fertilizing reduces essential oil concentration
- Signs of overfertilizing: dark green leaves, lots of foliage, poor fruiting or flowering
- Always water before applying liquid fertilizer to avoid root burn on dry soil
Pro Tip: Yellowing lower leaves on vegetable plants 6+ weeks after planting usually means the slow-release is depleted — start liquid feeding immediately.
Pruning, Deadheading, and Harvesting
Quick Answer: Regular harvesting and pruning keeps plants producing. Most edibles and flowers are “cut and come again” — the more you take, the more they give.
- Herbs: Pinch stem tips regularly to encourage bushy growth and delay flowering
- Flowers: Deadheading [removing spent blooms] redirects energy to new buds
- Lettuce and greens: Harvest outer leaves only — leave the center to keep producing
- Tomatoes and peppers: Stake early, remove “suckers” from tomatoes for better airflow
- Basil: Remove flower buds the moment they appear to extend harvest by weeks
For a full guide on keeping herbs productive on a balcony all season, see herbs that handle balcony conditions.
Seasonal and Regional Adjustments
Container gardening for beginners gets easier once you stop following one fixed schedule and start reading your environment. A patio in Arizona in July is a different world from a balcony in Seattle in April. Same plants, completely different care.
Spring, Summer, Fall, and Winter Timing Chart
Quick Answer: Cool-season crops go in spring and fall. Heat-lovers go in early summer. Refresh containers in fall with ornamentals or winter greens to keep your patio looking alive year-round.
| Season | Best Crops and Plants | Key Action |
|---|---|---|
| Early Spring (USDA zones 5–8) | Lettuce, spinach, pansies, parsley | Plant after last frost; start hardening off transplants |
| Late Spring / Early Summer | Tomatoes, peppers, basil, marigolds | Switch to warm-season plants once nights stay above 50°F |
| Midsummer | Zinnias, herbs, peppers | Increase watering; feed every 7–10 days in heat |
| Early Fall | Kale, chard, ornamental cabbage | Refresh tired containers; plant cool-season crops again |
| Late Fall / Winter | Evergreen herbs, ornamental grasses | Move tender plants indoors; mulch perennials heavily |
Hot, Dry, Humid, Coastal, and Cool-Climate Tips
Quick Answer: Your climate shapes your container strategy more than any other factor. Match your methods to your real conditions, not the care tag on the plant.
- Hot, dry climates (Southwest US, Mediterranean): Use larger pots (15+ gallons) to hold more moisture; add water-retaining crystals; group containers to reduce evaporation
- Hot, humid climates (Southeast US, Gulf Coast): Prioritize airflow between pots; choose disease-resistant varieties; water in morning only
- Coastal areas: Rinse salt spray off foliage weekly; choose salt-tolerant plants like lavender and ornamental grasses
- Cool, short summers (Northern US, Canada, UK): Choose fast-maturing varieties; use dark-colored pots to absorb heat; start indoors under lights
- Urban heat islands: Pave-reflected heat dries pots faster — check twice daily in summer peaks
Pro Tip: The USDA Plant Hardiness Zone Map is free and gives you your exact zone in seconds — it’s the foundation for every planting timing decision.
Common Beginner Mistakes to Avoid
Most container garden failures come down to a handful of predictable errors. Here’s what to watch for in your first season of small space gardening:
- Pots without drainage holes: Water pools at the bottom and roots rot within days
- Overcrowding: Too many plants per pot means root competition, poor airflow, and disease
- Wrong sun placement: Full-sun crops like tomatoes in shade produce nothing
- Rigid watering schedules: Watering every day regardless of soil moisture kills plants — check first, water second
- Garden soil in containers: It compacts, drains poorly, and suffocates roots
- Skipping fertilizer: Potting mix has limited nutrients — containers run out fast and need regular feeding
- Buying too much too fast: Start with 3–5 containers, learn what works, then expand
Common Problems and Solutions
Container gardening for beginners comes with a learning curve. Most problems are fixable fast if you catch them early. Here are the issues that show up most often on a small patio garden.
Yellow Leaves
Quick Answer: Yellow leaves usually mean overwatering, nutrient deficiency, or poor drainage — check the soil moisture and the drainage hole first.
- Overwatering: Soil stays wet for days; fix by improving drainage and reducing watering frequency
- Nutrient deficiency: Pale yellow across the whole plant, especially older leaves; start liquid feeding
- Poor drainage: Water sits in saucer; elevate pot and empty saucer after 30 minutes
- Natural aging: Lower leaves yellow and drop as plants mature — normal, no action needed
Wilting Even When Soil Is Wet
Quick Answer: Wet soil plus wilting usually means root rot or compacted mix — not a watering problem. More water makes it worse.
- Check roots: brown, mushy roots mean rot; white or tan roots are healthy
- If roots are rotten, repot immediately into fresh, well-draining potting mix
- Heat shock can cause midday wilt even in healthy plants — check again in the evening
- Compacted potting mix stops root growth; refresh annually or when drainage slows
Aphids, Whiteflies, and Spider Mites
Quick Answer: Inspect leaf undersides weekly. Early detection means a quick fix with water and soap — late infestations are much harder to control.
- Check undersides of leaves every 7 days — pests hide there first
- Rinse small infestations off with a strong spray of water
- Prune heavily infested stems and dispose of them off the patio
- Apply insecticidal soap spray (diluted, per label) for persistent problems
- Marigolds and nasturtiums attract beneficial insects that eat aphids naturally
Poor Flowering or Low Vegetable Yield
Quick Answer: Low yields and poor blooms usually trace back to not enough sun, pots that are too small, or inconsistent watering. Fix the fundamentals before reaching for fertilizer.
- Fruiting vegetables need 6–8 hours of direct sun — no exceptions
- Too much nitrogen fertilizer grows leaves, not fruit — switch to a low-N, high-K feed
- Pots under 10 inches deep stress root systems and reduce yield significantly
- Irregular watering causes blossom drop in tomatoes and peppers — consistency matters
container gardening for beginners FAQs
How do I start a container garden on my patio?
Assess your sunlight first — count the hours of direct sun your patio gets. Then choose containers with drainage holes, fill them with quality potting mix, plant beginner-friendly plants like herbs or cherry tomatoes, and water thoroughly. Start with 3 to 5 containers so the learning curve stays manageable.
What vegetables grow best in patio containers?
Lettuce, spinach, radishes, bush beans, cherry tomatoes, peppers, and dwarf cucumbers all do well in containers. Lettuce and radishes work in smaller pots (6 to 8 inches). Tomatoes and cucumbers need a 12 to 15 inch minimum. Match the container size to the plant’s root depth and you’ll do well.
How often should I water a patio container garden?
It depends on weather, pot size, plant type, and current soil moisture. Check by pressing your finger 1 to 2 inches into the soil. If it’s dry, water deeply until it drains from the bottom. In summer heat, most pots need water daily. In cool weather, every 2 to 4 days is typical.
Can I use garden soil in patio containers?
No. Garden soil compacts tightly in a pot, drains poorly, and suffocates roots. It also introduces weed seeds and pathogens. Always use a lightweight potting mix formulated for containers. It’s lighter, drains better, and gives roots the airy structure they need to thrive in a confined space.
How many plants should I put in one container?
It depends on the mature size of the plant and the pot diameter. Follow the spacing guidance on the plant label rather than crowding for instant fullness. As a rough guide: one tomato per 12-inch pot, two to three lettuce plants per 8-inch pot, and one herb per 6-inch pot. Crowding causes disease and reduces yield.
Key Takeaways
- Container gardening for beginners works best when you assess sun, wind, and water access before buying a single plant
- Every container needs a drainage hole — no exceptions; use quality potting mix, never garden soil
- Start with forgiving plants like basil, lettuce, cherry tomatoes, and marigolds for fast, visible results
- Water by checking soil moisture, not by schedule; feed every 1–2 weeks once slow-release is depleted
- Small space gardening and urban gardening thrive on consistency — 15 minutes a week beats one big effort per month