

Soil Mistakes in Container Gardening
Struggling with dying container plants? These hidden soil mistakes in container gardening are the real reason — fix them today and grow stronger plants. Learn how →
Let’s be honest — most container gardens don’t fail because you picked the wrong plant or forgot to water once. They fail because of what’s inside the pot before anything even gets planted. The soil mistakes in container gardening that beginners make are shockingly common, surprisingly easy to fix, and almost never talked about in plain English.
If your potted plants keep dying and you can’t figure out why, this is the article you needed three seasons ago.
Table of Contents
TL;DR — Top 5 Fixes (Because You’re Busy)
- Never use straight garden soil in pots — it compacts within days and suffocates roots
- Skip the gravel drainage layer — it actually drowns your plants (yes, really)
- Use a proper soilless mix: peat or coir + perlite + composted bark
- Water consistently — one bad drought event destroys fine root hairs permanently
- Test new compost before use — hidden herbicide residues can silently wipe out your entire season
1. The “Drainage Layer” Myth — What Gravel Actually Does to Your Soil
Why Gravel at the Bottom Kills Plants (The Perched Water Table, Explained Like You’re 12)
Okay, real talk — the gravel-at-the-bottom trick is probably the most repeated gardening advice that has no business existing. It sounds logical. Water goes down, gravel helps it drain faster, plants stay happy. Except that’s not what happens at all.
Here’s the actual science, and I promise it won’t hurt: water moving downward through fine potting soil refuses to cross into coarse gravel until the soil above it hits 100% saturation. This is called a perched water table — a permanently waterlogged zone that sits right above your gravel layer, exactly where your roots are trying to live.
The physics principle behind it is called matric potential (or capillary tension). Fine soil particles grip water more tightly than the air spaces between gravel pieces. Water won’t let go and move downward until that grip completely breaks — and by then, your roots have already been sitting in a swamp. Your “drainage layer” is, in fact, a drowning layer. Sorry.
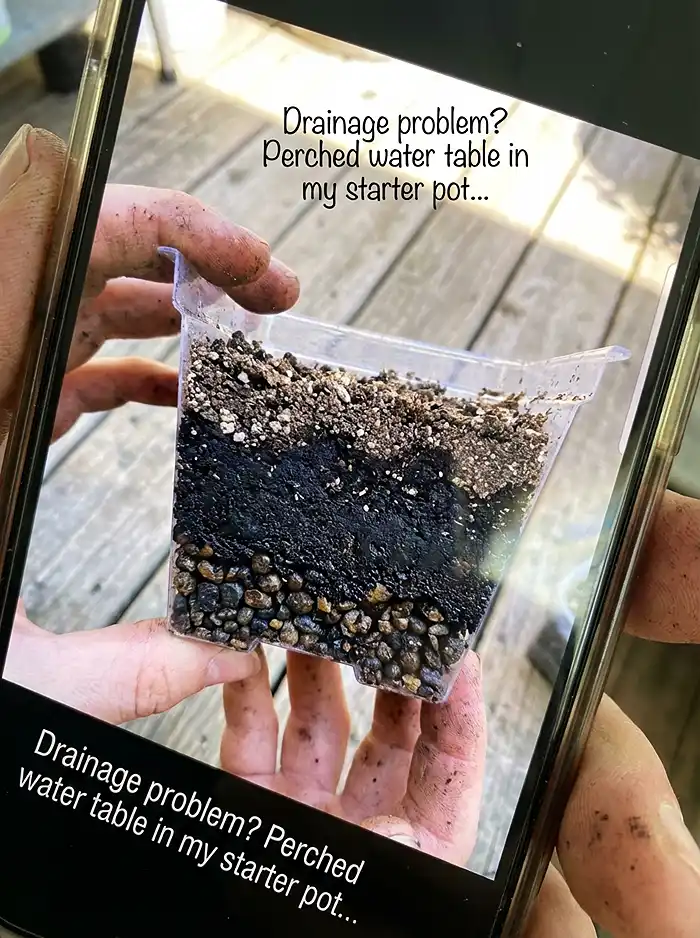
The Fix — One Uniform Soil Column, Top to Bottom
The good news? The fix is stupidly simple. Use one consistent soilless mix from the bottom of the pot to the very top — no layers, no rocks, no tricks.
The ideal beginner-friendly ratio looks like this:
- Peat or coir (60%) — holds moisture and gives roots something to anchor into
- Perlite (30%) — keeps air pockets open so roots can breathe
- Composted bark (10%) — feeds soil microbes and smooths out drainage
And the only actual drainage mechanism that works? A proper drainage hole at the bottom of the pot. Full stop.
The 30-Second Drainage Test (Do This Before You Plant Anything)
Pour a cup of water into your filled pot and watch the base. It should exit the drainage hole in under 30 seconds. Taking longer than that means your perlite or pumice content is too low — mix in more before planting. This test is a lifesaver especially for succulents, cacti, and fussy Mediterranean herbs like rosemary and thyme that are basically allergic to soggy soil.
2. Using Garden Soil in Containers — The Structural Compaction Problem
Why Garden Soil Fails in Pots (It’s Not What You Think)
Here’s something most beginner guides completely skip over: garden soil isn’t bad soil. It’s just soil designed for a completely different environment.
In the ground, an invisible workforce — earthworms, fungi, bacteria, root channels — constantly rebuilds soil structure. The moment you scoop that same soil into a sealed pot, that entire ecosystem disappears. What you’re left with is soil that compacts after just one or two waterings, crushing the microscopic air channels (macropores) that carry oxygen to your roots.
No oxygen at the root zone = anaerobic conditions = root rot and nutrient lockout. And the worst part? The plant looks like it just needs water, so you water it more. It’s a spiral.
What “Soilless” Really Means and Why It Works
“Soilless mix” sounds like you’re growing plants in nothing, but it actually means the mix is engineered specifically for container conditions — not borrowed from your backyard.
Each ingredient has one job:
- Peat or coir retains moisture and provides organic structure that roots can actually grip
- Perlite or pumice creates permanent air pockets that never collapse, no matter how many times you water
- Composted bark feeds beneficial microbes and acts as a slow drainage buffer
Soilless doesn’t mean infertile. It means you’re giving your plant the right physical environment to thrive — which is honestly more important than fertilizer at this stage.
The Tainted Compost Warning — The Bean Bioassay Test
This one’s genuinely scary and almost nobody talks about it. Many bagged composts contain persistent herbicide residues — specifically aminopyralid and clopyralid — that survive the entire composting process and end up right in your pot.
Before you add any new bagged compost to your containers, run this quick test:
- Fill a small pot with the new compost
- Plant 3–5 bean seeds (beans are the canary in the coal mine here)
- Wait 7–10 days after germination
- Twisted, cupped, or downward-curling leaves = contaminated batch — throw it out entirely
One afternoon spent on this test can save you a full growing season. According to the Royal Horticultural Society, herbicide-contaminated compost is one of the most underreported causes of unexplained plant failure in home gardens — and it’s far more common than most people realize.
3. Wrong Container Choice — The Soil’s Silent Enemy
Container Material Directly Affects Soil Moisture Physics
Here’s something nobody tells you when you’re standing in the garden center, pot in hand: the container you choose is actively managing your soil moisture 24 hours a day.
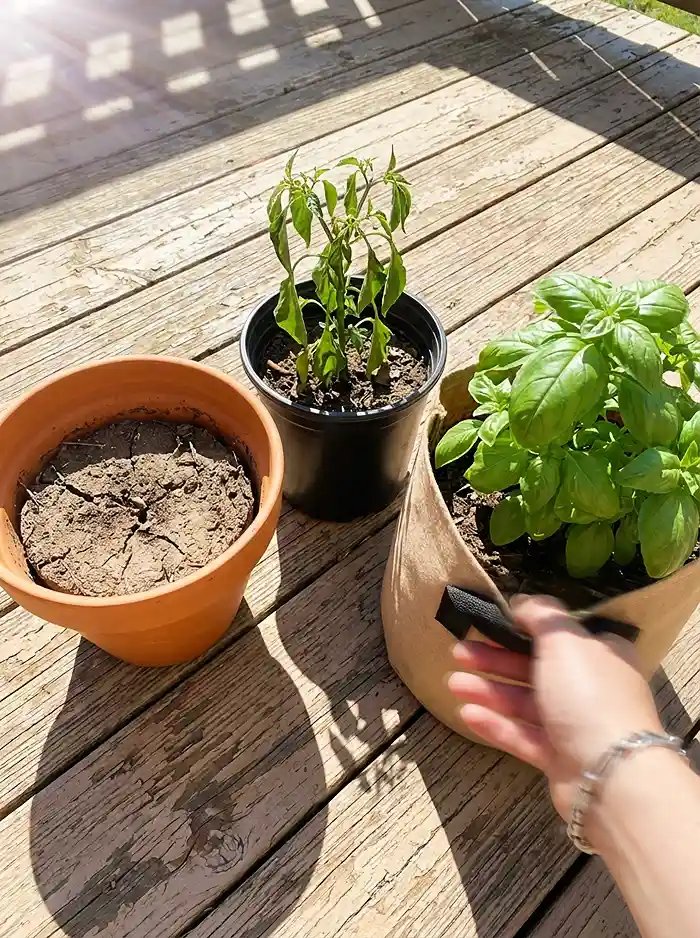
- Terracotta is porous and breathes through its walls, pulling moisture out continuously. Soil dries 30–50% faster than in plastic — great for drought-tolerant plants, brutal for thirsty vegetables without consistent watering routines
- Plastic and resin lock moisture in, which is perfect for tomatoes and basil but risky in shadier spots where soil stays wet far too long
- Fabric grow bags are the high-performance option — they air-prune roots naturally (a genuinely powerful root-bound prevention technique) but demand near-daily watering in hot summers, making them tricky for beginners without a drip system
The Depth Deficit — Container Size Is a Soil Volume Problem
Picking a pot that’s too small is one of those soil mistakes in container gardening that bites you weeks later, not immediately. Less soil volume means less moisture buffer, faster nutrient depletion, and wild temperature swings that stress roots constantly.
Here’s the minimum depth you need by crop:
- Herbs and lettuce: 6–8 inches
- Peppers and eggplant: 10–12 inches
- Tomatoes and squash: 7–10+ gallon containers
If you’re making sizing mistakes alongside other beginner errors, it’s worth checking out Common Small-Space Gardening Mistakes Beginners Make — a lot of these issues overlap and compound each other faster than you’d expect.
Thermal Instability — Your Dark Pot Is Cooking Your Roots
Dark-colored pots sitting in full summer sun can push root-zone temperatures above 90°F (32°C). At that point, your plant can’t absorb phosphorus or iron properly — and it shows up as nutrient deficiency symptoms even if you’ve fertilized perfectly. The fix: wrap dark pots in burlap, use light-colored pot sleeves, or double-pot by nesting a plastic container inside a larger terracotta shell for insulation.
4. Inconsistent Watering — How It Quietly Destroys Your Soil Ecosystem
Repetitive Drought Stress (RDS) and the Root Hair Problem
Fine root hairs are tiny, invisible, and responsible for over 90% of all water and nutrient absorption in your plant. They’re also incredibly fragile — and they die within hours of a drought stress event.
Here’s the frustrating part: they don’t regenerate from the same cell. The plant has to grow entirely new root tips, which stalls everything above ground for days while the root system rebuilds itself. Do that repeatedly across a whole season? You’ve significantly stunted your harvest without ever knowing why.
The classic boom-bust pattern — flooding the pot after days of ignoring it — is actually more damaging than consistent slight underwatering. Steady and predictable wins every time.
Self-Watering Systems (SIPs) — The Engineering Fix for Forgetful Gardeners
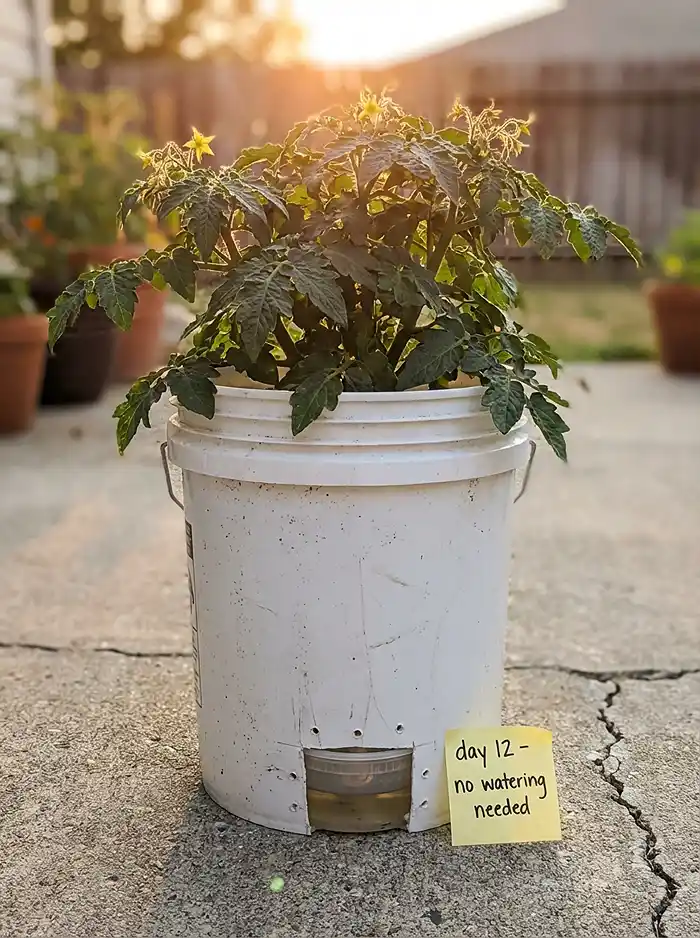
If you’ve ever killed a plant while on vacation or simply forgotten to water for a few days too many, Sub-Irrigated Planters (SIPs) are genuinely life-changing.
A SIP uses a reservoir at the base that wicks water upward through the soil via capillary action — maintaining a consistent moisture level without any daily input from you. The benefits stack up fast:
- Eliminates the guesswork of checking soil moisture daily
- Maintains ideal soil moisture tension for maximum nutrient absorption
- Dramatically reduces salt buildup by cutting back on the repeated top-watering cycle
- Works best for tomatoes, peppers, and basil — exactly the crops most damaged by moisture fluctuation
DIY option: Repurpose a 5-gallon bucket with a drilled wicking chamber insert. The whole build costs under $10 and honestly outperforms most commercial self-watering pots on the market.
5. Ignoring Nutrition — Leaching and the Fertilizer Burn Paradox
The Leaching Phenomenon — Why Container Soil Goes Broke Fast
Every time you water a container — every single time — you’re flushing soluble nutrients out through the drainage holes. Nitrogen, potassium, magnesium: gone. This isn’t a mistake, it’s just physics. But ignoring it is a mistake.
A container plant in active growth needs supplemental liquid feeding every 10–14 days, no exceptions. The most effective approach is a two-tier strategy: mix slow-release granular fertilizer into the base layer at planting, then layer in a balanced liquid feed starting around week 4–6 and continuing through the growing season.
Over-Fertilization and Salt Buildup — When Feeding Becomes Poisoning
There’s a nasty irony in container gardening: over-fertilize, and your plant looks like it’s dying of thirst — even in perfectly moist soil.
Here’s why. Synthetic fertilizer salts accumulate in the confined soil volume over time. As that salt concentration builds up around root cells, osmotic pressure reverses and the soil starts pulling water out of roots instead of delivering it. The plant wilts, you water more, you maybe even fertilize more, and the problem gets worse.
Spot it early with these signs:
- White crusty residue forming on the soil surface or around the pot rim
- Wilting that doesn’t respond to watering
- Crispy brown leaf tips on otherwise healthy-looking growth
The fix: Flush the entire container with plain water at twice its volume every 4–6 weeks. Let it drain completely before resuming your feeding schedule. Think of it as a reset button for your soil.

6. Soil Refreshing — The Zero-Waste No-Till Method
Why You Don’t Need to Dump and Refill Every Year
Tossing out all your container soil every spring feels productive. It’s not. Full replacement destroys the beneficial fungal networks your plants spent months cultivating, wastes your money, and is honestly just unnecessary labor.
Instead, try the No-Till Top-Dress Protocol:
- Remove the top 2–3 inches of compacted, depleted soil
- Top-dress with 1–2 inches of bioassay-tested compost
- Add a thin layer of fresh soilless mix to restore structure and aeration
- Water in thoroughly with a diluted liquid fertilizer to reactivate soil biology
That’s it. Refreshed soil health, restored drainage, and zero wasted soil — without disturbing the root system or your bank account.
Signs Your Soil Needs Refreshing (Not Replacing)
- Soil pulling away from the pot edges — that’s hydrophobic media; drench with a diluted dish soap solution to restore water absorption before amending
- Water running straight through without absorbing — classic macropore collapse
- Visible white salt crust on the surface or pot rim
- More than two full growing seasons of use without any amendment at all
7. Strategic Placement — Because Where You Put the Pot Matters Too
Light Requirements Are a Soil Management Issue (Seriously)
Placement isn’t just about sunlight for the leaves. It directly controls soil temperature, moisture evaporation rate, and root metabolism.
- Fruiting crops (tomatoes, peppers, cucumbers) need 8+ hours of direct sun — too little light and root metabolism slows down, making nutrients impossible to cycle efficiently even in perfect soil
- Leafy greens (lettuce, spinach, herbs) do fine with 4–6 hours — any more and you’re overheating the soil surface and triggering premature bolting
Mobility as a Soil Temperature Management Tool
Here’s one of the best underused advantages of container gardening: you can move the thing.
Invest in a wheeled pot stand and slide containers into afternoon shade whenever temperatures climb above 95°F (35°C). This one habit prevents the root-zone overheating that shuts down nutrient uptake — the same thermal instability issue mentioned earlier with dark pots. It costs nothing and saves your harvest.
Bonus: Thriller–Filler–Spiller Companion Mix Guide
Mixing plants in one container? Match growth rates or faster growers will bully the slower ones out of the pot entirely.
| Role | Plant Variety | Growth Rate | Container Min. Size | Notes |
|---|---|---|---|---|
| Thriller | Supertunia Vista Bubblegum | Fast | 12″ | Needs weekly liquid feed |
| Filler | Lobularia (Sweet Alyssum) | Medium | 8″ | Fixes nitrogen, attracts pollinators |
| Spiller | Dichondra ‘Silver Falls’ | Medium | 10″ | Low water demand, pairs well with terracotta |
| Thriller | Dwarf Pepper ‘Lunchbox’ | Medium | 10–12″ | Heat-lover — avoid dark pots at all costs |
| Filler | Basil ‘Spicy Globe’ | Fast | 8″ | Best companion for tomatoes; thrives in a SIP |
| Spiller | Nasturtium ‘Jewel Mix’ | Fast | 10″ | Edible and doubles as a nutrient deficiency indicator via leaf color |
Pairing plants by growth rate is also one of the most effective passive root-bound prevention strategies for mixed containers — nobody gets overcrowded, everyone gets soil space.
Conclusion: Start With the Soil, Win the Season
Here’s the honest truth that most beginner container gardening guides dance around: if the soil is wrong, nothing else you do will fix the plant. Not more fertilizer, not better placement, not a fancier pot.
The three rules that actually matter: right mix, right container, consistent water. Nail those three things and you’ve solved 80% of container gardening problems before they start.
Because at the end of the day, container gardening failure is almost always a soil physics problem — not a you problem.
- 📖 Read next: The Best Potting Mix Recipes for Every Crop
- 🪣 Build it: DIY Self-Watering Planter Guide (5-Gallon SIP Build)
- 🌿 Feed smarter: The Complete Fertilizing Schedule for Container Gardens