
Rustic Balcony Garden Ideas for a Warm, Natural Look
Rustic balcony garden ideas turn a bare concrete slab into a warm, cottage-style retreat — and wooden planters are the fastest way to get there. Here’s how to do it right, from weatherproofing timber to picking plants that love the look.
Table of Contents
Embracing Rustic Charm on a Small Balcony
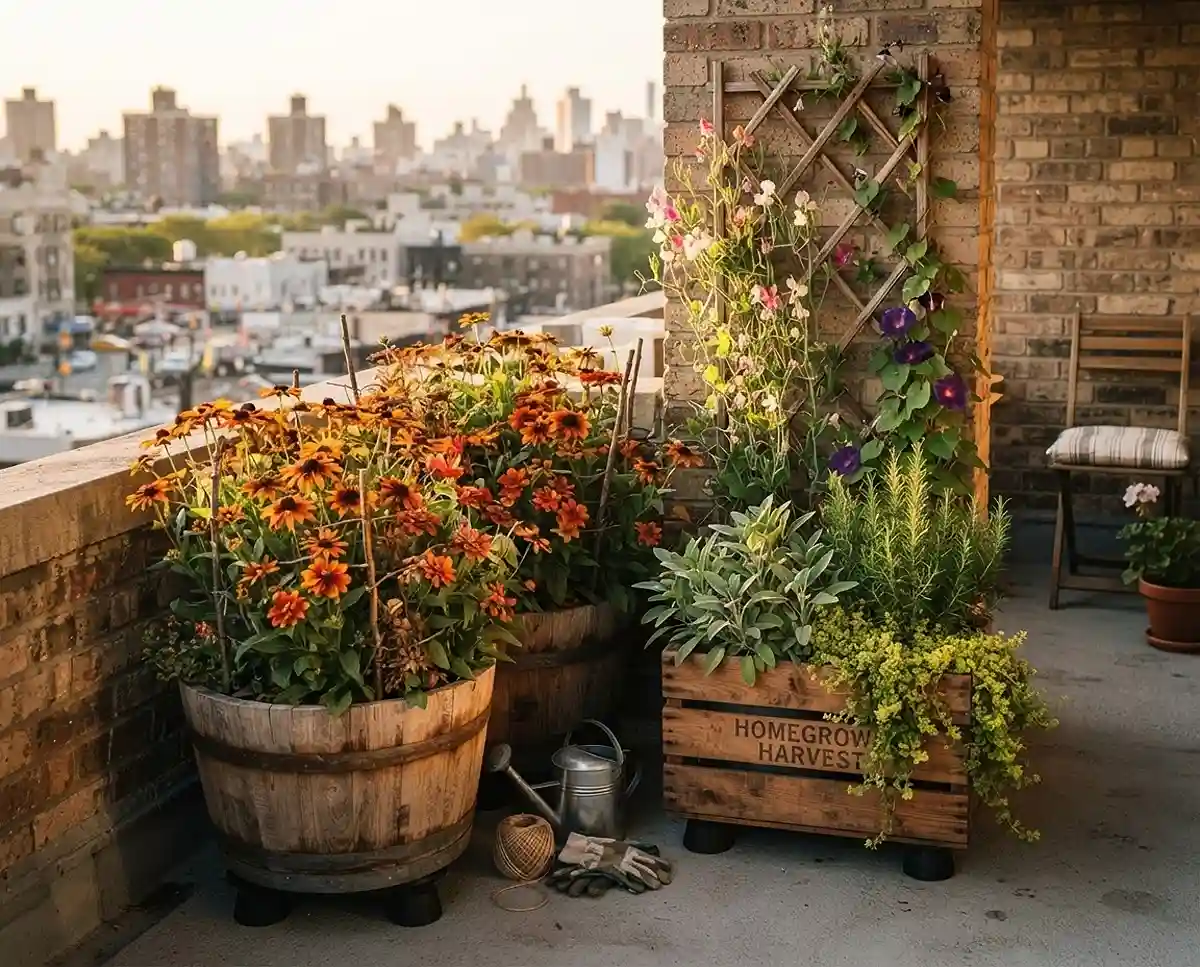
I garden on a fifth-floor balcony in zone 7a. When I moved in, it was grey concrete, metal railings, and zero personality. Two cedar half-barrels, a slatted apple crate, and a simple wooden trellis changed everything by the following spring.
Warm, weathered wood softens hard urban surfaces instantly. It introduces natural texture, earthy tones, and a sense of age that no plastic pot can replicate.
The secret is layering. Ground-level planters anchor the space. A vertical trellis draws the eye upward. Climbing vines and trailing herbs blur the boundaries between structure and planting.
Even a narrow 4-foot balcony can feel like a woodland nook with the right combination of materials. You don’t need a sprawling garden — you need the right details. Check out these apartment balcony garden ideas for more inspiration before you plan your layout.
Planning Your Rustic Balcony Layout
Before you buy a single plank, measure everything. Solid wooden furniture and heavy planters can overload a narrow balcony quickly. Most apartment balconies are rated for 40-60 lbs per square foot — check with your building manager if you’re unsure.
The goal is a clear walking path of at least 24 inches through the center of the space. Everything else can be stacked, tiered, or hung.
Measuring Space for Wooden Planters
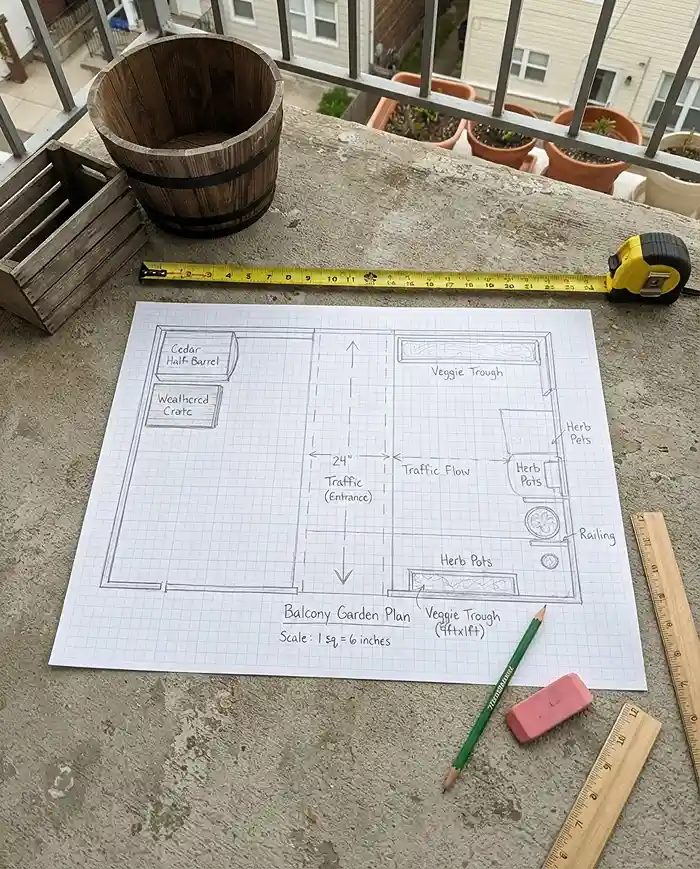
Quick Answer: Measure your total floor footprint, subtract a 24-inch walkway, and use that remaining area for ground planters. Push vertical with corner shelves and trellises to multiply planting space without eating floor area.
I use a simple rule: one large floor planter (18″ x 18″ or smaller) per corner, one medium crate on each side rail, and the trellis mounted flat against the wall. That leaves the center clear.
Tall wooden corner shelves — the kind sold as plant stands — let you stack three or four pots in the footprint of one. They’re especially useful for herb crates, which don’t need deep root space.
Pro Tip: Sketch your layout on graph paper first, with each square representing one square foot. It’s much easier to catch crowding on paper than after hauling a 60-lb planter upstairs.
Evaluating Sun and Wind Exposure
Quick Answer: Track sunlight for one full day before planting — morning sun only, afternoon sun only, or all-day exposure will dictate every plant choice. High-rise wind is equally critical: it dries wooden planters 30-40% faster than sheltered ground-level beds.
My east-facing balcony gets about four hours of direct morning sun. That’s enough for herbs and cottage flowers but not for tomatoes. I learned that the hard way in 2022 when I planted a ‘Sun Gold’ cherry tomato in a cedar barrel and got exactly zero fruit.
Wind is the hidden variable. Above the third floor, crosswinds accelerate evaporation dramatically. Wooden planters hold moisture longer than thin plastic, but even cedar will dry out within a day in strong wind. A simple wind-resistant planting guide from the RHS can help you choose species that won’t shred in exposed conditions.
Install a simple windbreak — a woven willow screen or a dense trellis of vines — on the windward side before summer hits.
Selecting and Weatherproofing Wooden Garden Details
Not all wood survives outdoors. The wrong timber will rot within a single season, taking your plants and your investment with it. Choosing the right species and sealing it correctly is the foundation of any lasting small balcony garden.
Best Wood Types: Cedar, Teak, and Acacia
Quick Answer: Cedar, teak, and acacia are the top three naturally rot-resistant woods for outdoor planters. Their dense grain and natural oils repel moisture and fungal decay without chemical treatment — critical when you’re growing edibles.
| Wood Type | Best For | Expected Lifespan (outdoor) | Watch Out For |
|---|---|---|---|
| Western Red Cedar | Half-barrels, large planters | 10-15 years | Grays quickly without oil |
| Teak | Premium containers, furniture | 20+ years | Expensive; sustainably sourced only |
| Acacia | Crates, smaller planters | 7-12 years | Needs annual oiling |
| Untreated Pine | Avoid for planters | 1-3 years | Rots fast; not worth it |
Cedar is my go-to. It’s widely available, reasonably priced, and smells incredible when freshly cut. I built a cedar window box in spring 2021 and it still looks solid as of summer 2026 — I just rub it with raw linseed oil every April.
Pro Tip: Even rot-resistant wood benefits from annual treatment with a plant-safe penetrating oil (linseed or tung oil). It preserves the warm honey tone and extends lifespan significantly.
Sealing and Lining Wooden Containers to Prevent Rot
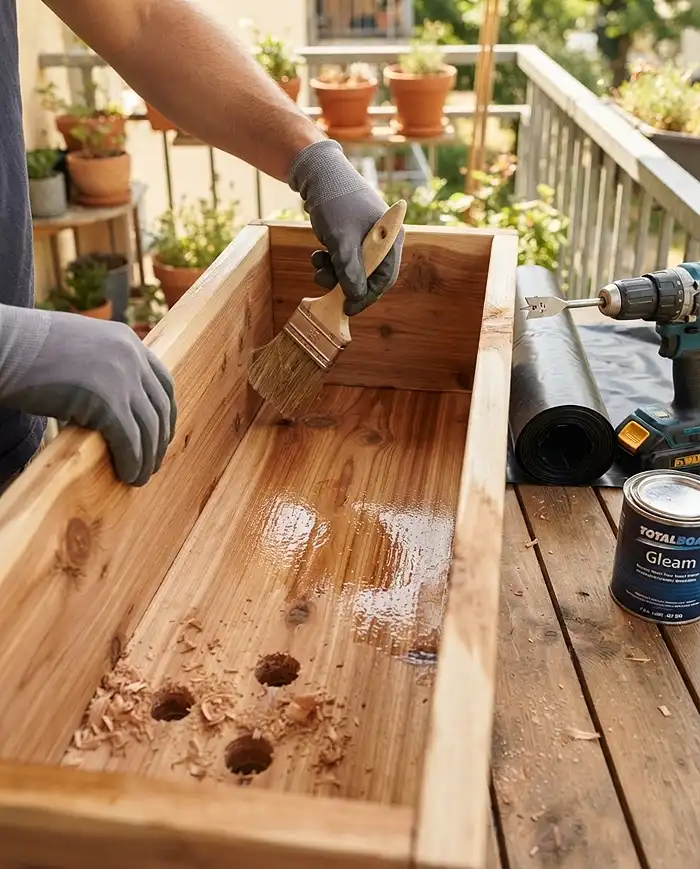
Quick Answer: Line wooden planters with heavy-duty plastic sheeting (punched for drainage) or coat the interior with non-toxic marine sealant before adding soil. This barrier is what separates a planter that lasts one season from one that lasts a decade.
Wet potting mix in direct contact with wood accelerates decay from the inside out — even with cedar. The fix is simple: cut a piece of heavy plastic sheeting to fit the interior, punch drainage holes in the bottom, and staple it in place.
For a cleaner finish, apply two coats of non-toxic, water-based marine sealant to all interior surfaces before planting. Let it cure for 48 hours. I use this method on my upcycled wine barrel planters and they’ve never shown a soft spot.
Always drill drainage holes in the bottom of any wooden container — at least four 1/2-inch holes per square foot of base area. Standing water is the number-one killer of both wooden planters and plant roots.
Best Plants for a Rustic Woodland Aesthetic
The right plants tie the whole look together. You want species with a relaxed, informal habit — nothing stiff or architectural. Think wildflower meadow transplanted into a barrel, not a formal bedding scheme.
For a deeper look at building a full cottage-style setup, this guide to a cafe-style balcony garden pairs well with a rustic wooden aesthetic.
Cottage-Style Blooms for Wooden Barrels
Quick Answer: Daisies, Zinnias, and Black-Eyed Susans are the easiest cottage-garden bloomers for wooden half-barrels. Their loose, wildflower habit contrasts beautifully against dark, weathered grain and they bloom prolifically with minimal fuss.
- Shasta Daisy ‘Becky’ — Reliable perennial in zones 4-9; returns every year with almost no care.
- Zinnia ‘Profusion Orange’ — Heat-tolerant annual; blooms nonstop from June through first frost.
- Black-Eyed Susan ‘Goldsturm’ — Native perennial; drought-tolerant once established, perfect for wind-exposed balconies.
- Cosmos ‘Sensation’ — Feathery foliage softens the look; self-seeds lightly for a natural effect.
I planted ‘Goldsturm’ Black-Eyed Susans in a cedar half-barrel in 2023. They came back stronger in 2024 and 2025 without any intervention. Against dark, weathered cedar they look genuinely stunning.
Climbing Vines for Rustic Trellises
Quick Answer: Sweet Pea, Morning Glory, and climbing Nasturtiums are the fastest-growing options for a wooden trellis on a small balcony. Plant them at the base of a lattice trellis in spring and you’ll have a living privacy screen by midsummer.
Sweet Pea ‘Matucana’ is a heritage variety with intense fragrance — it threads itself up a wooden lattice without any training. Morning Glory ‘Heavenly Blue’ covers a 5-foot trellis in six to eight weeks from direct sow.
Climbing Nasturtiums are underrated. They’re edible, fast, and their round leaves look beautiful cascading through wooden slats. They also repel aphids naturally, which is a genuine bonus in apartment gardens where beneficial insects are scarce.
Pro Tip: Soak Sweet Pea seeds in water for 24 hours before planting to speed up germination by nearly a week.
Earthy Culinary Herbs for Wooden Crates
Quick Answer: Rosemary, sage, and creeping thyme thrive in wooden crates because the natural wood aeration prevents the waterlogged roots that kill most herbs in plastic. These drought-tolerant Mediterranean species are ideal for balcony gardeners who miss watering days.
- Rosemary ‘Arp’ — One of the hardiest cultivars; tolerates zone 6 winters and high wind.
- Sage ‘Berggarten’ — Broad silver-grey leaves; ornamental as well as culinary.
- Creeping Thyme ‘Elfin’ — Spills over the edges of crates beautifully; tiny pink flowers attract pollinators.
An upcycled apple crate planted with all three creates a textural herb garden that looks like it came from a farmhouse kitchen. The different leaf shapes and silvery tones work together without any fuss.
Step-by-Step Guide to Assembling Your Rustic Garden
Sequence matters here. Do this in the wrong order and you’ll be moving heavy, soil-filled planters around a cramped balcony. Trust me — I’ve made that mistake.
- Seal the wood first. Apply two coats of non-toxic marine sealant to interior surfaces. Allow 48 hours to cure fully before adding any soil or plants.
- Line the containers. Cut landscape fabric or heavy plastic sheeting to fit. Punch drainage holes every 4 inches across the base. Staple or clip the liner in place.
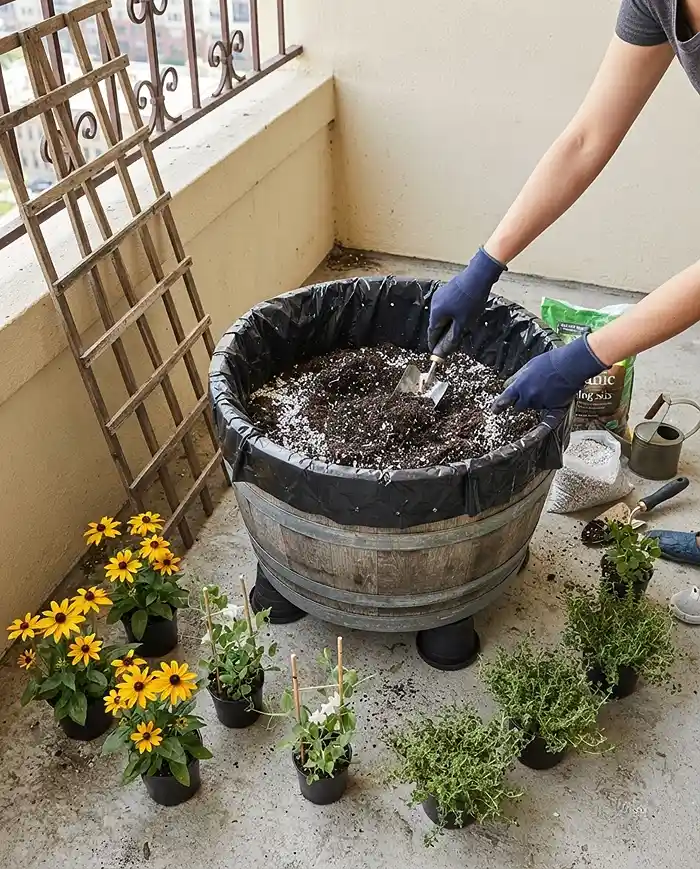
- Position heavy planters before filling. Move cedar barrels and large crates into their final positions while they’re still empty. A filled 18″ cedar half-barrel can weigh 80+ lbs.
- Elevate everything on pot feet. Place three or four rubber pot feet (or bricks) under each planter before filling. This is non-negotiable for drainage and airflow.
- Fill with lightweight mix. Use a blend of 60% quality potting mix and 40% perlite. This reduces weight and improves drainage significantly — critical for balcony load ratings.
- Plant from back to front. Install the trellis first, plant climbers at its base, then layer cottage bloomers in the middle ground and low herbs at the front edges.
Seasonal Maintenance for Plants and Wood
A rustic balcony garden needs two kinds of maintenance: care for the plants and care for the wood itself. Neglecting either will show by the end of summer.
Watering Strategies to Protect Balcony Floors
Quick Answer: Elevate all wooden planters on rubber pot feet and use drip trays sized to the exact base of each container. This prevents standing water from rotting the planter base and protects the balcony waterproofing membrane beneath.
Pot feet do two jobs: they allow air to circulate under the planter (slowing bottom rot) and they keep the planter base off the wet surface after rain or watering. I use a set of four rubber feet under every single container.
For watering frequency, wooden planters dry out faster than plastic — especially in wind. On my balcony in July, I water every day. A finger-test to 2 inches depth before each watering saves more plants than any schedule.
Drip trays are essential for apartment balconies. Check them after every watering session and empty any standing water within an hour. You’ll want to build a cozy balcony with plants — not a water damage complaint from the neighbour below.
Winterizing Wooden Planters
Quick Answer: Before the first hard freeze, either empty wooden containers fully or wrap them tightly with burlap and a tarp. Wet soil expands as it freezes — that expansion force is strong enough to split wooden planter joints and crack barrel staves.
In zone 6 and colder, I empty my cedar barrels down to the last inch of soil in late October. I store them upside down under a tarp or bring them indoors if space allows. The liners come out and dry over winter.
In zones 7-9, you can leave planters in place but cover them with landscape fabric or burlap when a hard freeze is forecast. The wood itself survives cold fine — it’s the repeated freeze-thaw cycle with saturated soil inside that does the damage.
Pro Tip: Apply a fresh coat of linseed oil to all exterior wood surfaces in autumn, after the growing season. It soaks in over winter and provides a layer of protection before spring.
Common Problems and Solutions
Wooden containers are more forgiving than most gardeners expect — but they do have specific failure modes. Catch these early and the fix is straightforward.
Fungal Rot on Wooden Planter Bottoms
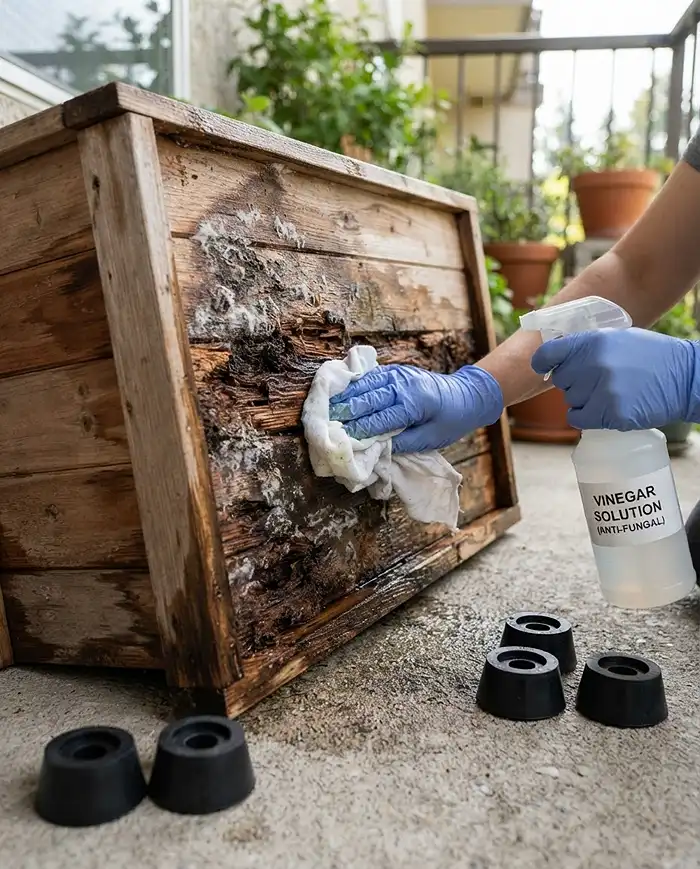
Quick Answer: White mold or soft, spongy spots on the base of a wooden planter mean poor airflow and trapped moisture. The immediate fix: scrub with diluted white vinegar (1 part vinegar to 3 parts water), let dry fully, and elevate the planter on pot feet immediately.
Bottom rot happens when a planter sits flat on a wet surface without drainage or airflow. The underside stays perpetually damp and fungal growth moves in fast.
If the rot is caught early (soft but not structurally compromised), vinegar treatment and elevation will stop it. Let the wood dry out completely for several days before returning it to service.
If the base is fully compromised — hollow, punky, or collapsing — replace that planter. Trying to save it risks losing your plants too when the base fails under the weight of wet soil.
Managing Termites and Wood-Boring Pests
Quick Answer: Look for small piles of fine sawdust (called frass) at the base of wooden planters — that’s the clearest sign of wood-boring insects. Treat immediately with neem oil spray or food-grade diatomaceous earth around the planter base. Both are plant-safe and organic.
Termites and wood-boring beetles are uncommon on high-rise balconies but not impossible, especially in warm climates or if you’re using upcycled timber that was already compromised.
Neem oil diluted to a 2% solution (about 2 tsp per quart of water with a few drops of dish soap as an emulsifier) can be sprayed directly onto affected wood surfaces. Diatomaceous earth scattered around the base creates a physical barrier that deters crawling insects without any chemical toxicity.
Frequently Asked Questions
Can I use untreated wooden pallets for a balcony garden?
Only use pallets stamped HT (Heat Treated). Pallets marked MB (Methyl Bromide) have been treated with a toxic fumigant that leaches into soil and is unsafe for edibles. Avoid any pallet with no stamp at all — when in doubt, leave it out.
How do I stop dirt from washing out of slatted crates?
Line the interior walls and base of any slatted wooden crate with thick woven landscape fabric or a heavy-duty plastic bag with drainage holes punched in the bottom. The liner retains soil while allowing excess water to drain freely through the slats.
What is the best way to secure a wooden trellis without drilling?
Use heavy-duty UV-resistant zip ties to strap the trellis directly to your balcony railing, or sink the trellis legs deep into a large, soil-filled planter box and let the weight anchor it. Both methods hold well through summer storms without damaging rental property.
How often should I reseal wooden planters?
Reapply non-toxic marine sealant or penetrating oil to exterior surfaces every 12 months, ideally in early spring before the growing season begins. Interior liners should be inspected annually and replaced if cracked or torn.
Are rustic balcony garden ideas suitable for renters?
Absolutely. Use freestanding planters, trellis panels weighted with soil-filled containers, and pot feet instead of drilling or permanent fixtures. Everything can be moved at the end of a tenancy without leaving any marks or damage.
Key Takeaways
- Rustic balcony garden ideas work best when you layer textures: ground-level barrels, mid-height crates, and a vertical trellis with climbing vines.
- Always choose cedar, teak, or acacia for outdoor planters — and seal or line the interior before adding soil.
- Elevate every wooden container on pot feet from day one. It’s the single simplest step to prevent rot and protect your balcony floor.
- A small balcony garden thrives with cottage-style bloomers like Black-Eyed Susans, climbing Sweet Peas, and Mediterranean herbs in wooden crates.
- Whether you have a 4-foot apartment balcony garden or a generous wrap-around terrace, natural wood transforms the space faster than any other material.