

How to Refresh Potting Soil
If your container vegetables look rough by late summer, the soil is almost certainly the problem. Learning how to refresh potting soil is the single fastest way to rescue a struggling harvest or set up a strong fall crop.
Table of Contents
Recognizing When Your Container Soil is Exhausted
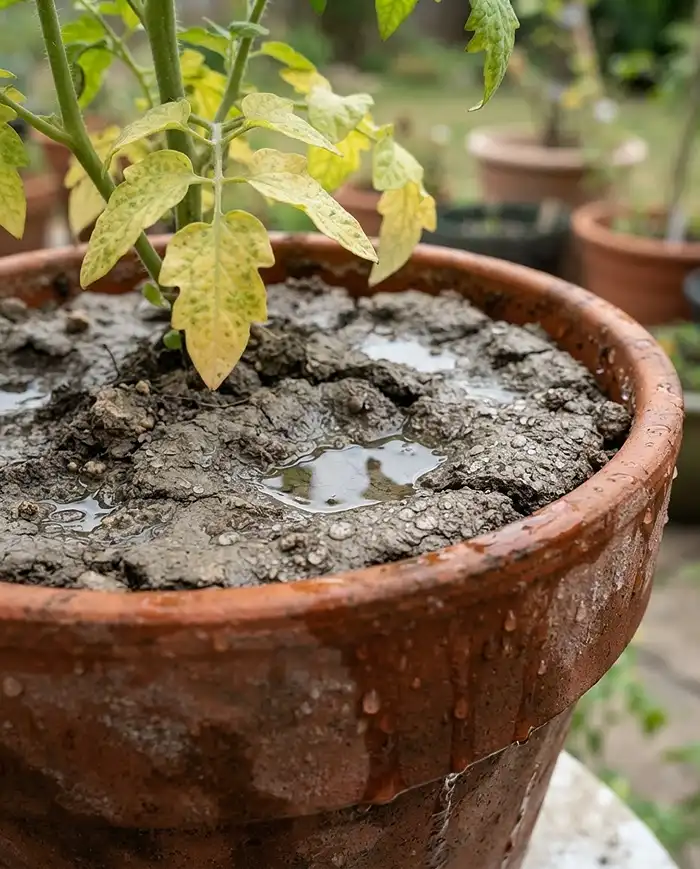
Your tomato plant isn’t just tired. It’s starving. By August, the potting mix that looked perfect in May has been baked, leached, and compacted into something closer to concrete than garden soil.
Watch for these warning signs: yellowing lower leaves despite regular watering, fruit that stops sizing up, and water that pools on the surface before eventually running straight down the sides of the pot.
I grow peppers and cherry tomatoes on a south-facing balcony in zone 6b, and every September I deal with at least one pot that’s hit this wall. The plants aren’t dying of old age — the soil has simply stopped functioning.
The good news: tired soil is fixable. In most cases, a targeted intervention will save the late-season harvest and get the container ready for fall container vegetables without buying a fresh bag of mix.
Understanding What Happens to Potting Soil Over Summer
Container soil exists in a closed system. Unlike a garden bed, it can’t pull nutrients up from deeper layers or recharge its structure from surrounding soil. Every watering, every hot day, and every feeding cycle degrades it a little more.
Two things break down simultaneously: the nutrient supply and the physical structure. You need to fix both, or fixing one won’t help much. Understanding the “why” tells you exactly which amendments to reach for.
Nutrient Leaching from Heavy Watering
During peak summer heat, most vegetables in pots need deep, daily watering. That’s correct practice — but it comes at a cost.
Water-soluble macronutrients, especially nitrogen and potassium, literally wash out through the drainage holes with every thorough watering. Nitrogen, the nutrient most responsible for leafy green growth, is the first to go.
A heavy feeder like a beefsteak tomato can strip available nitrogen from a 5-gallon container in as little as 4 to 6 weeks during peak production. By September, that same pot may have less than 20% of its original nutrient baseline remaining.
This is why even well-watered, regularly fed plants in container vegetable gardening can look pale and stalled by late summer — the soil can no longer hold what you’re putting in.
Soil Compaction and Peat Moss Breakdown
Most commercial potting mixes are built on a peat moss or coir base. These materials start out light and fluffy, full of air pockets that roots need to breathe and grow.
Over a full growing season, that structure collapses. Peat moss decomposes, organic particles break down into fine silt, and the whole profile compresses under its own weight and repeated watering pressure.
What you’re left with is a dense, almost sludge-like mass. Roots can’t push through it. Oxygen exchange drops. Stagnant moisture sits in the lower third of the pot, creating the perfect environment for fungal root rot — the exact opposite of what vegetables in pots need.
Essential Materials to Fix Tired Vegetable Soil
Before you start, gather these four items. You don’t need all of them for every situation, but having them on hand lets you match the fix to the problem.
- Compost (finished, bagged or homemade) — restores nutrients and biological activity
- Worm castings — concentrated, gentle nutrients that won’t burn roots
- Coarse perlite (or pumice) — fixes compaction and restores drainage
- Balanced dry granular organic fertilizer — slow-release baseline for new or refreshed soil
- Liquid organic fertilizer (fish emulsion or liquid kelp) — fast-acting rescue for struggling plants
Skip synthetic granular fertilizers entirely in container situations. They contribute to salt buildup fast — a problem we’ll cover below.
Organic Amendments for Nutrient Boosting
By September, a pot that spent the summer growing tomatoes or peppers has been strip-mined of nutrients. Compost and worm castings are the two best tools to fix that.
Finished compost restores macro and micronutrients, but its real value is reintroducing the microbial life that makes those nutrients available to plant roots. Dead soil — no matter how many fertilizers you pour on — is inefficient at feeding plants.
Worm castings are a step beyond. They’re dense in bioavailable nutrients, gentle enough to apply directly against roots without burning, and they carry beneficial microbes and plant growth hormones. A handful mixed into the top few inches of a struggling pot delivers results you can see within a week.
As a rule for the best soil mix for container vegetables: use compost for volume and castings for potency. Together, they rebuild what months of heavy cropping removed.
Aeration Additives to Fix Compaction
Nutrients alone won’t fix a compacted pot. If the physical structure is gone, roots can’t access what you’ve added. That’s where perlite and pumice come in.
Coarse perlite (not the fine grade sold for seed starting) mechanically separates compacted soil particles and creates permanent air pockets. It doesn’t break down, so it keeps working all season.
Pumice does the same job but also holds a small amount of moisture and nutrients in its porous surface — a slight edge in very dry climates. Either works well for container garden tips focused on improving drainage.
When mixing into existing soil, aim for about 20 to 25% perlite or pumice by volume. More than that and the soil dries out too fast; less and it doesn’t meaningfully improve aeration.
How to Revive Soil While Vegetables Are Still Growing
This is the trickier scenario: the plant is still alive, still producing, and you can’t just dump the pot out. The goal is maximum impact with minimum root disturbance.
Two methods work reliably here, and they’re best used together. One feeds the soil ecosystem slowly from the top. The other bypasses it entirely for an immediate rescue.
The Top-Dressing Method with Compost and Castings
Quick Answer: Scratch the top 1 to 2 inches of compacted soil with a hand fork — carefully, to avoid feeder roots — then apply a 1-inch layer of compost blended with worm castings. Water it in well. Nutrients leach down with every subsequent watering.
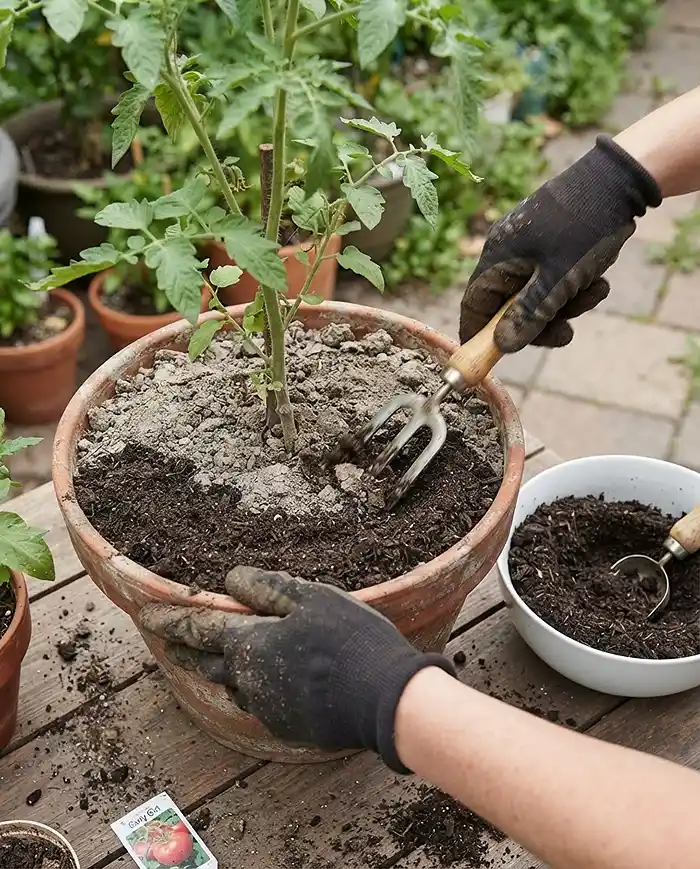
I did this with a ‘Sweet Million’ cherry tomato in a 10-gallon fabric pot last August. The plant had stalled completely and the lower leaves had gone pale yellow-green.
After top-dressing with a 50/50 blend of compost and castings, new growth resumed within 10 days and I got another full month of production before first frost.
The hand fork step matters more than it sounds. You’re not just loosening the surface — you’re breaking the hydrophobic crust that’s preventing water absorption in the first place.
Pro tip: Work in small circles around the drip line, not near the stem — that’s where feeder roots concentrate in container vegetable gardening.
Liquid Feeding for Immediate Root Uptake
Quick Answer: Mix fish emulsion or liquid kelp per label directions and apply directly to moist soil. Liquid nutrients bypass degraded soil microbes and reach roots in bioavailable form within 24 hours.
Fish emulsion (typically a 5-1-1 NPK ratio) hits nitrogen-starved plants fast. Liquid kelp is lower in nutrients but rich in growth hormones and trace minerals that support stress recovery.
Use both: fish emulsion when the plant looks pale and stalled, liquid kelp when it looks stressed but green. Alternate weekly until you see active new growth.
Don’t apply liquid fertilizer to bone-dry soil — always water first, then feed. Concentrated nutrients on dry roots cause burn, which is the last thing a struggling plant needs.
How to Refresh Soil Between Summer and Fall Crops
When the summer crop is done and you’re resetting the pot for autumn seedlings, you have room to be more aggressive. This is how to refresh potting soil properly, not just patch it.
You’re not just adding amendments to the top — you’re physically rebuilding the medium. The extra work here pays off in a fall crop that establishes fast and outgrows sluggish, tired soil.
Check out fast fall root vegetables to grow in pots if you’re deciding what to plant next — some crops are more forgiving of imperfect soil than others.
Removing Old Roots and De-Clumping the Dirt
Quick Answer: Dump the container onto a tarp. Break up hardened clods by hand. Sift out all old root matter before adding any amendments. Dead roots left behind decompose anaerobically and can introduce fungal pathogens to your new crop.
This step feels tedious, but it’s not optional. Old tomato or pepper roots mat together into a dense web that resists water movement even after you’ve amended the surrounding soil.
Work through the pile in sections, pulling root clumps and breaking up any clods larger than a golf ball. The goal is a loose, even texture before you add anything else.
Inspect while you work. If the soil smells sour or sulfurous (like rotten eggs), it’s been waterlogged and anaerobic. Add extra perlite in your refresh mix and make sure the drainage hole isn’t blocked.
The 50/50 Refresh Recipe for New Seedlings
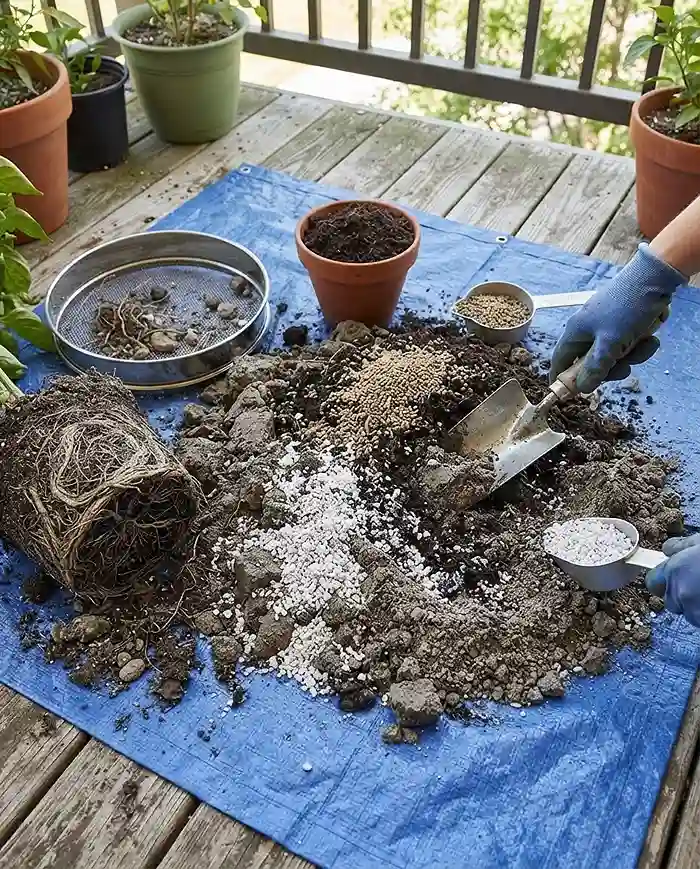
Quick Answer: Blend your sifted old soil with 30 to 50% new material — compost, perlite, and a balanced dry organic fertilizer — to create a light, fertile medium. This costs a fraction of replacing the entire pot and performs just as well.
| Component | Amount (by volume) | Purpose |
|---|---|---|
| Sifted old potting soil | 50-70% | Base structure, retains some biology |
| Finished compost | 20-30% | Nutrients, microbial recharge |
| Coarse perlite | 10-20% | Aeration, drainage correction |
| Dry organic fertilizer | Per label | Slow-release nutrient baseline |
Mix everything thoroughly before filling the container. The finished blend should feel noticeably lighter and fluffier than what came out. If it still feels heavy and dense, add more perlite.
Maintenance to Keep Soil Alive Through Autumn
Refreshed soil is a good start. But as temperatures drop below 50°F (10°C), the microbial activity that drives nutrient availability slows dramatically. You need to give it a head start.
Water your freshly filled containers once with a diluted compost tea or liquid mycorrhizal inoculant before planting. This seeds the soil food web with beneficial fungi and bacteria that continue working even as air temperatures cool.
Mycorrhizal fungi form a physical network around root tips that dramatically extends their reach. In a container, where roots can’t spread freely, this is especially valuable for cool-season container combinations that need to establish fast before cold arrives.
After that initial inoculation, continue feeding every two weeks with diluted fish emulsion or liquid kelp through the fall growing season. Cool soil slows nutrient release from dry amendments, so liquid feeding fills the gap.
Common Problems and Solutions
Even after amending, you may run into two classic signs of severely degraded soil. Both are easy to fix once you know what you’re looking at.
Hydrophobic Soil Repelling Water
Quick Answer: Old peat moss can become water-repellent when it dries out completely. Water pours in and runs straight down the container walls without absorbing. Add one drop of biodegradable dish soap to a full watering can and water slowly — the surfactant breaks the surface tension and allows moisture to penetrate again.
This isn’t a long-term fix, but it works immediately. Follow up by top-dressing with compost to introduce fresh organic matter that holds moisture better than dried peat.
If a pot is severely hydrophobic, submerge the entire container in a tub of water for 20 to 30 minutes. The slow soak forces water into hydrophobic zones that surface watering can’t reach.
White Salt Crust on the Soil Surface
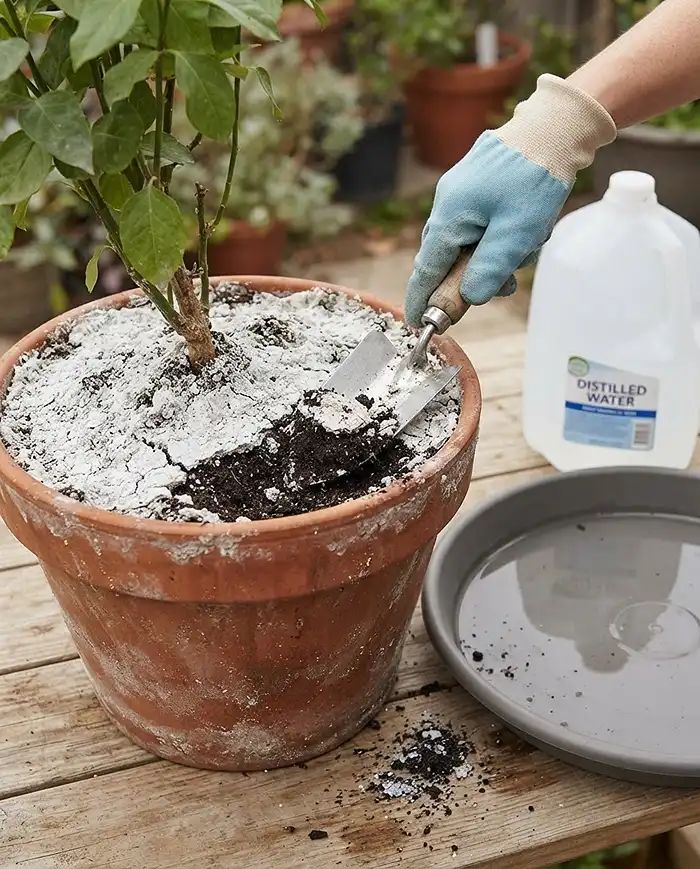
Quick Answer: A white or pale crust on the soil surface is accumulated fertilizer salts and tap-water calcium. Scrape off the top inch, then flush the container thoroughly with distilled or rainwater — ideally 3 or 4 times — to push remaining salts out through the drainage holes.
This crust is toxic at high concentrations. It raises the soil’s electrical conductivity (EC) to levels that actively prevent roots from absorbing water, even when the soil appears moist.
Switch to organic fertilizers after flushing. Synthetic formulas, especially liquid concentrates, are the primary salt contributors in container garden tips gone wrong. Organic options release nutrients through microbial activity rather than salt chemistry.
Frequently Asked Questions
Should I throw away potting soil if the plant had a disease?
Yes — discard it completely. Seal it in a trash bag and do not compost it. Soil that hosted plants killed by fusarium wilt, powdery mildew, or viral blights contains dormant pathogens that will infect your next crop. No amendment can reliably neutralize active disease spores in a closed container environment.
Can I use regular garden fertilizer to fix my potting soil?
No. Heavy synthetic agricultural fertilizers build up toxic salt levels fast in the confined volume of a container. Use only organic, slow-release fertilizers — granular options like blood meal, bone meal, or all-purpose organic blends feed the soil food web rather than bypassing it with salt chemistry.
Does adding coffee grounds help tired tomato plants?
Not directly. Uncomposted coffee grounds tie up nitrogen as they break down, which can actually starve plants short-term. They add organic matter over time but offer no immediate nutritional relief. Compost coffee grounds fully before using them in containers, or skip them and use worm castings for faster results.
How often should I fully replace container potting soil?
Every 2 to 3 years at most, and only if the 50/50 refresh method no longer produces healthy crops. Most containers can be refreshed rather than replaced for several seasons in a row using the methods above, which saves significant cost over time.
Can I reuse soil from a container where a plant died unexpectedly?
It depends on why the plant died. Death from drought, heat, or pest damage poses no soil risk — refresh and reuse. Death from root rot, wilts, or any fungal or viral disease means the soil should be discarded. When in doubt, throw it out.
Key Takeaways
- Knowing how to refresh potting soil saves money and rescues late-season harvests — full replacement is rarely necessary.
- Fix both problems at once: nutrient depletion (compost, castings, liquid fertilizer) and compaction (perlite or pumice).
- For plants still in the ground, top-dressing plus liquid feeding is the safest, most effective combo.
- Between crops, use the 50/50 refresh recipe — 50 to 70% sifted old soil plus compost, perlite, and dry organic fertilizer.
- Inoculate refreshed soil with compost tea or mycorrhizal fungi before fall planting to reboot biological activity as temperatures drop.