

Container Gardening Mistakes
Yellow leaves, bolting lettuce, wilting greens? It’s your pot, not your skills. Diagnose the real cause in 60 seconds. Grab our free triage chart inside →
Here’s what nobody tells you when you start growing greens in pots: most container gardening mistakes have nothing to do with your gardening skills. They have everything to do with the tiny, hostile environment you’ve accidentally created inside that pot.
I call it the Amplified Microclimate — and once you understand it, every mystery symptom suddenly makes sense. Why are my plants turning yellow? Microclimate. Lettuce bolting before you even got a decent salad out of it? Microclimate. Wilting container greens that look like they’re auditioning for a drama series? You guessed it.
A container isn’t a cute little garden bed. It’s a pressure cooker where heat, drought, and nutrient loss happen three to five times faster than they do in the ground. But that’s actually great news — because once you know what’s going wrong, the fixes are surprisingly simple.
Let’s walk through every symptom, figure out what’s actually happening, and then set you up with a system that practically runs itself.
Table of Contents
Why Your Pots Are Stressing Your Plants Out (More Than You Think)
Before we diagnose a single leaf, we need to talk about why containers are so dramatically unforgiving. Understanding this is the difference between guessing and actually solving the problem.
Small Pots Run Dry Ridiculously Fast
A pot under 12 inches across holds maybe five to eight liters of growing media. That sounds reasonable until you realize roots can drain every usable drop of moisture in a few hours on a warm afternoon.
Soil scientists call this the permanent wilting point — the moment where there’s technically moisture in the soil, but roots physically can’t pull it out anymore. In-ground plants almost never hit this threshold because their roots spread wide and dig deep. Your container lettuce? One skipped watering and it’s already there.
This is why pot size is the very first thing I look at when someone tells me their greens keep dying. Not fertilizer. Not watering schedule. The pot.
Your Pot Material Is Either Helping or Cooking Your Roots
Not all containers betray you equally. What your pot is made from has a massive impact on how hot the root zone gets — and that matters more than most people realize.
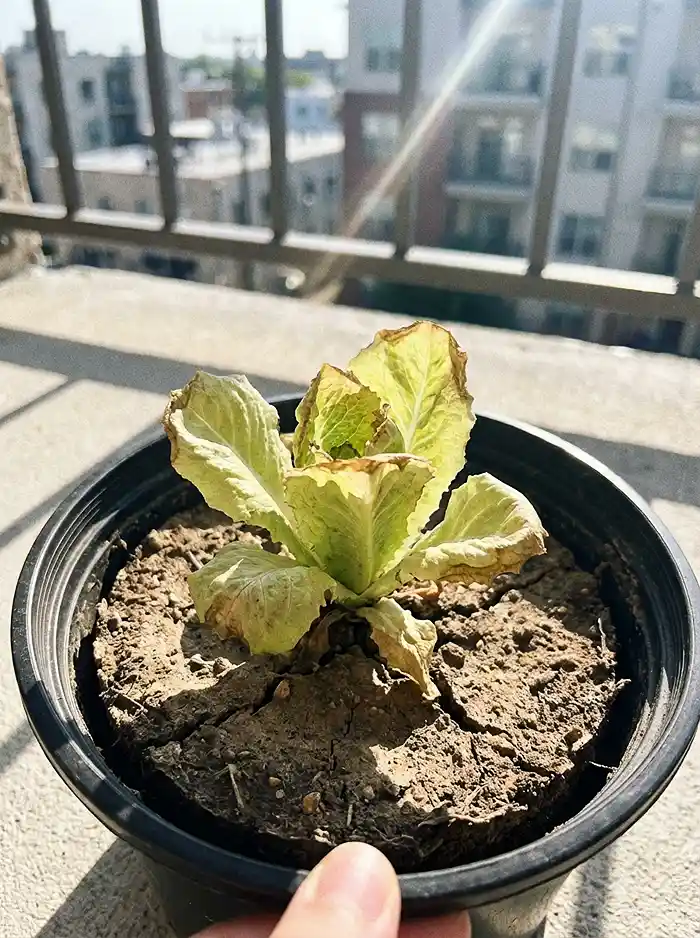
Black plastic is the worst offender. It absorbs solar radiation like a parking lot in July. Root-zone temps can hit 120 °F on a sunny day. Your greens never stood a chance.
Unglazed terracotta is a step up. Moisture seeps through those porous walls, creating evaporative cooling that drops root temps five to ten degrees below plastic. The catch? Your soil dries out faster, so you’re watering more often.
Fabric grow bags are my personal favorite for greens. They allow air exchange from every direction, keep root temperatures the most stable, and naturally air-prune roots so they don’t circle and strangle themselves. The only downside: you’ll be watering more frequently.
Here’s a quick scoring system I use when choosing containers:
| Pot Material | Heat Absorption | Evaporative Cooling | Thermal Buffer Score |
|---|---|---|---|
| Black Plastic | High | None | 3 / 10 |
| Glazed Ceramic | Medium | Minimal | 5 / 10 |
| Unglazed Terracotta | Medium | Moderate | 7 / 10 |
| Fabric Grow Bag | Low | High | 8 / 10 |
If your greens keep failing in full sun and you’re using dark plastic pots, honestly, just switching the container might solve everything.
Decoding Yellow Leaves: The Chlorosis Matrix
Alright, let’s talk about the thing that sends every container gardener into a spiral: yellow leaves. The moment you notice them, the instinct is to grab fertilizer. Don’t. Not yet. The yellowing pattern is actually telling you exactly what’s wrong — if you know how to read it.
| Yellowing Pattern | Probable Deficiency | Which Leaves Are Affected |
|---|---|---|
| Uniform yellowing, bottom up | Nitrogen (N) | Oldest / lower leaves |
| Green veins, yellow between — top of plant | Iron (Fe) | Newest / upper leaves |
| Green veins, yellow between — bottom of plant | Magnesium (Mg) | Oldest / lower leaves |
| Yellow edges with scorching | Potassium (K) | Oldest / lower leaves |
When Everything Turns Yellow From the Bottom Up — That’s Nitrogen
Nitrogen is what’s called a mobile nutrient. When the plant runs low, it literally cannibalizes its own oldest leaves, strips the nitrogen out, and ships it upward to feed new growth. It’s ruthless but efficient.
The problem in containers? Nitrogen washes out with every single watering. In the ground, there’s a massive soil reservoir to buffer this. In a 12-inch pot, there’s not. A half-strength liquid fertilizer applied weekly usually corrects this within days.
Interveinal Chlorosis: Same Look, Completely Different Problem
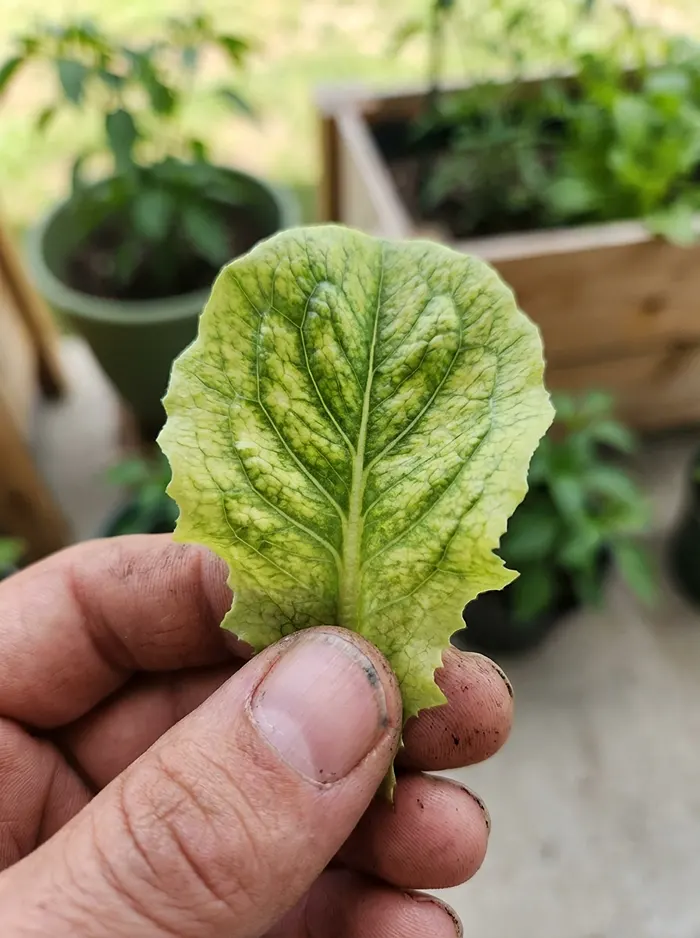
This is the tricky one. You see green veins with yellow tissue between them and think “that’s obviously one thing.” Nope. It’s two completely different deficiencies depending on where on the plant it shows up — and this is where most container gardening mistakes in diagnosis happen.
Iron deficiency hits the youngest leaves at the top. Iron can’t move within the plant (it’s immobile), so new growth starves first.
Magnesium deficiency hits the oldest leaves at the bottom. Magnesium is mobile — the plant drains it from old leaves to feed young ones.
Same visual. Opposite location. Get it backwards and you’ll apply the wrong fix entirely.
The Real Culprit Nobody Checks: pH Lockout
Here’s the insight that’ll save you more containers than any fertilizer ever will. Most yellowing in pots is a pH problem, not a nutrient problem.
When your substrate pH climbs above 7.0–7.5, iron, manganese, and zinc become chemically locked in the soil. They’re right there, but roots can’t access them. It’s like having a fridge full of food and no way to open the door.
Alkaline tap water is usually the culprit. Before you add a single drop of fertilizer to a yellowing plant, grab a ten-dollar soil pH probe. If you’re above 7.0, acidify first.
According to Clemson Cooperative Extension’s guide on changing soil pH, incorporating sulfur or using naturally acidic amendments like peat moss are among the most effective long-term solutions. A peat-based or coco-coir mix naturally buffers in the 5.5–6.5 sweet spot that greens love.
The “Emergency Escape Plan”: Stopping Bolting Before It Starts
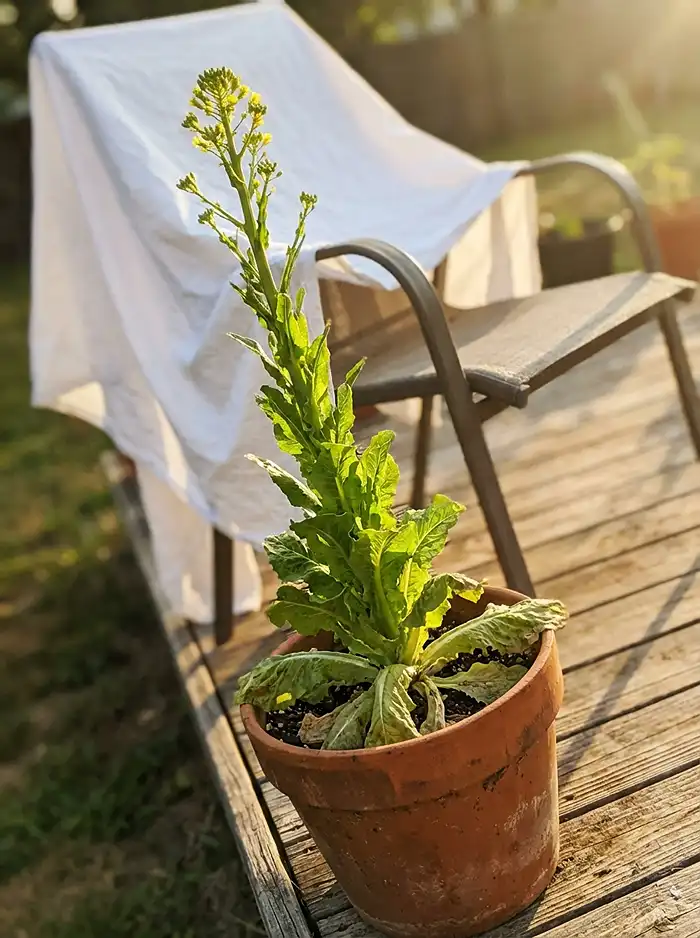
If you’ve ever grown lettuce only to have it suddenly shoot up a tall stalk, flower, and become inedibly bitter in what felt like overnight — congratulations, you’ve experienced lettuce bolting. It’s not random. It’s not your fault (mostly). It’s biology.
It’s Not Just About Heat — Light Hours Matter Too
Bolting is triggered by two independent signals, and this is where it gets interesting.
Day length is the sneaky one. Spinach is a long-day plant — once it’s getting more than 13 hours of light, it flips the reproductive switch and starts flowering. Doesn’t matter if the temperature is perfect. The light hours alone are enough.
Root-zone heat is the other trigger. Lettuce bolts when soil temps consistently sit above 80 °F, even under shorter days.
And guess what makes both triggers worse? The amplified microclimate inside your container. Hot pot walls jack up root temps. Reflective balcony surfaces bounce extra light around. Your greens are getting hit from every angle.
Pick Varieties That Are Built to Resist
Honestly, choosing slow-bolt cultivars is the single highest-return move you can make. It buys you two to four extra weeks of harvest before the plant decides it’s done being a salad and wants to become a flower instead.
My go-to recommendations:
- Lettuce: ‘Jericho’ (romaine), ‘Nevada’ (Batavian), ‘Buttercrunch’ (butterhead), ‘Black Seeded Simpson’ (loose-leaf), ‘All the Year Round’ (the name tells you everything)
- Spinach: ‘Bloomsdale Long Standing,’ ‘Tyee’
- Arugula: ‘Astro’ — it grows so fast you can harvest before bolting even becomes an issue
If you’re brand new to growing greens in containers, our guide on how to grow salad greens in small planters walks you through the full setup step by step.
The 8-Hour Light Hack
This is my favorite trick for summer growing. I physically limit my greens containers to eight hours or fewer of direct sunlight. Morning sun from roughly 6 AM to 2 PM, then I roll them into building shadow or drape a 40% shade cloth over the top.
Cutting the photoperiod below the critical threshold tricks long-day plants like spinach and cilantro into staying vegetative. They literally don’t know it’s summer. Combine this with heat-resistant varieties and you’ve basically hacked the system.
Wilting Container Greens: What’s Actually Going Wrong
Here’s where people get into real trouble. Your greens are wilting, so you water more. They wilt harder. You water even more. They die. Sound familiar?
Wilting doesn’t always mean “thirsty.” Sometimes it means the exact opposite.
The Morning Recovery Test
This is the simplest diagnostic tool I know, and it costs nothing.
Check your plant at 6–7 AM, before the sun hits the container.
If it’s perked back up overnight: that’s just heat wilt. The plant was losing water through its leaves faster than roots could replace it during the hot afternoon, but the soil still had moisture. The solution is more shade, not more water.
If it’s still drooping at dawn: that’s true drought. The root zone genuinely ran dry. Water immediately and seriously consider whether your pot is big enough.
The Overwatering Paradox (This One’s a Killer)
This is the number one reason container greens die, and it’s completely counterintuitive. When roots sit in waterlogged, oxygen-depleted soil, they suffocate. Dead roots can’t absorb water. So the plant wilts — even though it’s sitting in a swamp.
Your brain screams “it’s wilting, add water!” and you make it worse. Every. Single. Time.
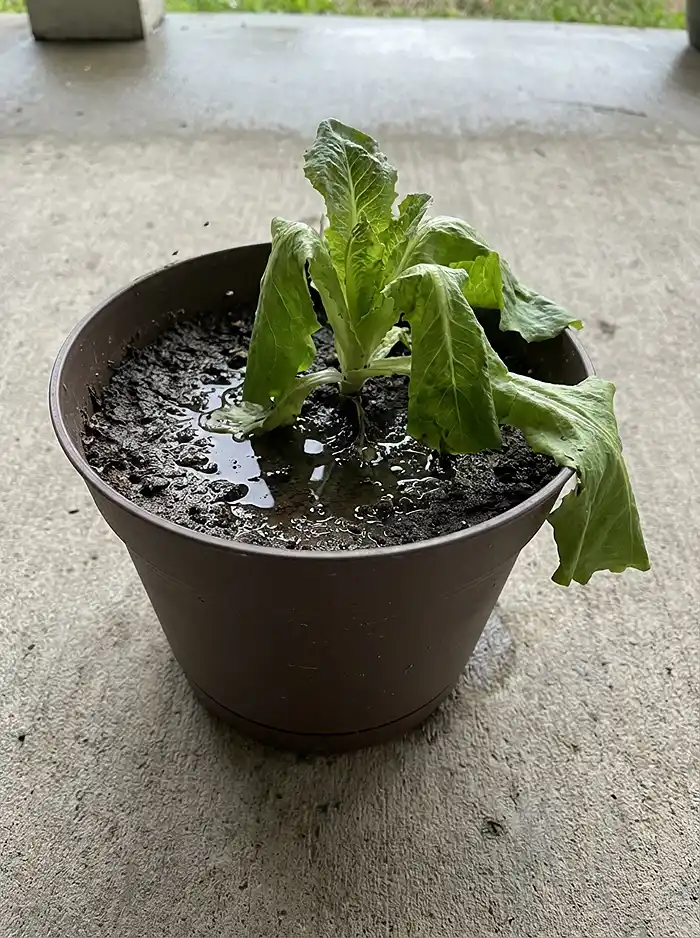
The telltale signs: soft mushy stem base, a funky smell from the soil, and those annoying little fungus gnats circling the surface.
The fix isn’t about watering less — it’s about structure. Make sure drainage holes are clear. Elevate pots on feet for airflow underneath. And switch to a chunkier substrate with perlite or pumice so water actually moves through instead of pooling.
When It’s Something Worse: Fusarium & Verticillium Wilt
If you’ve ruled out water issues and your plant is still wilting progressively, it’s time to suspect soil-borne fungal pathogens. These are the container garden villains nobody wants to meet.
Fusarium often causes one-sided wilting — half your plant droops while the other half looks fine. You’ll see V-shaped brown lesions on leaves. Cut the stem open and there’s reddish-brown vascular staining inside, like the plant’s veins are infected. Because they are.
Verticillium works more evenly, killing from the bottom up.
Both survive in contaminated soil, which is exactly why using unsterilized garden soil in containers is such a gamble. Potting mix vs garden soil isn’t just a texture preference — it’s a disease prevention strategy. If you spot these symptoms, remove the plant, throw out the soil (don’t compost it), and bleach the container before replanting.
7 Container Gardening Mistakes You Can Prevent Starting Today
Everything above is diagnosis. This section is prevention. Follow these seven protocols and you’ll eliminate most problems before they ever show symptoms.
1. The 12×12 Rule. Minimum container size: 12 inches wide, 12 inches deep. That gives you roughly 15 liters of substrate — enough buffer to survive a missed watering and enough room for roots to actually develop properly.
2. Substrate Engineering. Garden soil in a container is a death trap. It compacts, drowns roots, and carries pathogens. Use a proper mix: 40% peat or coco coir, 30% perlite, 20% compost, 10% vermiculite. Replace or refresh it every season.
3. Strategic Shadow Management. Morning sun, afternoon shade. That’s the default. Morning light gives your greens the energy they need without the brutal thermal load of late-day sun that cooks root zones on west-facing balconies.
4. Living Mulch with the Thriller-Filler-Spiller Method. Don’t leave soil exposed. Plant a tall central green like kale (thriller), surround it with mid-height lettuce (filler), and let something like nasturtium or sweet alyssum trail over the edge (spiller). The canopy covers soil, cuts evaporation, and looks fantastic.
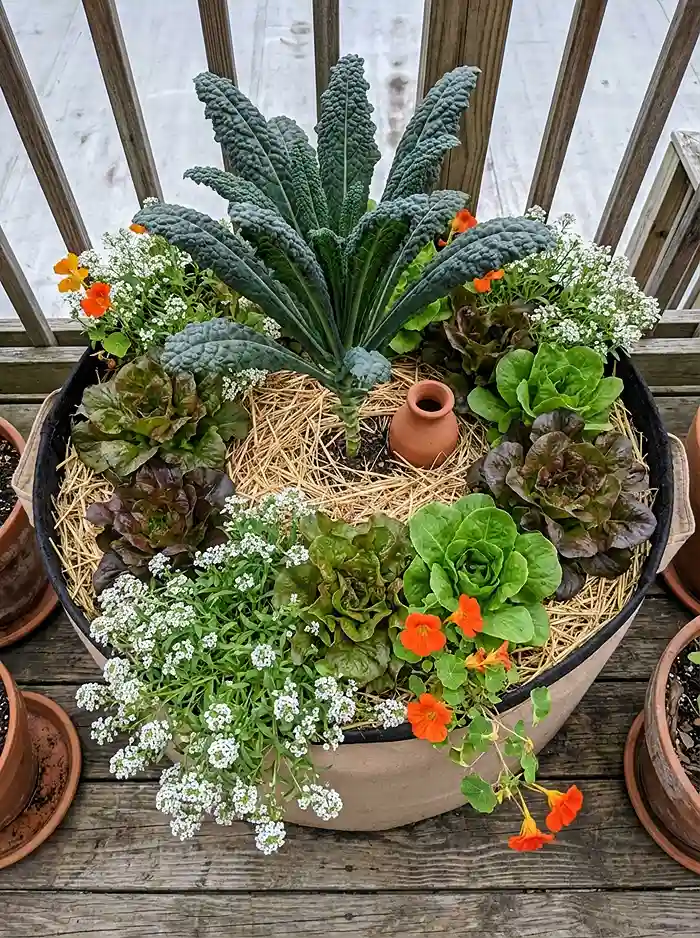
5. Hydration Consistency with Ollas or Sub-Irrigation. Bury a clay olla in your substrate — water seeps through the porous walls at exactly the rate the plant needs. Or use a sub-irrigation planter with a bottom reservoir. Either way, you eliminate the boom-and-bust watering cycle that triggers half the container gardening mistakes on this list.
6. Weekly Weak Feeding. Forget heavy monthly fertilizer dumps. Dilute a water-soluble fertilizer to quarter strength and apply it with every watering. It mimics the slow, steady nutrient delivery of healthy ground soil and prevents the salt buildup that causes nutrient lockout.
7. Succession Staggering. Plant new greens every 10–14 days. No matter how perfect your system is, every planting eventually bolts. Staggered sowings mean that when one batch flowers out, the next one is at peak harvest. You’ll never go without salad again.
Frequently Asked Questions
Can you eat bolted lettuce?
You can, but you probably won’t enjoy it. Once lettuce bolts, it produces a milky white sap (sesquiterpene lactones) that tastes extremely bitter. If you catch it early — right when the central stalk starts elongating — the leaves are only mildly bitter and work fine in cooked dishes like stir-fries or soups where heat tames the flavor.
Why is my potting soil crusting on the surface?
That crust forms when rapid evaporation pulls dissolved salts and fine soil particles to the top. It’s a sign your soil surface is naked and baking. Fix it by adding an inch of organic mulch, watering deeply to full runoff instead of quick splashes, and gently breaking the crust with a fork to let air back in.
Do yellow leaves ever turn green again?
Sometimes, yes — but only if the cause was a mobile nutrient deficiency like nitrogen or magnesium. Once you correct the shortage, partially yellowed leaves can regain color. But if the tissue has fully died off, or if the damage came from sunscald, frost, or a pathogen, that leaf is done. Pinch it off and let the plant redirect energy to healthy new growth.
Stop Reacting — Start Preventing
If there’s one thing I want you to take away from this entire guide, it’s this: prevention beats cure every single time. Every symptom we covered — yellowing, lettuce bolting, wilting container greens — traces back to the amplified microclimate that containers create. And every fix traces back to building the right system before problems start.
Diagnose in this order: environment first, root zone second, nutrient access third, light exposure last. Never start with fertilizer. And remember that container gardening isn’t harder than growing in the ground — it’s just less forgiving when you ignore the basics.
Set up the right pot, the right substrate, the right light management, and a consistent feeding and planting schedule. After that? You’re basically just harvesting.
Want all of this in one quick-reference page? Download our free “Container Green Stress Triage” printable chart — a one-page flowchart that walks you from symptom to diagnosis to fix in under 60 seconds. Print it, stick it next to your pots, and never second-guess a yellow leaf again.