

How to Tell If Potting Soil Is Still Good
Knowing how to tell if potting soil is still good is one of the most valuable skills in container vegetable gardening — and most balcony gardeners skip it entirely.
Blindly tossing last season’s mix wastes real money. A quality organic potting blend runs $25 to $40 per cubic foot. But planting straight into exhausted, infected dirt is worse.
This guide walks you through every physical, biological, and chemical check you need to make a confident decision: reuse, amend, or discard.
Table of Contents
The Financial and Horticultural Value of Testing Soil Health
I grow vegetables in pots on a south-facing fire escape in zone 6b. Every spring, I used to dump everything and start fresh. Then I did the math: six large containers at $30 of soil each adds up fast.
The turning point came in 2022 when I reused a pot that had hosted a diseased pepper. I lost the entire next crop of ‘Sungold’ tomatoes to fusarium within three weeks. That failure taught me that the answer isn’t always “throw it out” or “keep it.” The answer is audit it first.
A proper inter-season soil audit takes about 20 minutes per container. It tells you exactly what you’re working with before a single seed hits the dirt.
Visual and Tactile Inspections: The First Line of Defense
Before you worry about pH strips or pest larvae, use your hands. A physical triage takes two minutes and immediately rules out the worst problems.
You’re checking for two things: structure and hydration. Both are visible and tactile. No tools required for this first pass.
The Squeeze Test for Compaction and Aeration
Quick Answer: Grab a fist-sized handful of damp (not soaking) soil. Squeeze it firmly, then poke it with your finger. If it holds a dense, clay-like shape and doesn’t crumble, the peat moss has broken down and the soil is too compacted for healthy roots.
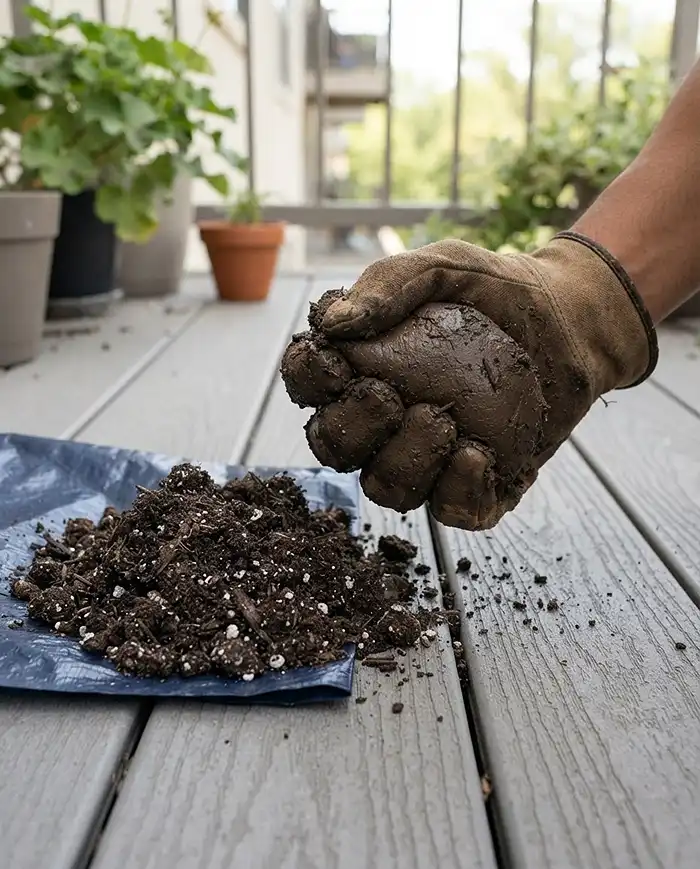
Good potting mix should fall apart easily when you release your grip. It should feel loose, slightly springy, and granular — not smooth and dense like modeling clay.
Compacted soil suffocates roots. Even if there’s no disease present, plants in compacted containers stall out within two weeks of germination. Oxygen can’t reach the root zone, and water either pools on top or channels straight through without absorbing.
This is especially critical for the best soil mix for container vegetables: it must drain freely while retaining enough moisture to sustain plants between waterings.
Pro Tip: If the squeeze test fails but the soil is otherwise disease-free, you don’t have to throw it away — see the 50/50 refresh ratio below.
Spotting Hydrophobic Peat Moss and Shrinkage
Quick Answer: Pour a small amount of water onto the soil surface and watch for two seconds. If water instantly pools on top and runs down the gap between the soil and the pot wall, the peat moss has gone hydrophobic and must be treated before reuse.
Hydrophobic soil literally repels water. The peat moss has fully decomposed, lost its sponge-like structure, and now sheds moisture instead of absorbing it. You’ll also notice the soil has shrunk — there may be a half-inch to full-inch gap between the soil surface and the rim of the pot.
To test conclusively, drop a small clod of dry soil into a glass of water. If it floats and stays dry in the center, it’s hydrophobic. A surfactant (like a drop of plain dish soap mixed into a watering can) can rehydrate mild cases.
Severe shrinkage — more than an inch — usually means the organic matter is too depleted to recover with amendments alone. Factor this into your final decision.
Diagnosing Biological Health: Pests, Weeds, and Fungi
Once you’ve checked the physical structure, it’s time for a forensic examination of the old root ball. Overwintering threats hide in the soil and activate the moment temperatures rise — often before you notice anything is wrong.
Dump the pot onto a tarp or into a wheelbarrow so you can spread the soil out and actually see what you’re dealing with.
Identifying Overwintering Pests and Root-Knot Nematodes
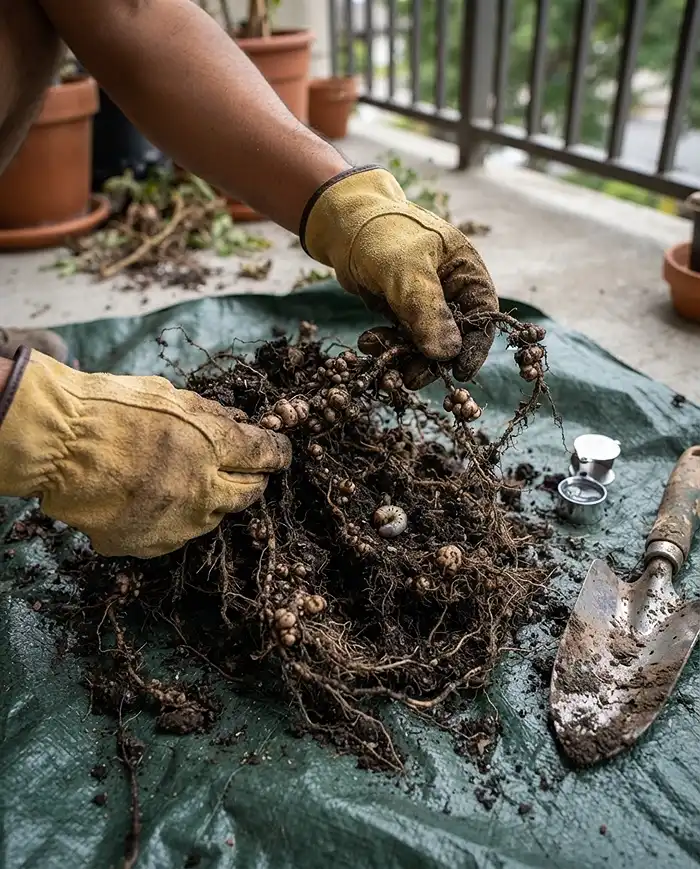
Quick Answer: Sift slowly through the old root ball with gloved hands. You’re looking for white C-shaped grub larvae, small brown pupae (fungus gnat cocoons), or swollen, knotty growths on old root tissue. Any of these means the soil needs intervention before reuse.
Fungus gnat larvae are tiny — about 1/4 inch — and translucent white with a black head. They live just below the soil surface and chew through seedling roots in spring. I found a cluster of them in a pot of old basil soil last fall, which explained why my herb seedlings kept collapsing at the stem.
Root-knot nematodes are trickier. You won’t see the nematodes themselves, but you’ll see their damage: irregular, swollen galls on the dead roots of your previous plant. If you grew tomatoes, peppers, or cucumbers and the roots look like a lumpy chain of beads, discard that soil immediately. Root-knot nematodes will devastate the next crop.
Pro Tip: Sift through the entire root ball, not just the surface. Larvae and pupae shelter deep in the mass where it stays warm.
Good Fungi (Mycorrhizae) vs. Bad Fungi (Mold and Blight)
Quick Answer: Fine, white, thread-like strands woven through the soil are mycorrhizal fungi — beneficial and worth preserving. Fuzzy gray surface growth, slimy black patches, or a powdery white coating on the soil are signs of harmful mold or fungal blight that should trigger serious concern.
Mycorrhizal networks look almost like a spider’s web running through the soil. They’re dry, delicate, and integrated into the soil structure. These fungi form symbiotic relationships with plant roots and genuinely improve nutrient uptake. Don’t mistake them for disease.
Bad fungi look different. Gray botrytis mold is fuzzy and concentrated. Dark pythium rot is slimy and often smells. White powdery mildew on the soil surface is gritty, not thread-like. If you see any of these, that container needs the disease rule treatment below.
Evaluating Nutrient Depletion and Soil Chemistry
Soil can pass all the physical and biological checks and still be nutritionally bankrupt. This is the most commonly overlooked step in container garden tips guides — and the most likely reason your second-season crops underperform.
Nutrients don’t regenerate on their own. Every plant that grew in that pot extracted nitrogen, phosphorus, potassium, and calcium from the soil. Unless you put them back, they’re gone.
Recognizing Signs of Macronutrient Exhaustion from Previous Crops
Quick Answer: If your container hosted heavy-feeding crops last season — tomatoes, peppers, eggplant, or squash — treat that soil as nitrogen-depleted and phosphorus-stripped by default, regardless of how it looks.
Nightshades are the hungriest crops you can grow in vegetables in pots. A single tomato plant in a 15-gallon container will consume nearly all available nitrogen by midsummer, and the fertilizer you applied during the season doesn’t leave any behind once the plant is removed.
Lighter crops — lettuce, herbs, radishes — are less exhausting. Soil that hosted a spring crop of ‘Black Seeded Simpson’ lettuce or ‘French Breakfast’ radishes will be in much better shape than soil that spent all summer feeding a ‘Cherokee Purple’ tomato.
Use crop history as your first indicator. Then confirm with a pH test before making any amendment decisions.
Conducting a DIY pH Test for Container Soil
Quick Answer: Take a tablespoon of moist soil and drop it in a small dish. Add white vinegar — if it fizzes, the soil is alkaline (above 7.0). Take a second sample, add water to make a paste, then add baking soda — if it fizzes, the soil is acidic (below 7.0). No reaction to either means you’re in the neutral zone.
This test isn’t precise, but it tells you direction. Most container vegetable gardening crops want a pH between 6.0 and 7.0. For a more accurate reading, a basic pH meter from any nursery costs under $15 and will give you a digital readout in seconds.
Soil that has received heavy synthetic fertilizer inputs over a full season often drifts acidic. Tap water high in calcium and magnesium (common in urban areas) pushes pH alkaline over time. Either direction reduces nutrient availability even if those nutrients are physically present in the soil.
Pro Tip: As of spring 2025, inexpensive 3-in-1 soil meters that measure pH, moisture, and light simultaneously are widely available for under $12 online and are accurate enough for container use.
The Decision Matrix: To Reuse, Amend, or Discard
After your audit, you need a firm rule to follow — not a feeling. Here’s the framework I use for every container before each new planting season.
| Soil Condition | Decision | Action |
|---|---|---|
| Previously hosted diseased plants (blight, mosaic, fusarium) | Discard | Seal in trash bag. Do not compost. |
| Root-knot nematode galls found | Discard | Bag and bin. Do not reuse under any conditions. |
| Grub larvae or fungus gnat pupae present | Amend | Solarize outdoors 1 week, then treat with beneficial nematodes. |
| Compacted but disease-free | Amend | Apply 50/50 refresh ratio (see below). |
| Hydrophobic but otherwise healthy | Amend | Rehydrate with surfactant, then refresh 30-50%. |
| Nutrient-depleted, good structure, no disease | Reuse with amendments | Add compost, worm castings, and balanced organic fertilizer. |
| Passed all checks, hosted light crops | Reuse as-is | Top-dress with 1-2 inches of compost. Adjust pH if needed. |
The Disease Rule: When to Absolutely Throw Soil Away
Quick Answer: Any soil that hosted a plant killed by late blight, tobacco mosaic virus, fusarium wilt, or verticillium wilt must be permanently discarded. Seal it in a heavy-duty plastic bag and put it in the trash. Never compost it.
These pathogens are not killed by standard composting temperatures. Fusarium oxysporum can survive in soil for years. Late blight spores (Phytophthora infestans) overwinter on infected plant debris and will immediately infect new crops the following season.
Signs the previous plant died from disease rather than neglect: rapid wilting that didn’t respond to watering, black or brown vascular tissue inside the stem when you cut it, yellow mosaic patterns on old leaves, or stem lesions at the soil line.
If you’re unsure what killed last season’s plant, err toward discard. A bag of potting soil is significantly cheaper than a failed crop.
Calculating the 50/50 Refresh Ratio for Healthy Soil
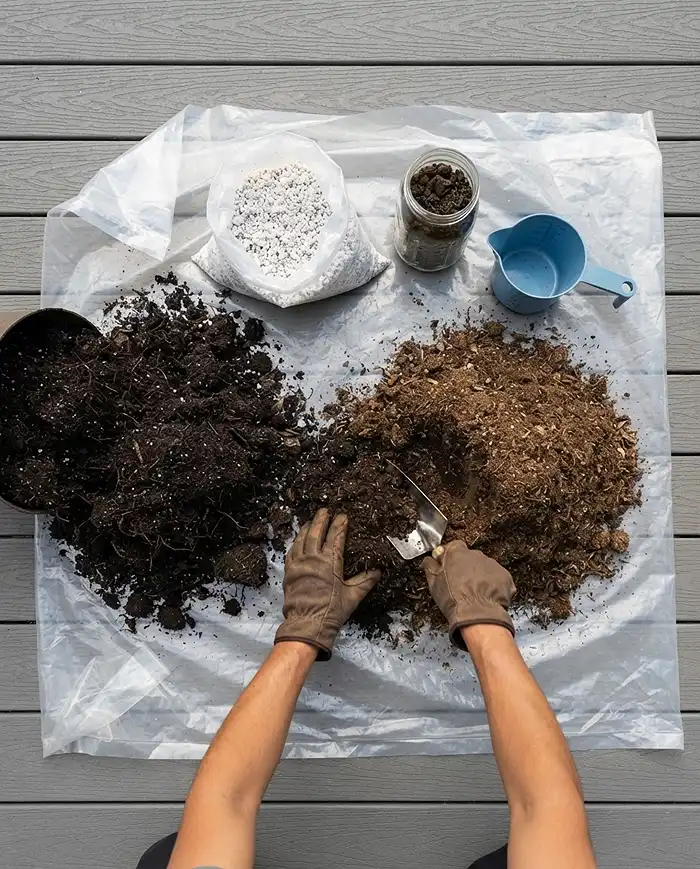
Quick Answer: For compacted, nutrient-depleted but disease-free soil, remove the old root ball and blend the remaining soil 50/50 with fresh organic compost, adding 10-15% coarse perlite by volume to restore drainage.
This is the single most reliable rejuvenation method I’ve found after six seasons of growing fall container vegetables in urban spaces. It’s not just about volume — it’s about restoring what’s missing.
- Old soil contributes: remaining mineral content, beneficial microbial memory, residual mycorrhizal networks
- Fresh compost contributes: organic matter, macronutrients, new microbial populations
- Perlite contributes: aeration, drainage channels, long-term structural support
Add a handful of worm castings per gallon of total mix. They’re mild enough not to burn seedlings and provide a slow-release nitrogen hit that early-stage roots can actually use.
Step-by-Step Guide to Rejuvenating Approved Soil
Once you’ve confirmed your soil passes the disease and pest checks, here’s the exact process I follow every season. It takes about 30 minutes per container.
- Dump everything onto a tarp. Remove the old root ball by hand. Shake the roots loose over the tarp to recover as much soil as possible.
- Sift out all root material. Dead roots left in the mix decompose anaerobically and create pockets of rot. Use a 1/2-inch hardware mesh screen or a cheap soil sifter.
- Crush any compacted clods. Break up dense chunks by hand or with a trowel. Clods don’t absorb water or compost evenly.
- Measure and blend. For every bucket of old soil, add one bucket of fresh organic compost and about 1/4 bucket of coarse perlite. Mix thoroughly.
- Water with compost tea. Mix a cup of finished compost into a gallon of water, let it steep for an hour, and water the newly blended soil before planting. This reintroduces aerobic bacteria and wakes up dormant microbial populations.
- Let it rest 48 hours. If possible, let the amended mix settle in the container before planting. This gives microbes time to establish and lets you catch any drainage problems.
For more ideas on what to plant into your refreshed containers, the guide to fast-growing fall root vegetables in pots pairs well with newly amended soil that’s rich in phosphorus.
Seasonal Maintenance to Preserve Soil Structure
Rejuvenating soil once is worth nothing if you don’t maintain it through the growing season. Structure breaks down fast under daily watering, root pressure, and heat.
- Top-dress with 1/2 inch of compost every 6 weeks during the active growing season
- Avoid over-compacting the surface when transplanting — press in gently, don’t pack
- Mulch the soil surface with straw or coco coir to reduce compaction from watering impact and slow evaporation
- Flush containers deeply once a month to prevent fertilizer salt buildup before it crusts
- In hot weather, use a moisture meter rather than guessing — overwatering accelerates organic matter breakdown faster than anything else
These habits compound. Soil maintained this way season after season develops a living microbial community that actually improves plant performance over time.
If you’re planning a cool-season rotation, check out cool-season shade container combos — many of those crops are light feeders that go easy on your newly refreshed soil.
Common Problems and Solutions
Even after a thorough audit, you may uncover issues mid-process. Here’s how to handle the two most common ones without starting over.
Foul, Swampy Smells Indicating Anaerobic Soil
Quick Answer: A rotten-egg or sulfur smell means anaerobic bacteria have colonized the soil due to poor drainage and oxygen deprivation. Either discard it or solarize it outdoors for 7-10 days before amending.
Anaerobic soil isn’t automatically a death sentence, but it needs oxygen before it can support plant life again. Spread it in a thin layer — no more than 2 inches deep — on a tarp in full sun. Turn it daily. After a week, the smell should dissipate and aerobic bacteria will begin to recolonize.
After solarizing, treat it as nutrient-depleted and apply the full 50/50 refresh ratio before using it in any containers with vegetables in pots.
Thick White Mineral Crusts on the Soil Surface
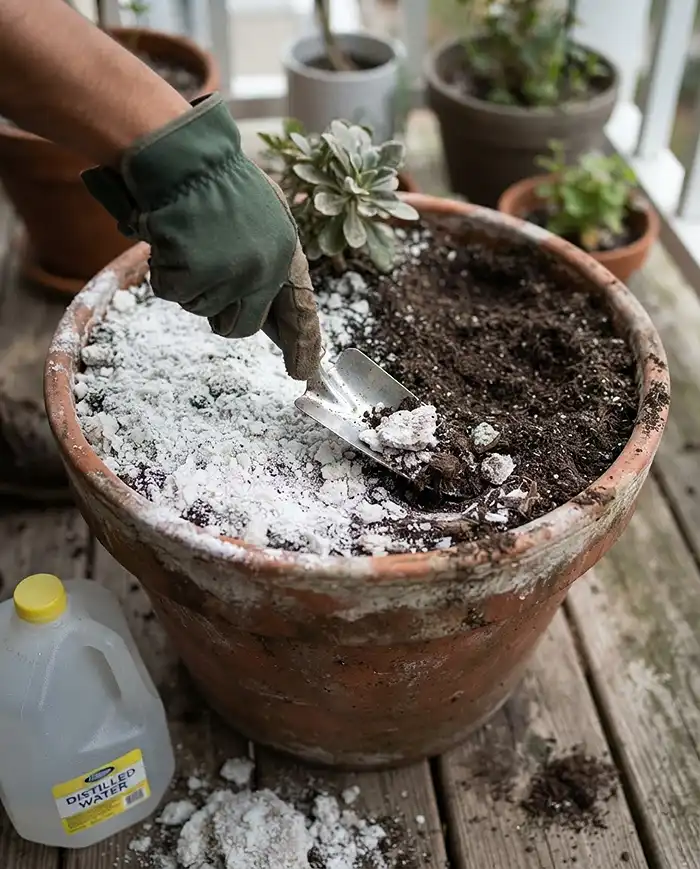
Quick Answer: A hard white crust on old container soil is accumulated fertilizer salts and calcium from tap water. Scrape off and discard the top 2 inches, then flush the remaining soil deeply and slowly with distilled or rainwater.
This crust raises soil pH and blocks moisture penetration. Don’t mix it into the rest of the soil — scrape it clean and trash it. Then set the container in a tray and slowly pour distilled water through it until the runoff from the drainage holes runs clear.
Allow the soil to fully dry between flushes. One deep flush isn’t enough for severely crusted containers — plan on two or three over a week before the salt levels drop to a safe range.
Frequently Asked Questions
How many seasons can I reuse the same potting soil?
Indefinitely, if you manage it properly. Audit for disease and pests between every planting, sift out all dead root material, and amend with 30% to 50% fresh compost and perlite each cycle. A high-quality organic base can last for many years with consistent maintenance.
Can I bake old potting soil in the oven to sterilize it?
It works, but it’s a bad idea for indoor use. Baking soil at 180 to 200 degrees Fahrenheit for 30 minutes kills pathogens — but it also destroys every beneficial microbe, creates a genuinely terrible smell indoors, and leaves you with biologically dead dirt. You’d need to fully reinoculate with compost and mycorrhizal inoculant before it could support plant life.
What should I do with potting soil that is too diseased to reuse?
Seal it immediately in a heavy-duty plastic garbage bag and put it in the municipal trash. Never dump diseased soil into a community garden, flower bed, or home compost pile. Standard composting temperatures do not get hot enough to destroy fusarium, late blight, or viral pathogens.
How do I know if my old soil has root-knot nematodes?
Pull out the dead root system from the previous plant and inspect it closely. Root-knot nematodes leave swollen, irregular galls — rounded lumps fused onto the root tissue. They look distinctly different from healthy root nodules, which are small and uniform. If you see knotty galls, discard that soil entirely.
Is it safe to add new seedlings to freshly amended soil?
Yes, with one caveat: let the amended soil rest in the container for 48 hours before planting. This gives the new compost and old soil time to integrate, lets you spot any drainage issues, and allows a brief microbial reactivation period that benefits early root development.
Key Takeaways
- Knowing how to tell if potting soil is still good starts with three checks: physical structure, biological health, and soil chemistry — in that order.
- Any soil that hosted a plant killed by late blight, fusarium wilt, or mosaic virus must be sealed and trashed — no exceptions, no composting.
- Disease-free but depleted soil can be fully restored with the 50/50 refresh ratio: equal parts old soil and fresh compost, plus 10-15% coarse perlite by volume.
- Test pH before planting — continuous fertilizer use and hard tap water both shift pH outside the 6.0 to 7.0 range that most container vegetables need for nutrient uptake.
- For more guidance on container vegetable gardening by season, use the University of Minnesota Extension’s container gardening for vegetables guide as a companion reference for variety selection and container sizing.