

Pot Size for Tomatoes Peppers and Cucumbers
Getting the pot size for tomatoes peppers and cucumbers wrong is the fastest way to ruin a container garden season. I grow all three on a south-facing rooftop deck in zone 6b, and the difference between a 5-gallon and a 15-gallon container is the difference between a struggling plant and an actual harvest.
This cheat sheet gives you exact gallon capacities and physical dimensions — no vague ranges, no guessing.
Table of Contents
The Secret to High-Yield Container Vegetables
Heavy-feeding summer vegetables don’t just need soil — they need volume. Tomatoes, peppers, and cucumbers all have deep, aggressive root systems that must anchor the plant, absorb water, and store nutrients simultaneously.
When roots hit the container wall and start circling, everything stalls. You’ll see slow growth, yellowing leaves, and flowers that drop before setting fruit. The fix isn’t more fertilizer — it’s a bigger pot from the start.
Matching container volume to mature root depth is the single most important decision you make in container vegetable gardening. Get it right on day one, and the rest of the season takes care of itself.
Understanding Container Measurements: Gallons vs. Inches
Seed packets list gallon capacities. Nurseries sell pots by diameter in inches. These two systems don’t talk to each other cleanly, which causes a lot of confusion at the garden center.
A quick rule of thumb: a pot that’s 12 inches in diameter and 12 inches deep holds roughly 5 gallons. A 16-inch pot at the same depth holds about 10 gallons. Always verify with the product listing — diameter alone won’t tell you depth, and depth matters enormously for tap-rooted crops.
True Gallons vs. Nursery “Trade” Gallons
Here’s a gotcha that trips up a lot of gardeners: a horticultural “trade gallon” is not the same as a standard liquid gallon.
A trade gallon equals roughly 0.71 liquid gallons. So a pot labeled “1 gallon” at a nursery holds less than a true liquid gallon of soil. This discrepancy grows fast when you scale up — a “5-gallon” nursery pot may only hold 3.5 true gallons of potting mix.
For fruiting crops like tomatoes and cucumbers, always size up one tier when buying standard plastic nursery pots. If the recommendation says 10 gallons, buy a 12- or 15-gallon nursery container to compensate.
Why Depth Is Critical for Heavy Feeders
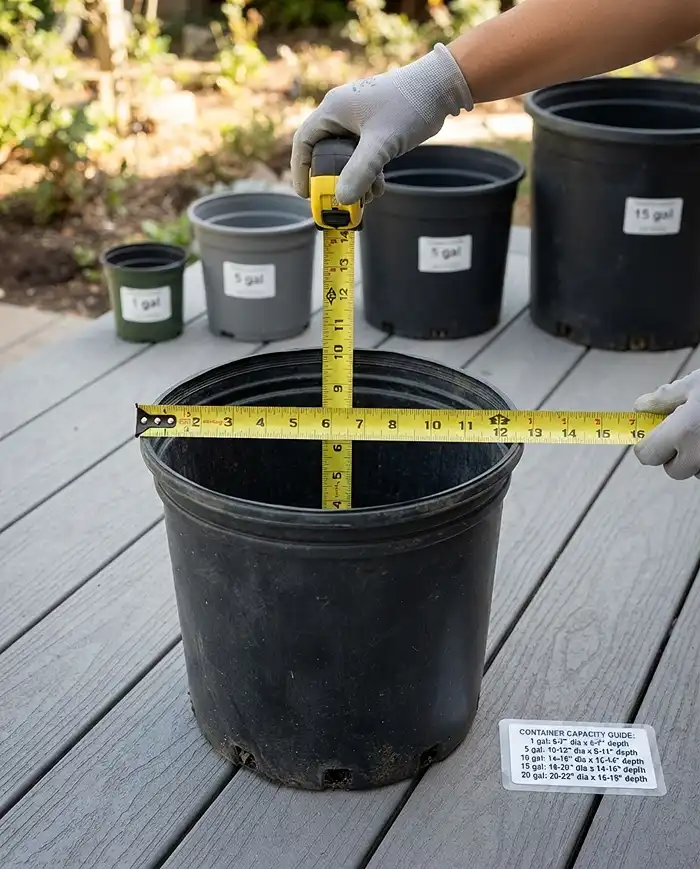
Nightshades (tomatoes, peppers) and cucurbits (cucumbers) both produce substantial tap roots that drive straight down before branching laterally. They need vertical depth first, width second.
A squat, wide, shallow pot — even one that technically holds enough gallons — will cause problems. Roots reach the bottom, hit hard drainage rock or the pot floor, and start compacting into a dense mat.
The minimum depth for any of these three crops is 12 inches. For indeterminate tomatoes, aim for 18 inches deep. Check the physical dimensions before you buy, not just the gallon label.
Tomato Container Size Cheat Sheet
Tomatoes have the widest sizing range of the three crops because it entirely depends on whether you’re growing a compact bush variety or a sprawling vining type. Get this one wrong and no amount of feeding will save the plant.
| Tomato Type | Min. Gallons | Min. Depth | Example Varieties |
|---|---|---|---|
| Determinate (Bush) | 10-15 gal | 12 in | Roma, Patio Princess, Bush Early Girl |
| Indeterminate (Vining) | 15-20 gal | 18 in | Sungold, Early Girl, Cherokee Purple |
| Dwarf/Patio Types | 5-7 gal | 10 in | Tiny Tim, Tumbling Tom, Balcony |
Determinate (Bush) Tomatoes: 10 to 15 Gallons
Determinate varieties stop growing at a set height — usually 3 to 4 feet — and ripen all their fruit in a concentrated 2-to-3-week window. That compact habit makes them ideal for container vegetable gardening on smaller patios.
A 10-gallon container works for ‘Roma’ or ‘Patio Princess.’ Go 15 gallons if you want a safety buffer — the extra soil volume retains more moisture between waterings, which matters during July heat waves.
Last summer I grew ‘Bush Early Girl’ in a 10-gallon fabric grow bag on my rooftop. By mid-August I had 34 tomatoes off one plant. Same variety in a 5-gallon pot the year before? Eleven tomatoes and chronic blossom drop.
Pro Tip: With determinate tomatoes, bury the stem up to the lowest set of leaves when planting — adventitious roots will form along the buried stem and dramatically increase nutrient uptake.
Indeterminate (Vining) Tomatoes: 15 to 20 Gallons
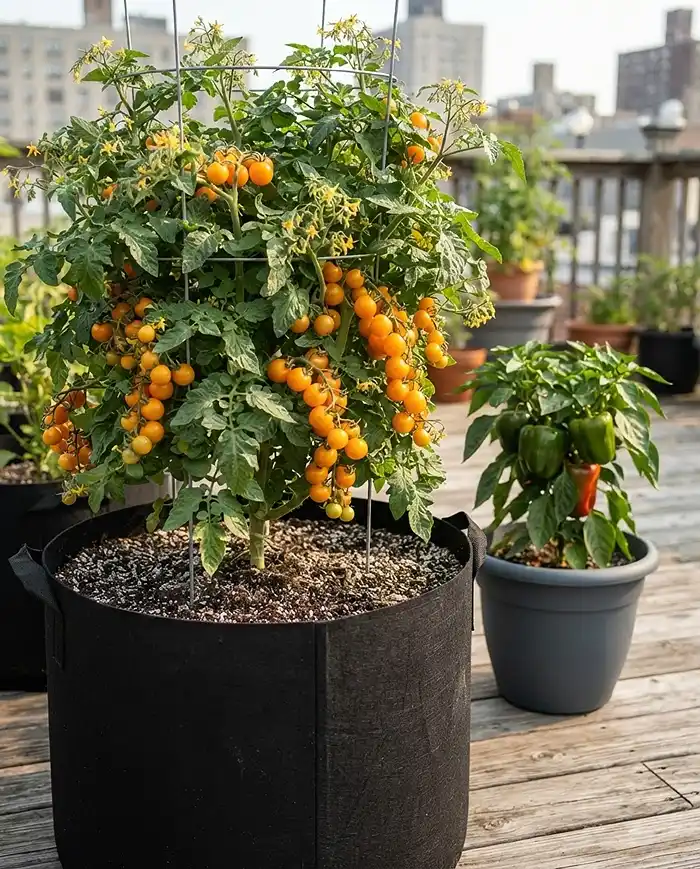
Indeterminate tomatoes never stop growing. ‘Sungold’ will reach 8 feet given the chance. That continuous growth requires a root system large enough to support both the plant’s height and its nonstop fruiting cycle from July through frost.
Go 15 gallons at an absolute minimum. A 20-gallon container is better if you’re growing a heavy producer like ‘Early Girl’ or any beefsteak type. The extra soil weight also serves a structural purpose — it anchors the container against wind when the plant is tall and top-heavy.
I learned this the hard way in 2023. A ‘Cherokee Purple’ in a 10-gallon pot produced beautifully until week six, then crashed hard. Roots had filled every inch of available space and the plant simply couldn’t sustain itself. I repotted mid-season into a 20-gallon and it partially recovered — but I lost three weeks of prime fruiting time.
Pro Tip: Install your tomato cage or stake at planting time, not later. Driving a stake into an established root ball mid-season damages the roots you worked so hard to protect.
Pepper Container Size Cheat Sheet
Peppers in containers are actually more forgiving than tomatoes. Their root systems are more fibrous and lateral, which means they don’t demand quite the same depth. But canopy weight is the real concern — a loaded bell pepper plant in a small pot will topple in the first summer storm.
| Pepper Type | Min. Gallons | Min. Depth | Example Varieties |
|---|---|---|---|
| Small Hot Peppers | 5 gal | 10 in | Jalapeño, Habanero, Thai Hot |
| Large Sweet Peppers | 7-10 gal | 12 in | Bell, Poblano, Anaheim |
| Ornamental/Mini Types | 3-5 gal | 8 in | Lunchbox, Shishito, Aji Charapita |
Small Hot Peppers (Jalapeños, Habaneros): 5 Gallons
Hot peppers actually benefit from slightly tighter container conditions. A 5-gallon pot warms up faster than a massive 15-gallon container, and peppers love warm roots — soil temps around 70°F trigger faster flowering and more concentrated capsaicin production.
I grow ‘Habanero Orange’ in black 5-gallon fabric bags on my rooftop. The dark color absorbs solar heat, and the soil stays warmer than my larger gray resin pots. Those plants consistently flower two weeks earlier than my bell peppers and fruit twice as heavily per plant volume.
Stick to one plant per 5-gallon container for hot peppers. Crowding two plants together in peppers in containers cuts yield per plant by roughly 30% — I’ve tested this side by side.
Pro Tip: Stress-testing hot peppers by letting them dry slightly between waterings (never to wilting) concentrates capsaicin and intensifies heat. Bigger pots make this harder to control.
Large Sweet Peppers (Bell, Poblano): 7 to 10 Gallons
Bell peppers are the heaviest fruiting pepper you’ll grow, and a fully loaded plant is surprisingly top-heavy. A 7-gallon minimum keeps it upright under normal conditions, but a 10-gallon container gives you a true safety margin during thunderstorms.
Poblanos and Anaheims fall in the same range. These are big plants with large fruits, and the extra soil weight of a 10-gallon pot acts as ballast. Use a pot with a wide base-to-mouth ratio — straight-sided containers tip more easily than tapered ones.
Pro Tip: Place a bamboo stake in the pot at planting and loosely tie main branches as the plant loads up with fruit. Even in a 10-gallon pot, a heavy crop of bells can snap a main stem.
Cucumber Container Size Cheat Sheet
Cucumbers in containers are the thirstiest of the three. Their sprawling, fragile root system requires highly aerated, moisture-retentive soil and a container volume large enough to buffer the rapid evaporation that happens during peak summer heat.
| Cucumber Type | Min. Gallons | Min. Depth | Example Varieties |
|---|---|---|---|
| Bush Cucumbers | 5-7 gal | 10 in | Spacemaster, Pickle Bush, Bush Pickle |
| Vining Cucumbers | 10-15 gal | 14 in | Marketmore, Diva, Armenian |
| Mini/Cocktail Types | 5 gal | 10 in | Bush Baby, Miniature White, Iznik |
Bush Cucumbers: 5 to 7 Gallons
‘Spacemaster’ and ‘Pickle Bush’ are the go-to varieties for tight balcony spaces. Their compact vines top out around 2 to 3 feet, making them manageable without a large trellis. A 5-gallon pot is workable; 7 gallons gives better moisture retention.
The biggest mistake with bush cucumbers in containers is underwatering. Even a compact plant pulls a surprising amount of water once it starts fruiting. Inconsistent moisture is the number-one cause of bitter cucumbers — the plant responds to stress by producing cucurbitacin, which is what makes them taste sharp and unpleasant.
Check out the best cucumbers for containers for a full variety breakdown if you’re still deciding what to grow.
Pro Tip: Mix 25% perlite into your potting soil for bush cucumbers. Their roots need oxygen as much as water, and heavy soil compacts fast in smaller containers during repeated watering.
Vining Cucumbers: 10 to 15 Gallons
Traditional vining cucumbers like ‘Marketmore’ or ‘Diva’ can run 6 to 8 feet of vine. That canopy creates enormous transpiration demand — the leaves are pumping moisture out into the air all day, and the roots have to keep up.
A 10-gallon container is the minimum. A 15-gallon pot gives you meaningful drought buffer on 95-degree days when you can’t check on your plants. Place an A-frame trellis in the pot at planting — not beside it — so the trellis weight is supported by the container itself.
The other benefit of a large container for vining cucumbers is structural. A 15-gallon pot filled with moist potting mix weighs 40 to 50 pounds — that’s enough ballast to keep the trellis from tipping when the vines are fully loaded.
Pro Tip: Vining cucumbers in containers benefit enormously from a self-watering insert or a buried reservoir. Even a 15-gallon pot can dry out completely in under 24 hours during a heat wave.
Choosing the Best Container Material
Hitting the right gallon count is half the battle. The container material controls soil temperature and oxygen exchange — two factors that determine how efficiently those roots actually work inside whatever volume you give them.
Fabric Grow Bags for Root Aeration
Fabric grow bags are the best all-around choice for tomatoes and cucumbers. The breathable walls allow air to reach the outer root zone, which triggers “air pruning” — roots that reach the wall desiccate and stop growing instead of circling.
Air-pruned roots branch back inward, creating a dense, fibrous root system that fills the container volume more efficiently than roots in rigid pots. This means a 10-gallon fabric bag often performs like a 12- or 15-gallon plastic pot for the same crop.
The tradeoff is moisture — fabric bags dry out faster. Plan to water more frequently, especially in summer. A peat-free potting mix with added coir helps retain moisture in fabric containers without sacrificing drainage.
Pro Tip: Set fabric grow bags inside a slightly larger decorative pot or wooden planter box. This reduces sun exposure on the bag walls, slows evaporation by 20 to 30%, and makes the setup look intentional rather than utilitarian.
Resin Pots for Heat Retention
Double-walled resin pots are the best choice for peppers. The insulated walls keep soil temperature stable — hot peppers especially want consistent warmth around their roots, and resin holds heat better than terracotta or fabric.
Resin pots are also the strongest option structurally. If you’re running a 6-foot bamboo trellis out of a container, a heavy resin pot with drainage holes in the base provides the most stable anchor point.
They’re not perfect — black resin in direct sun can overheat soil past 90°F on the hottest days, which stresses roots. White or light-colored resin avoids this problem entirely for summer growing.
Step-by-Step Planting Guide for Large Containers
Follow this process every time you plant a fruiting crop into a large container. Skipping any step costs you yield later in the season.
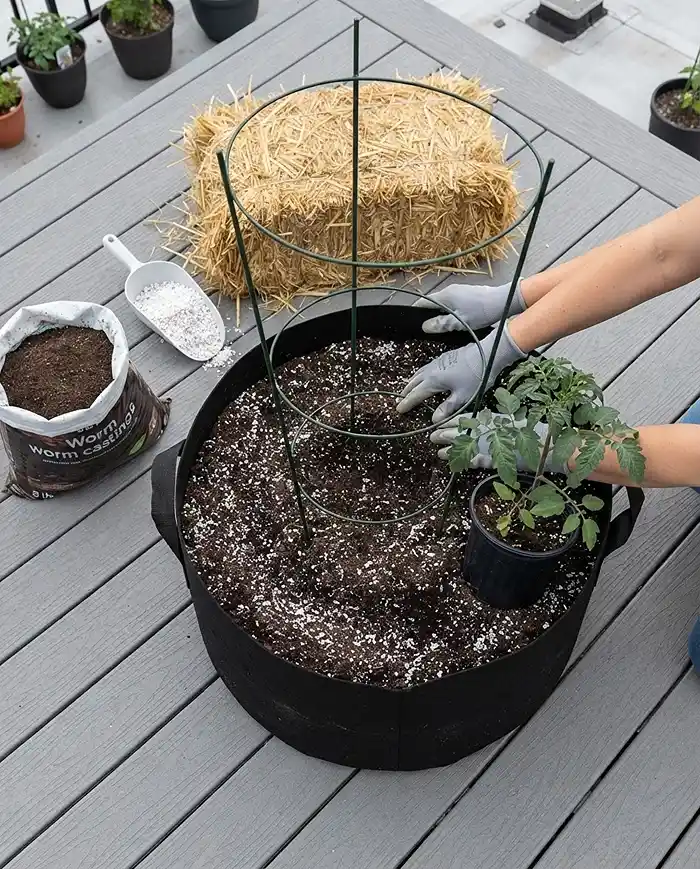
- Mix your potting soil correctly. Start with a high-quality perlite-heavy organic potting mix. Add 20-25% perlite by volume plus a generous layer of worm castings at the bottom third of the pot.
- Install support structures first. Place tomato cages, bamboo stakes, or trellis frames into the container before you plant. Driving stakes into an established root ball damages the roots you’re trying to protect.
- Plant tomatoes deep. Bury tomato transplants up to the lowest set of leaves — often 4 to 6 inches deeper than they were in their nursery pot. The buried stem produces adventitious roots and dramatically boosts uptake.
- Plant peppers and cucumbers at soil level. Unlike tomatoes, peppers and cucumbers don’t benefit from deep planting. Keep the soil line at the same level as the transplant’s original container.
- Water in thoroughly. Water until moisture flows freely from the drainage holes. This settles air pockets and establishes first contact between roots and surrounding soil.
- Mulch the top 1 to 2 inches. A thin layer of straw or shredded leaves on the soil surface cuts evaporation by up to 40% — critical for moisture-demanding crops in summer heat.
Maintenance for Maximized Pot Space
Container vegetable gardening compresses the normal maintenance timeline. Nutrients wash out faster. Moisture fluctuates more dramatically. There’s no subsoil buffer to bail you out when you miss a watering. A proactive schedule isn’t optional — it’s the whole game.
Watering Deep Containers Correctly
A light sprinkle is worse than no water at all for deep containers. It moistens the top inch and lets roots gravitate upward toward the surface — exactly where you don’t want them.
Water until moisture flows freely and steadily from every drainage hole. That’s a genuine deep soak. For a 15-gallon container, this often means 2 to 3 gallons of water applied slowly enough to absorb rather than run straight through. Water in the morning so foliage dries before nightfall.
Fertilization Schedules for Confined Roots
Every time you water deeply, you flush nutrients out the drainage holes. In an in-ground garden, roots chase those nutrients downward. In a container, they’re gone.
Switch to a diluted liquid organic fertilizer — something high in phosphorus — applied weekly once your plants begin to flower. Phosphorus drives root development and fruit set. A balanced 5-5-5 works for the vegetative stage; shift to something like 2-8-4 once blossoms appear.
I use a diluted fish emulsion at half strength, every seven days, from first flower to first frost. That schedule keeps plants productive without salt buildup in the soil.
Common Problems and Solutions
The problems below are almost always caused by an undersized container — not disease, not pests, not bad luck. Recognize them early and you can still save the season.
Root-Bound Plants and Stunted Growth
A root-bound plant shows itself through yellowing lower leaves, failure to set blossoms, and a plant that wilts within hours of watering even when the soil feels moist.
To confirm, tip the pot sideways and slide the root ball out. If roots are circling tightly around the outside of the ball with almost no visible soil, it’s root-bound. Score the root ball vertically in four places with a knife, loosen the outer roots with your fingers, then transplant into a container at least 5 gallons larger. Water with diluted fish emulsion immediately after repotting.
Blossom End Rot from Uneven Moisture
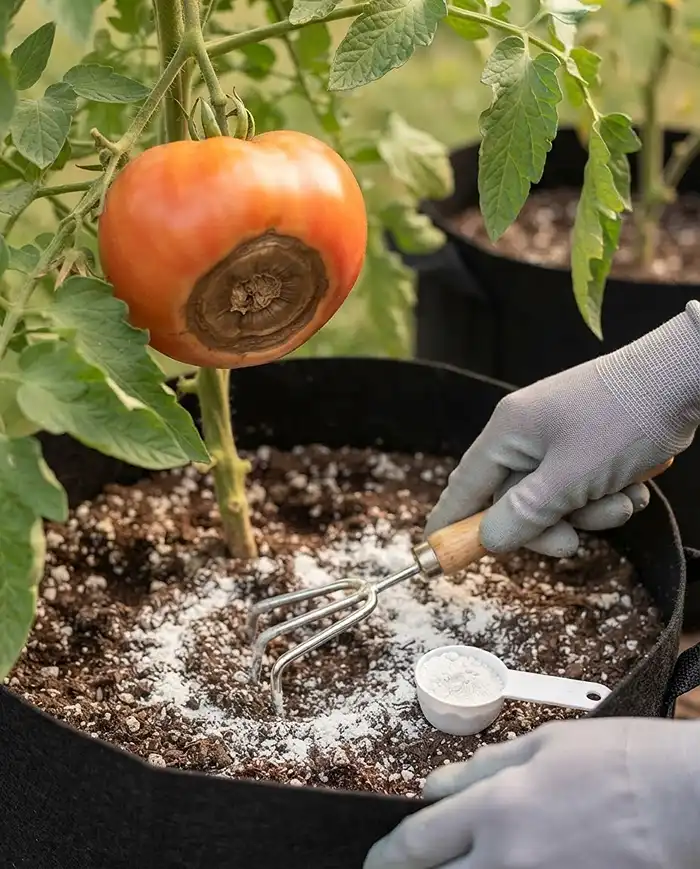
Blossom end rot looks like a dark, sunken, leathery patch on the bottom of tomatoes, peppers, or cucumbers. It’s caused by calcium deficiency at the fruit — but the calcium is usually present in the soil. The problem is inconsistent watering that prevents the plant from moving calcium into developing fruit.
Small, rapidly drying containers make this much worse. Fix it by regulating your watering schedule to maintain consistent moisture, and scratch a tablespoon of agricultural gypsum into the top inch of soil. Gypsum adds soluble calcium without affecting soil pH — it won’t interfere with your nutrients.
pot size for tomatoes peppers and cucumbers FAQs
Can I plant tomatoes, peppers, and cucumbers in the same pot?
It’s not recommended. All three are heavy feeders with aggressive root systems. Planting them together in anything under 30 gallons triggers root competition and nutrient starvation for all three plants. If you want to companion plant, use a large raised bed planter of 30+ gallons and limit it to two compatible crops.
How many pepper plants can fit in a 10-gallon container?
A 10-gallon container fits two small hot pepper plants (like Jalapeños) if spaced at least 12 inches apart. For large sweet peppers like Bell or Poblano, use the full 10 gallons for a single plant. Crowding two bell peppers into a 10-gallon pot cuts fruit production significantly.
Do I need to put rocks at the bottom of large vegetable pots?
No. Rocks at the bottom actually make drainage worse, not better. This is due to a perched water table — moisture doesn’t move from fine soil into coarse rock until the fine soil above is completely saturated. The rocks raise the saturation point and push soggy, anaerobic soil up into your plant’s root zone. Use drainage holes and quality potting mix instead.
What is the best potting mix for tomatoes and cucumbers in containers?
Use a perlite-heavy, peat-free organic potting mix. Aim for a blend that drains fast but retains enough moisture to buffer between waterings. Add 20-25% perlite by volume, plus worm castings at the bottom third of the container. Avoid garden soil entirely — it compacts in containers and blocks drainage.
Can I reuse container soil from last year for tomatoes or peppers?
Yes, but refresh it first. Remove any old root debris, add 20-30% new potting mix by volume, and work in fresh worm castings or a slow-release organic fertilizer. Soil from a disease-free season is safe to reuse. If your plants had blight, wilts, or root rot last year, start fresh with new mix.
Key Takeaways
- Getting the pot size for tomatoes peppers and cucumbers right from day one is more impactful than any fertilizer or watering upgrade you can make mid-season.
- Indeterminate tomatoes need 15 to 20 gallons and at least 18 inches of depth — less and the plant can’t sustain continuous fruiting through a full season.
- Hot peppers thrive in 5-gallon containers; large sweet peppers need 7 to 10 gallons for canopy support and stability during storms.
- Cucumbers in containers demand consistent, deep moisture — use at least 5 to 7 gallons for bush types and 10 to 15 gallons for vining varieties, and mulch the soil surface to slow evaporation.
- Fabric grow bags outperform rigid plastic pots for tomatoes and cucumbers due to air pruning; resin pots work better for heat-loving peppers that need stable soil temperature.
If you’re expanding beyond these three crops, the best root vegetables for container gardening is a solid next read for making the most of your container space year-round.